Adobe Photoshop's layer system is a fundamental concept for any digital artist or photo editor. Think of layers as transparent sheets of paper stacked on top of one another, each containing a different element of your image. This allows for precise, non-destructive editing of specific areas without affecting the rest of your composition. As your projects grow in complexity, managing these layers becomes crucial for both organization and efficiency. Merging layers is a powerful technique that combines two or more separate layers into a single layer, which can significantly streamline your workflow, reduce file size, and simplify complex compositions. This article will delve into the various methods of merging and combining layers in Photoshop, exploring their nuances, advantages, and potential pitfalls.
Understanding the Foundation: Layers and Their Properties
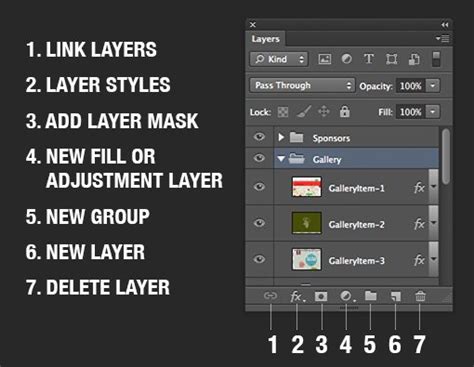
Before diving into merging, it's essential to grasp what layers are and how they behave. In Photoshop, each layer is an independent canvas. You can add text, shapes, images, or adjustment layers, each residing on its own transparent sheet. As you add layers or layer groups to an image, it’s helpful to give them names that reflect their content. Double-click the layer name or group name in the Layers panel and enter a new name. This practice is vital for maintaining clarity, especially in complex projects. Color coding layers and groups further aids in locating related elements within the Layers panel, making navigation intuitive.
It's important to note that certain tools and filters cannot be applied directly to layers containing vector data (such as type layers, shape layers, vector masks, or Smart Objects) or generated data (like fill layers). To work with these elements using pixel-based tools, you must first rasterize them. Rasterizing converts vector data into pixels. Once your layer is rasterized, you cannot edit them earlier because they are now converted to pixel-based layers. It's recommended to duplicate your layer and apply rasterization so that you can always go back to the original if necessary. Rasterizing the type on a type layer, for instance, allows for pixel-level manipulation.
The Art of Combination: Merging Layers
Merging layers is the process of combining two or more separate layers into a single layer. When this happens, the data on the top layer replaces any data it overlaps with on the lower layers. This action is often referred to as a "destructive" editing method because, once merged and saved, you cannot easily revert to the individual layers. Therefore, it's often wise to duplicate your layers before merging or to use methods that create a new merged layer, preserving the originals.
Direct Merging Techniques
Photoshop offers several straightforward ways to merge layers:
Merge Down: This command merges the currently selected layer with the one directly below it. To use this, select the top layer in the Layers panel and then choose
Layer > Merge Down, or selectMerge Downfrom the Layers panel’s menu, or pressCmd+E(macOS) /Ctrl+E(Windows). This is particularly useful for combining two adjacent visible layers where the bottom layer is a pixel layer.Merge Layers: This option allows you to merge multiple selected layers into one. The easiest way to merge layers is to click on one layer, hold
Shift, and click on another to select a contiguous range. For non-consecutive layers, hold downCtrl(Cmd on macOS) and click each layer you want to merge. Once selected, you can use theMerge Layerscommand from theLayermenu or the Layers panel menu. When you use the Merge Layers command, the data on the top layers replaces any data it overlaps with on the lower layers.Merge Visible: This is a highly efficient method for combining a selected group of layers. You can hide the layers you don’t want to combine by toggling off their visibility (the eye icon next to the layer name) and then select a pixel layer as your base. Then, choose
Layer > Merge VisibleorMerge Visiblefrom the Layers panel’s menu. Alternatively, you can simply hide the layers you don’t want to merge and then pressShift+Opt+Cmd+E(macOS) /Shift+Alt+Ctrl+E(Windows). This command merges all currently visible layers into a single new layer, leaving the original layers intact but hidden if they were not the base layer.
Advanced Merging and Compositing Strategies
Beyond direct merging, Photoshop provides more nuanced methods for combining layer content, especially when dealing with complex effects like blend modes.
Merging with Clipping Masks: A clipping mask is a layer that defines the shape and boundaries of a group of layers. For instance, a triangular clipping mask will define the same triangular boundaries to all of the layers grouped within it. You can merge layers with a clipping mask by first hiding any layers that you don’t want to merge. Then, select the base layer in the Clipping Mask. This method allows you to merge the contents of layers while respecting the boundaries set by the mask.
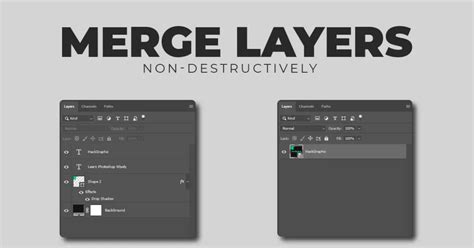
The "Stamp Visible" Technique (Creating a Merged Copy): If you want to keep your original layers intact while creating a combined version for further editing, the "Stamp Visible" command is invaluable. This method essentially takes a snapshot of the combined visible layers and places it on a new layer. With the top layer selected, press and hold
Shift+Alt+Ctrl(Win) /Shift+Option+Command(Mac) and press the letterE. This creates a new layer above the others that contains the merged result of all visible layers, preserving the originals for independent editing. This is a non-destructive way to merge the visual output of multiple layers.
The Nuances of Blend Modes and Merging
A common challenge arises when merging layers that have different blend modes applied. Blend modes control how pixels on one layer interact with pixels on the layers below it. When you merge layers with differing blend modes, the result can be unexpected because Photoshop prioritizes a single blend mode for the merged layer.
For example, if you have a layer set to "Overlay" blending with the layer below it, and another layer set to "Multiply" above that, simply merging the top two layers might result in the loss of one or both blend modes, leading to a drastic change in the image's appearance. This happens because blend modes don't alter the actual pixels on a layer; they only change how those pixels interact with layers beneath them. A layer can only have one blend mode active at a time.
The solution to preserving the intended composite effect when merging layers with different blend modes is to use the "Stamp Visible" technique described above (Shift+Alt+Ctrl+E or Shift+Option+Command+E). This captures the visual outcome of all active blend modes onto a new layer, effectively "baking in" the composite appearance without discarding the individual layer effects. It's crucial to remember that the overall appearance of a composite image is a result of all layers interacting, not just the ones with modified blend modes.
Flattening: The Ultimate Combination
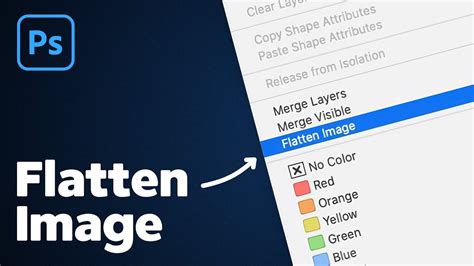
Flattening an image is the most extreme form of merging. It reduces the file size by merging all visible layers into a single background layer and discarding all hidden layers. Any transparent areas that remain are filled with white. While this significantly reduces file size and simplifies the layer structure, it is a completely destructive process, making individual layer editing impossible afterward. Choose Layer > Flatten Image to perform this action.
There's also an option to Flatten All Layer Effects. This command flattens only the layer styles (like drop shadows or bevels) instead of the entire image file, allowing you to retain individual layer content while solidifying their applied effects. Access this via File > Scripts > Flatten All Layer Effects.
Organizing for Efficiency: Groups and Renaming
Before embarking on extensive merging, effective organization is key. As mentioned, naming layers descriptively is paramount. Furthermore, grouping related layers together can make your Layers panel much more manageable. To group layers, select the layers you wish to group, then right-click and choose Group from Layers. This allows you to collapse and expand the group, keeping your workspace tidy.
Rasterization and Compatibility
Remember that certain tools and filters, such as the Camera Raw filter, work on only one layer at a time. Additionally, some tools can work only on non-vector or rasterized layers. If an individual layer or group of layers won’t merge, try rasterizing the layers first so they are compatible. As noted earlier, rasterizing converts vector data into pixels, making them editable with pixel-based tools but losing their scalability. Always consider duplicating layers before rasterizing if you might need to revert to the original vector information.
Conclusion: Strategic Layer Management
Merging layers in Photoshop is a fundamental skill that enhances efficiency and helps manage complex projects. Whether you're performing simple merges, preserving blend mode effects with "Stamp Visible," or consolidating an entire project through flattening, understanding these techniques is crucial. By combining strategic merging with good organizational practices like naming and grouping, you can maintain a clean, efficient, and powerful workflow in Photoshop.
The Adobe Photoshop community is a valuable resource for sharing ideas and asking questions about these advanced techniques. As of July 2024, Photoshop’s legacy 3D features have been removed, streamlining the software's focus on its core image editing capabilities.