Changing fonts in Adobe Photoshop is a fundamental skill for any designer, whether you're aiming for a subtle tweak or a complete typographic overhaul. While Photoshop offers a robust suite of tools for text manipulation, the process can sometimes feel less intuitive than in a word processing application. Fortunately, with the right approach, altering fonts, styles, and even entire text layers can be a quick and efficient part of your workflow. This guide will navigate you through various methods, from basic font selection to advanced techniques for managing multiple text elements, ensuring you can achieve precise typographic control for any project.
Selecting and Modifying Text Layers
At the core of any text-based editing in Photoshop lies the concept of the text layer. These layers are distinct from pixel-based layers and are identified by a "T" icon in the Layers panel. To begin altering text, you first need to ensure you're working with the correct layer.
The primary tool for interacting with text is the Type Tool, activated by pressing the "T" key on your keyboard. Once the Type Tool is selected, clicking on a text layer in the canvas will make it active. You can then click and drag over the specific text you wish to modify. This action highlights the characters, preparing them for changes.
For more granular control, specific selections can be made. Clicking to set the insertion point allows you to edit text character by character. Dragging with the Type Tool selects a range of characters. Double-clicking a word selects that entire word, while a triple-click selects an entire line of text. Selecting one or more characters you want to edit is the first step before applying any changes. You can also select a range of characters by holding down Shift and pressing the Right Arrow or Left Arrow key.
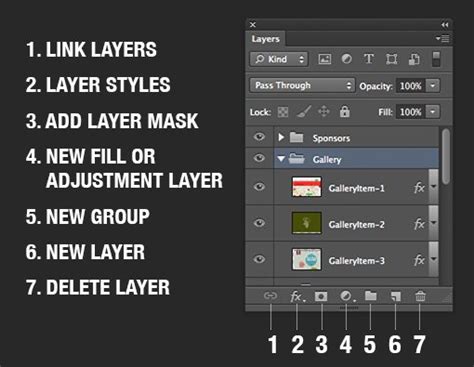
If you need to make changes to multiple text layers simultaneously, there are several efficient methods. You can select individual text layers by holding down the Command (Mac) or Control (PC) key and clicking between each desired text layer in the Layers Panel. Alternatively, to select all text layers in a document, click on the top-most text layer, then hold down the Shift key and click on the bottom-most text layer. This selection process is crucial when you need to apply a consistent font change across a series of text elements.
Applying Font Changes: Basic and Advanced Methods
Once your text is selected, the actual font change can be applied through various interfaces within Photoshop. The most straightforward method involves using the options bar at the top of the Photoshop interface when the Type Tool is active.
When the Type Tool is selected, the upper settings bar displays a font menu. Clicking this menu reveals a dropdown list of all fonts installed on your system. You can then simply click on your desired font to apply it to the highlighted text. This method is akin to changing fonts in a standard word document and is highly effective for single text layers or simple modifications.
For a more comprehensive set of typographic controls, the Character Panel is indispensable. This panel can be accessed by navigating to Window > Character. With a text layer selected and text highlighted, the Character Panel provides a dedicated space for font selection, style adjustments, size, color, and much more. Within the Character Panel, you'll find the font option, from which you can choose any installed font.
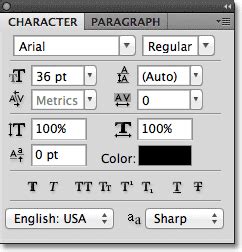
Beyond simply choosing a font family, Photoshop allows for the selection of various weights and styles associated with that font. Beside the font selection, there is often a font style box. Clicking here reveals different versions of your chosen font, such as bold, italic, light, or condensed variations. If a font family doesn't have built-in styles, Photoshop offers "faux" (fake) versions of bold and italic, which can be applied programmatically but may not always yield the best typographic results compared to true font styles.
After making your font selections, you need to commit to these changes. This can be done by pressing the Escape key on your keyboard or by clicking the checkmark icon in the upper settings bar. This action finalizes the text modifications.
Replacing Multiple Fonts Systematically
A common scenario involves needing to change a font across many text layers, perhaps when a client requests a switch from one typeface to another, such as from Roboto to Helvetica Neue. Manually changing each layer can be tedious.
One efficient way to handle this is by selecting all relevant text layers as described earlier (using Shift-click for a contiguous range or Command/Control-click for individual selections). With all desired layers selected, you can then use the Character Panel or the options bar to choose the new font. This will apply the selected font to all active text layers simultaneously. It's important to ensure all selected layers are in the same format before applying a bulk change.
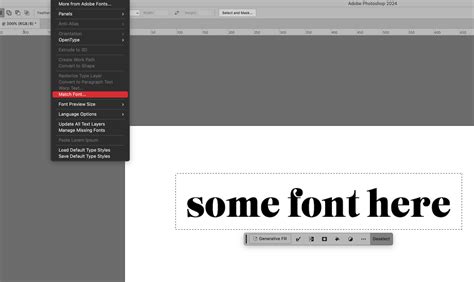
Another strategy, particularly useful if you encounter missing fonts, is to temporarily disable or uninstall the old font from your system. Subsequently, Photoshop's "Replace all missing fonts" feature, found under the "Type" menu, can be utilized. This prompts Photoshop to substitute the missing typeface with an available alternative, which you can then refine.
For situations where a script might be beneficial, especially if dealing with multiple fonts within a single layer, a custom script can automate the process. This is more handy if you have multiple fonts in a single layer because the traditional way replaces all fonts in a layer with one font. A script can intelligently target and replace specific font instances.
Advanced Typography Controls
Photoshop offers a rich array of features that go beyond basic font selection, allowing for sophisticated typographic treatments.
Font Filtering and Organization
Managing a large library of fonts can be challenging. Photoshop provides filtering options to help you find the fonts you need quickly. Within the font menu (accessible via the Type Tool's options bar or the Character Panel), you can filter fonts by class (e.g., Serif, Sans Serif, Script), by most used, or by similar styles.
You can also mark fonts as favorites by clicking the star icon next to their names. This creates a dedicated "Favorites" filter, showing only your preferred typefaces. The "similar" filter is particularly useful for discovering variations of a font you're currently using, helping you maintain visual consistency or explore related typographic options.
Working with Font Styles and Effects
The Character Panel is also where you can access advanced styling options. For instance, making text all caps is easily achieved by clicking the "All Caps" icon, represented by a "TT" symbol, within the Character Panel. Be mindful that if this setting is left active, subsequent text created with the Type Tool might default to all caps.
Photoshop also allows for warping text into various shapes. By selecting text and choosing a warp style from the "Warp Text" options (accessible through the options bar when the Type Tool is active or via Type > Warp Text), you can bend text into arcs, waves, or other custom forms. Parameters like "Bend" and "Distort" allow for fine-tuning the warp effect.
Color Fonts and Type Color
Modern font formats include Color Fonts, which enable the incorporation of vibrant, multi-colored elements directly into the text. These fonts can feature layered colors, gradients, and textures, offering a richer visual palette. You can change the type color before or after entering text. To adjust the color, select the text layer, then click the color swatch in the options bar. This opens Photoshop's Color Picker, allowing you to select a new color. Alternatively, you can sample a color directly from an image using the Eyedropper Tool while the Color Picker is open.
Resizing and Positioning Text
Accurately sizing and positioning text is critical for effective design. While the Font Size option in the Options Bar allows for numerical input, it can often lead to a "trial and error" process, especially when the exact point size isn't known.
A more dynamic and visually intuitive method for resizing text is by using Photoshop's Free Transform command. With the desired Type layer active, navigate to Edit > Free Transform (or use the shortcut Ctrl+T on Windows, Cmd+T on Mac). This action surrounds the text with a bounding box and handles. You can then click and drag these handles to scale the text. Holding down the Shift key while dragging the corner handles ensures the original aspect ratio of the type is maintained, preventing distortion.

Free Transform also allows you to reposition the text. While the bounding box is active, simply click and drag anywhere inside it to move the text to its desired location. Once you are satisfied with both the size and position, press Enter (Win) or Return (Mac) to commit the changes and exit Free Transform mode. A significant advantage of scaling vector-based type in Photoshop is that it can be resized infinitely without any loss of image quality.
Replacing Text Within Images
Sometimes, you may need to replace existing text that is part of an image, rather than editable text on a dedicated text layer. The approach here depends on the complexity of the background.
If the text is within a text box object, Photoshop's "Find and Replace Text" tool can be utilized. However, if the text is embedded within the image pixels, more advanced techniques are required.
For text on a complicated or busy background, precise selection and removal are key. You would first select the text using a selection tool like the Lasso or Quick Selection tool. Then, Photoshop's Content-Aware Fill feature (Edit > Content-Aware Fill) can be employed. This intelligent tool analyzes the surrounding pixels and attempts to seamlessly remove the selected text, filling the area with a plausible background.
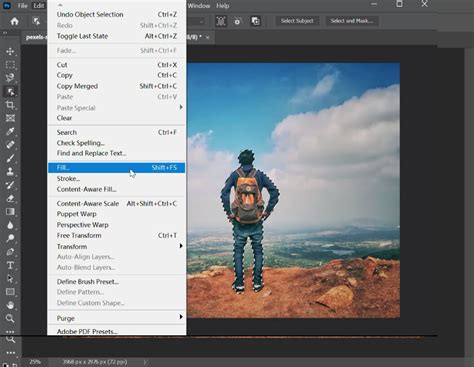
After removing the unwanted text, you can then use the Type Tool to insert your new text. You might try to match the original font, or select a completely new one to create a different aesthetic. If you need to rasterize the new text layer (converting it into pixels, which is sometimes necessary for certain effects or compatibility), you can right-click the new text layer and select "Rasterize Type."
For simpler backgrounds, duplicating the layer (Ctrl+J or Cmd+J) before attempting removal can provide a safety net. The specific tool used for replacement will depend on the background's complexity, with tools like Content-Aware Fill offering precise control when replacing text on a complex background.
Understanding Text Properties and Units
When working with text in Photoshop, it's helpful to understand the units of measurement and how they relate to your design. The default unit of measurement for type is points. You can adjust these units in the Units & Rulers section of the Preferences dialog box. A point is approximately equal to 1/72nd of an inch, meaning type that is 1-inch high in an image with a resolution of 72 pixels per inch (ppi) will appear as roughly 72 points in size.
The value entered for font size can be larger than 72 points; Photoshop converts the entered value into the default unit of measurement. This flexibility allows for very large display type when needed.
Vertical Alignment and Text Flow
Photoshop also provides options for controlling text flow and alignment. For vertical text, where lines of type flow from top to bottom, you can select the Type Tool and utilize alignment options. The "Align" button in the options bar or the Paragraph panel offers icons and settings for vertical alignment.
For horizontal text, where lines flow from left to right, similar alignment options are available. Understanding these settings can help ensure your text is positioned and organized according to your design requirements.
Undoing Mistakes
Mistakes are an inevitable part of any creative process. Photoshop offers a robust undo system. The most straightforward way to undo an error is by using the hotkey Ctrl+Z (Windows) or Cmd+Z (Mac). For multiple undos, holding down Ctrl or Cmd and repeatedly pressing Z will step backward through your recent actions.
By mastering these techniques, you can efficiently and effectively change fonts and manipulate text within Adobe Photoshop, elevating the typographic quality of your designs.