Ever found yourself staring at Photoshop, ready to work some magic with Content-Aware Fill, only to see that tempting option stubbornly greyed out? It's a common frustration, and one that often leaves beginners scratching their heads. You've made a selection, you're sure of it, yet the tool remains inaccessible. This article will delve into why this happens and how to overcome this common Photoshop hurdle, ensuring you can leverage this powerful feature effectively.
Understanding the Core of Content-Aware Fill
At its heart, Content-Aware Fill is designed to intelligently sample surrounding pixels to fill a selected area. It's a remarkable technology that analyzes the context of your selection and generates pixels that blend seamlessly with the existing image. Introduced in Photoshop CC 2018, this tool has revolutionized how users can remove unwanted objects, fill in gaps, or patch up inconsistencies in images, producing impressive results with minimal effort. However, like any powerful tool, it has its specific requirements for optimal functionality.
Why Content-Aware Fill Might Be Greyed Out
Several factors can lead to Content-Aware Fill being unavailable. Understanding these common culprits is the first step to resolving the issue.
The Smart Object Conundrum
When you place an image into a Photoshop document, it often defaults to becoming a Smart Object. This is a fantastic feature, allowing you to scale and transform your image without losing quality. However, it also means the layer is essentially a container, not directly editable pixel by pixel. Think of it like trying to paint directly onto a sealed glass jar - you can't. So, if you've placed an image and then tried to use Content-Aware Fill, and it's greyed out, chances are you're dealing with a Smart Object. A common prompt in this scenario is: "Could not complete your request because the smart object is not directly editable." This message directly indicates that Photoshop cannot access the underlying pixels of a Smart Object layer for direct manipulation.
Restrictions on Other Layer Types
It's also true that Content-Aware Fill won't work directly on adjustment layers or pixel groups. Adjustment layers affect other layers non-destructively, meaning they don't alter the original pixels. Pixel groups, on the other hand, are collections of layers that are treated as a single unit for organizational purposes. In both cases, Photoshop cannot directly access the pixel data needed for Content-Aware Fill to function.
Layer Lock and Lack of Pixel Information
Content-Aware Fill may also be greyed out because the selected layer is locked or has no pixel information. A locked layer, as the name suggests, prevents any editing, including the use of advanced tools. Similarly, if a layer is empty or contains no actual pixels (e.g., a blank layer without any content painted on it), there's nothing for Content-Aware Fill to analyze or generate.
Fill Opacity Settings
In some instances, even if the tool itself isn't greyed out, the results might be unexpected or the tool might seem unresponsive. One user reported that their "ordinary Fill with colour work" was not greyed out, but the Content-Aware Fill was not working as expected. A potential cause for such issues, particularly if the fill appears to be missing or transparent, could be that the fill opacity is set to 1%. While this doesn't typically grey out the Content-Aware Fill option, it would render its effects invisible.
Solutions to Enable Content-Aware Fill
Don't despair! There are several straightforward solutions to make Content-Aware Fill accessible again.
Rasterize the Layer
The simplest solution when dealing with a Smart Object is to 'rasterize' it. This process converts the Smart Object into a standard pixel-based layer, making its pixels directly editable.
- Locate the layer: In your Photoshop Layers panel, identify the Smart Object layer. It will typically have a small icon resembling a document with a folded corner.
- Right-click: Right-click on the Smart Object layer.
- Select 'Rasterize Layer': From the contextual menu that appears, choose 'Rasterize Layer'.
Once rasterized, you should be able to use Content-Aware Fill on that layer, provided you have a selection made.
Open and Edit within the Smart Object
Another approach, especially if you want to retain some of the Smart Object's benefits for other transformations, is to edit the Smart Object directly.
- Double-click: Double-click the Smart Object thumbnail in the Layers panel. This will open the image within its own separate window or tab.
- Make your selection: Within this new window, make your desired selection using any of Photoshop's selection tools (e.g., Lasso Tool, Object Selection Tool).
- Use Content-Aware Fill: Now, you can use Content-Aware Fill (Edit > Content-Aware Fill).
- Save and Close: After applying Content-Aware Fill, save and close the Smart Object window. The changes will be reflected in your main document.

Merging Groups
If you're encountering the issue with a group of layers, you might need to merge the relevant layers within that group before attempting to use Content-Aware Fill. Merging layers combines them into a single layer, which can then be rasterized if necessary.
- Select layers: In the Layers panel, select the layers you want to merge.
- Merge: Right-click on the selected layers and choose 'Merge Layers'. Alternatively, you can use the shortcut
Ctrl+E(Windows) orCmd+E(Mac) to merge selected layers. If you want to merge all visible layers, useCtrl+Shift+E(Windows) orCmd+Shift+E(Mac).
Addressing the "Smart Object is Not Directly Editable" Error
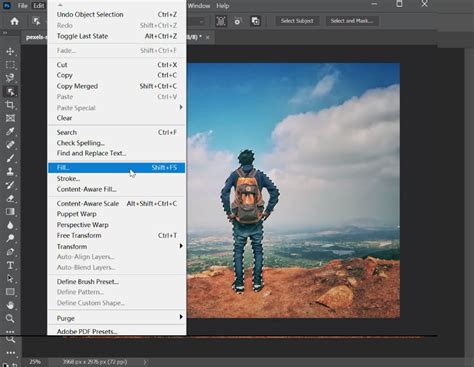
This specific error message directly points to the Smart Object issue. As explained above, rasterizing the layer or editing the Smart Object directly are the primary solutions. If you've started a fresh project, added a photo, and made a selection, but Content-Aware Fill is still greyed out after selecting "Select > Subject" and trying to use "Edit > Fill > Content-Aware Fill," it strongly suggests the imported photo has been placed as a Smart Object by default. The Shift + Backspace shortcut often brings up the Fill dialog box, and if it returns this error, the Smart Object is indeed the cause.
Exploring Advanced Content-Aware Fill Options
Photoshop also offers a dedicated Content-Aware Fill workspace, providing more advanced controls and a real-time preview of the results.
The Content-Aware Fill Workspace
This workspace offers an interactive editing experience for precise image manipulation. It features a live, full-resolution preview, allowing you to refine the sampling area that Content-Aware Fill uses to achieve the desired results.
- Access the workspace: Make a selection on your pixel-based layer, then go to
Edit > Content-Aware Fill. - Refine the sampling area: The workspace displays your image with the selection area in green. You can use the brush tools provided within the workspace to either add to or subtract from the green area, thereby telling Photoshop which parts of the image it should sample from.
- Adjust settings: The Options Bar at the top provides essential tools for selecting and removing areas from the sample. You can also adjust settings like Color Adaptation and Rotation Adaptation to fine-tune how Photoshop blends the fill.
- Output Settings: The Output Settings are an essential part of the process as well, allowing you to control how the final adjustments affect the image. You can choose to output the fill to a new layer, duplicate the current layer, or directly modify the current layer.
How to Extend Background Using Content Aware Scale in Photoshop
Content-Aware Fill vs. Generative Fill
It's important to distinguish Content-Aware Fill from newer AI-powered features like Generative Fill. While both aim to fill areas of an image, they operate on different principles.
Generative Fill and Its Unique Requirements
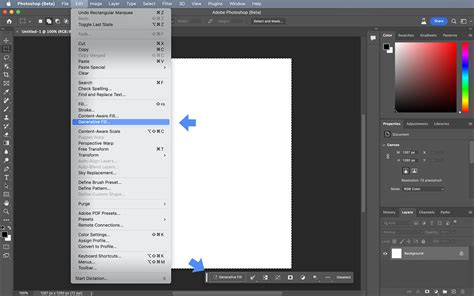
Generative Fill is part of Adobe's newer generative AI (gen AI) features, powered by Adobe Firefly and Sensei. It fills selected areas with AI-generated content based on text prompts. However, some users find that the Generative Fill feature is disabled or greyed out. This can be due to several factors:
- Version and Updates: Ensure you are running the latest version of Photoshop and have it fully updated. You can check this via
Help > System Info. - Creative Cloud Login: Make sure you are logged into the Creative Cloud desktop app.
- Raster Layer and Selection: Generative Fill requires a file to be open, a raster layer to be selected, and a selection drawn around a body of pixels.
- Behance Integration: A peculiar requirement for enabling Generative Fill is sharing personal identifying information with Adobe's Behance cloud service. This involves providing your month and year of birth. After doing so and relaunching Photoshop, Generative Fill should become enabled. This is a notable point, as it ties access to a new AI feature to sharing personal data, a concern for many users given past Adobe data breaches.
Refining Content-Aware Fill Results
After using Content-Aware Fill, some results might need a little more refining to achieve a perfectly seamless look.
Post-Fill Touch-ups
To clean up the filled area and ensure it blends perfectly with the surrounding image, you can utilize other Photoshop tools:
- Clone Stamp Tool: This tool allows you to sample pixels from one area of an image and paint them onto another. It's excellent for precisely copying textures and patterns.
- Healing Brush Tool: Similar to the Clone Stamp, but it also blends the sampled pixels with the target area, taking into account texture, lighting, and shading.
- Spot Healing Brush Tool: This is an even simpler tool that automatically samples from the surrounding pixels when you paint over an imperfection, making it ideal for small blemishes or minor touch-ups.
- Patch Tool: This tool allows you to select an area you want to fix and then drag that selection to a source area that you want to use as the repair. It works similarly to the Healing Brush but offers more control over the source.
Alternative Tools for Object Removal
While Content-Aware Fill is a powerful tool, there are other methods you can use to remove unwanted objects or elements in your image, each with its strengths:
- Clone Stamp Tool: As mentioned, this is a fundamental tool for manual pixel duplication and blending.
- Healing Brush and Spot Healing Brush: Ideal for imperfections and blending.
- Patch Tool: Offers a more controlled approach to repairing larger areas by selecting a source.
- Content-Aware Move Tool: This tool enables you to seamlessly move or extend an object within an image while automatically adjusting the background. It's particularly useful for repositioning elements.
- Content-Aware Scale: This feature allows you to resize images without distorting the important content. It analyzes the image, preserves critical areas, and rescales the rest of the image, which can be helpful in composition adjustments before or after removing elements.
By understanding the reasons behind Content-Aware Fill being greyed out and employing the various solutions and alternative tools available, you can ensure that this powerful feature remains a valuable asset in your Photoshop workflow.