Photoshop's selection tools are fundamental to image editing, allowing for precise manipulation of specific areas within an image. Often, an initial selection needs to be adjusted to encompass a broader or more refined area. Expanding a selection is a common requirement, whether for improving photo quality by removing a background, isolating a specific object for further editing, or for countless other creative purposes. Fortunately, Photoshop offers several straightforward methods to achieve this, ensuring your selections are always precisely what you need them to be.
Understanding the Core Need for Selection Expansion
The necessity to expand a selection can arise in numerous scenarios. Perhaps you've meticulously selected an object, but upon closer inspection, you realize you need to include a small sliver of the background for a smoother composite. Or maybe you're aiming to enhance an image by subtly extending its borders to create a more expansive feel. In product photography, a precise selection is key for isolating an item from its background for marketing materials. For artistic endeavors, expanding a selection might be the first step in a complex compositing project. The core principle remains: achieving a perfect selection is often an iterative process, and expanding is a crucial step in that iteration.
Method 1: The "Expand" Command - Simplicity and Speed
The most direct and often the easiest way to enlarge a selection is by using the dedicated "Expand" command. This method is ideal for straightforward adjustments where a uniform expansion is desired.
Steps to Expand with the "Expand" Command:
- Select Your Target Layer: Before you begin, ensure that the correct layer is active in your Layers panel. This is the layer containing the selection you intend to modify.
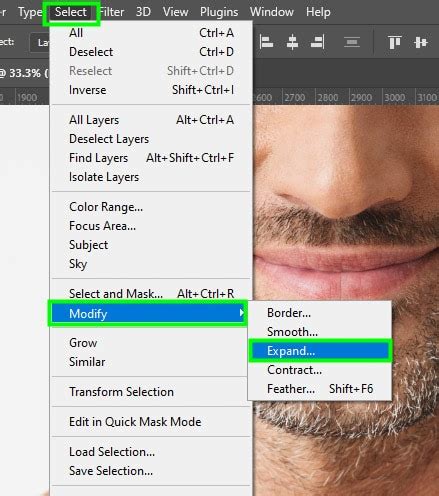
- Access the Expand Command: Navigate to the menu bar and select
Select > Modify > Expand. - Enter Your Value: A dialog box will appear, prompting you to enter a numerical value. This value represents the number of pixels you wish to add to your selection's border, effectively pushing it outwards. You can typically enter a number between 1 and 10, though larger values are also possible depending on your needs and image resolution.
- Confirm and Apply: Click "OK" to apply the expansion. Your selection will immediately increase in size by the specified number of pixels.
This method is particularly useful when you need a quick, uniform increase to your selection. It's a fundamental tool for many basic retouching and compositing tasks.
Method 2: The "Modify" Command - Granular Control
While the "Expand" command is simple and effective, the "Modify" command offers a more advanced and versatile approach. This command allows for both expansion and contraction of a selection, providing greater control over the process.
Steps to Expand with the "Modify" Command:
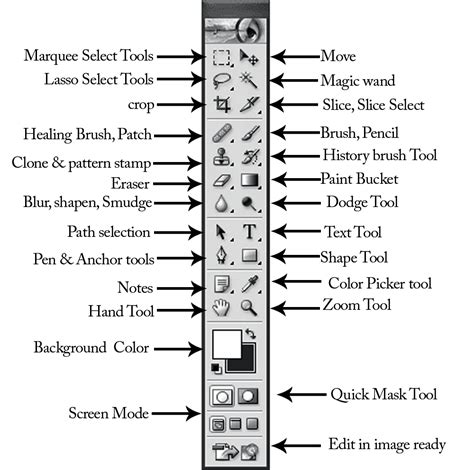
- Initial Selection: Begin by selecting the object or area you wish to work with. This can be done using any of Photoshop's selection tools, such as the Lasso Tool, Marquee Tool, or Magic Wand Tool. For instance, to select an object, you might click and drag the Lasso Tool around its perimeter.
- Access the Modify Dialog: Once you have an initial selection, go to
Select > Modify. Here, you'll see options likeContract,Expand,Smooth,Feather, andSlightly Shift Edge. For expansion, you will chooseExpand. - Enter Expansion Value: Similar to the dedicated "Expand" command, a dialog box will appear when you select
Expandfrom theModifysubmenu. You will be prompted to enter the number of pixels by which you want to expand the selection. Again, a value between 1 and 10 is common for subtle adjustments, but you can use larger numbers for more significant expansion. - Apply the Expansion: Click "OK" to apply the changes. Your selection will now be larger by the specified pixel amount.
The "Modify" command, by offering Contract as well as Expand within the same submenu, provides a convenient way to adjust selections in either direction. This is invaluable for fine-tuning, where you might expand slightly and then contract by a smaller amount to achieve a very specific edge.
How to Expand, Contract, and Feather Selections on Photoshop
Advanced Selection Manipulation: Transform Selection
Beyond simple expansion and contraction, Photoshop offers a powerful feature called "Transform Selection." This command allows you to resize, rotate, skew, distort, and even warp the outline of a selection without affecting the pixels within that selection. This is particularly useful for geometric selection outlines created with tools like the Rectangular or Elliptical Marquee Tool.
How to Use Transform Selection:
- Make an Initial Selection: Create a selection using a tool like the Marquee Tool.
- Activate Transform Selection: Right-click inside the selection border. From the context menu, choose
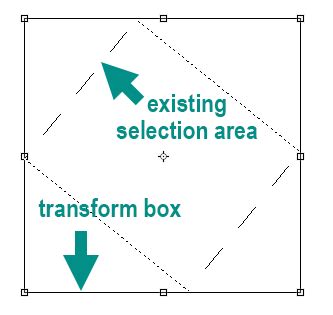
Transform Selection. - Manipulate the Outline: A transform box with handles will appear around your selection outline, similar to the Free Transform tool.
- Resize: Drag the corner or side handles to scale the selection outline.
- Rotate: Click and drag just outside the transform box to rotate the outline.
- Skew: Drag the top or bottom handle left or right to skew horizontally, or drag the left or right handle up or down to skew vertically.
- Distort/Perspective/Warp: Right-click within the transform box to access options like
Skew,Distort,Perspective, andWarp. These allow for more complex manipulations of the selection outline. - Grid: A grid can appear to aid in precise transformations.
- Accept or Cancel: Click the checkmark in the Options Bar to accept your changes, or click the Cancel button to discard them.
Transform Selection is incredibly useful for situations where you need to precisely shape a selection outline, such as creating a diagonal strip within an image for a specific visual effect.
Expanding Selections for Generative Fill and Expand
More recent versions of Photoshop have introduced "Generative Expand," a powerful AI-driven feature that goes beyond simply expanding a selection. Generative Expand allows you to extend an image by intelligently filling in new areas based on the existing content and descriptive prompts.
Using Generative Expand:
- Create or Select an Area to Expand: You can either make a selection that extends beyond the current image boundaries or use the Crop Tool to expand the canvas.
- Activate Generative Expand: Once the canvas is expanded beyond the original image, Generative Expand will often activate automatically, or you can trigger it via the contextual taskbar.
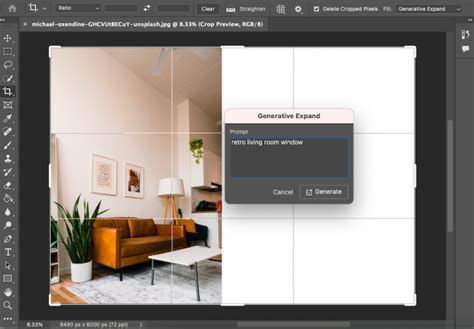
- Enter a Prompt (Optional but Recommended): You can provide a text prompt to guide the AI on what to generate in the expanded areas. For example, "add a forest background" or "extend the sky with clouds."
- Generate: Photoshop's AI will analyze the image and the prompt to create new content that seamlessly blends with the existing image. You will typically be presented with several variations to choose from.
- Refine: You can continue to use Generative Expand by further extending the canvas or by making new selections within the generated areas to refine the results.
Generative Expand transforms image editing from simple manipulation to creative generation, allowing for entirely new possibilities in storytelling and visual design. It can adapt images to various sizes and formats, making it an invaluable tool for diverse creative endeavors.
Considerations for Specific Selection Tools
The methods described above can be applied to selections made with various tools, but some considerations are worth noting:
- Magic Wand Tool: When expanding selections made with the Magic Wand, remember that its initial selection is based on color and tolerance. Expanding this selection will add pixels that are similar in color to the original selection's border, within the defined tolerance.
- Marquee Tools (Rectangular, Elliptical): These tools create geometric selections. When expanding these with the "Expand" or "Modify > Expand" commands, especially with larger pixel values, you might notice the corners becoming rounded. If you need to maintain sharp, straight corners, the "Transform Selection" command offers more precise control over the outline's shape.
- Lasso Tools: Selections made with the Lasso tools are freeform. Expanding these will add pixels along the irregular path of your initial selection.
Fine-Tuning Selections with Shift Edge
The "Slightly Shift Edge" option within Select > Modify offers another subtle way to adjust selection borders. This command allows you to increase or decrease the size of a selection by pushing the edge outwards or inwards, often by a percentage rather than a fixed pixel value, providing a different kind of control over the expansion or contraction.
The Importance of Experimentation
Photoshop's selection tools and modification commands are powerful. The best way to master them is through practice and experimentation. Try expanding selections using both the "Expand" command and the "Modify > Expand" option with different pixel values. Explore the capabilities of "Transform Selection" on various geometric shapes. And experiment with "Generative Expand" to see how AI can revolutionize your workflow. Understanding how each method works and when to apply it will significantly enhance your ability to achieve precise and creative results in your image editing projects.