Photoshop offers a remarkable gateway to transform your digital photographs into evocative pieces of art, mimicking the rich textures and expressive qualities of traditional paintings. Whether you aim to create a striking new profile picture, imbue a cherished pet portrait with artistic flair, or craft a unique holiday gift from an old family photo, Photoshop provides a versatile suite of tools to achieve a painterly effect. This guide will delve into various methods, from leveraging built-in filters to employing advanced brushwork and blending techniques, enabling you to imbue your images with a distinct artistic character.
The Foundation: Understanding the Painterly Aesthetic
The "painterly effect" in Photoshop refers to the process of altering a realistic photograph to evoke a more expressive, artistic feel. This is achieved by introducing elements such as soft textures, brush-like details, and intensified colors, ultimately giving the image the appearance of a painting rather than a straightforward camera shot. This approach is particularly effective when you desire an image that resembles a piece of art destined for a gallery wall.
Essential Preparations and Tools
Before embarking on the creative journey, it's crucial to have your digital "school supplies" ready. This involves setting up your workspace and understanding the fundamental tools you'll be utilizing.
Setting Up Your Canvas
To begin, open a new document in Photoshop by navigating to File > New or using the Ctrl+N (Windows) or Command+N (Mac) shortcut. For this tutorial's foundational steps, a canvas width of 1000 pixels, a canvas height of 667 pixels, and a resolution of 72 pixels per inch (ppi) are recommended.
Mastering the Brush Tool
The Brush Tool (B shortcut) is central to many painterly effects. Accessing brush options can be done through the right-hand panel or by selecting Window > Brush Presets. Photoshop offers a wide array of built-in brushes, including those designed to mimic real-world watercolor and oil paint brushes. Furthermore, you can expand your toolkit by downloading custom brush sets. For instance, a texture brush set might contain a brush labeled "422," which can be further customized.
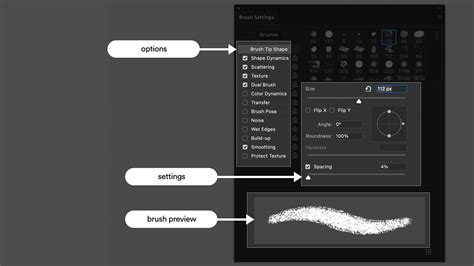
Customizing Brush Dynamics
To achieve specific textural effects, it's often necessary to adjust brush dynamics. When using a brush like the aforementioned "422," toggling on Shape Dynamics and setting parameters such as Jitter Size to 100%, Minimum Diameter to 0%, Jitter Angle to 42%, and Jitter Roundness to 0% can dramatically alter its behavior. Similarly, under Color Dynamics, setting Foreground/Background Jitter to 40% and under Transfer, setting Jitter Opacity to 100% (keeping all other settings at 0% or off) can create unique color variations and transparencies within your strokes.
The Power of Layer Duplication
A fundamental technique in Photoshop for non-destructive editing is layer duplication. By pressing Ctrl+J (Windows) or Command+J (Mac), you create an exact copy of your active layer. This allows you to apply filters or make adjustments to the duplicate without altering the original image, providing a safety net and enabling experimentation.
Achieving a Painterly Look: Step-by-Step Techniques
Photoshop offers multiple pathways to transform a photograph into a painting. These methods range from quick filter applications to more intricate manual detailing.
Method 1: Leveraging Built-in Filters for a Quick Painterly Effect
For those seeking a rapid transformation, Photoshop's integrated filters are an excellent starting point.
- Duplicate the Background Layer: As mentioned, press
Ctrl+J(Windows) orCommand+J(Mac) to duplicate your background layer. - Apply the Basic Watercolor Filter: Navigate to
Filter > Artistic > Watercolor. This filter smooths your image, introduces brush-like strokes, and imparts a glossy, painted aesthetic. You can fine-tune theStylization,Cleanliness, andScaleparameters to control the overall style. - Explore Other Artistic Filters: Within the
Filter Gallery(Filter > Filter Gallery), explore theArtisticsection for options likeDry Brush,Paint Daubs, orPalette Knife. These filters are adept at creating painted textures. - Combine Filters for Unique Results: For a truly personalized look, consider blending different filters. For example, combining the
Oil Paintfilter withPoster Edgescan yield surprising and artistic results.
Tip: Always make a copy of your original layer before applying filters to ensure you can revert to the original if needed.
Method 2: Manual Brushwork and Texture Application
For a more hands-on and nuanced painterly effect, manual brushwork and texture application are key.
- Isolating the Subject: Begin by opening your desired photograph. A powerful tool for isolating the main subject is
Select > Subject. Photoshop's AI can often create a remarkably accurate selection. You may need to refine this selection using theLasso ToolorQuick Selection Tool, holdingAlt(orOptionon Mac) to subtract from the selection andShiftto add to it. Zooming in closely is essential for capturing fine details. - Refining Edges: Once your subject is selected, click the
Refine Edgebutton in the options bar. Setting theSmooth Edgeto around 25,Contrastto 40%, and ensuring the output is set toSelectioncan create a cleaner transition between the subject and its background. - Creating a Mask: With the subject still selected, create a new layer (
Layer > New > LayerorShift+Ctrl+N). Then, apply a layer mask by going toLayer > Layer Mask > Reveal Selection. This effectively isolates your subject onto its own layer. - Adding Background Texture: Turn off the visibility of your subject layer by clicking the eye icon next to it. Select the layer thumbnail above (not the mask) to ensure you're working on the layer itself. Use the
Color Fill Toolto fill this layer with black. Now, with theBrush Tool(B), select a textured brush, such as one from the "Dither and Hatches CS2" set, perhaps brush number 244, described as a "crunchy, spray paint texture." AdjustShape Dynamicswith an angle of 100%. Lightly spray this brush in clusters around the silhouette of your model, creating a tight aura. Avoid continuous strokes to prevent an unnatural effect. - Enhancing the Aura: To further detail this contour aura, apply an
Unsharp Mask(Filter > Sharpen > Unsharp Mask) with anAmountset to 100%. - Simulating Paint Texture on the Subject: To make the subject itself appear more painted, add subtle light and shadow. Set your foreground color to
#ddaf91and background color to#edc9af. Re-open the spray brush from before, but this time, adjustColor Dynamicsto setForeground/Background Jitterto 100%. Select the top layer (your subject layer, not the mask) and begin applying these brush strokes to create texture. Multiple applications are needed for the texture to become apparent, aiming for a light and subtle effect.
Method 3: Utilizing the Smudge Tool for Expressive Strokes
The Smudge Tool offers a unique way to blend and manipulate pixels, creating the illusion of brush strokes and adding depth.
- Prepare Your Layers: Open your photo and duplicate the background layer (
Cmd-JorCtrl-J). - Select the Subject: Use
Select > Subjectto automatically select the main focus of your image. Refine the selection as needed by adding or subtracting areas. - Create an Inverse Selection: You'll want to apply the smudge effect to the background, not the subject. Once your subject is selected, you can invert the selection using
Select > InverseorShift+Ctrl+I(Windows) /Shift+Cmd+I(Mac). - Apply the Smudge Effect: Select the
Smudge Tool. Adjust the brush size using the square bracket keys ([and]). Experiment with theStrengthsetting; a lower strength (around 11%) preserves more background detail, while a higher strength obscures it. Brush over the selected background areas. The key difference from automated programs is your full control over the stroke application. - Refining the Subject's Edges: You can also use the
Smudge Toolon the edges of the subject itself. For a more subtle effect, use a lowerStrengthsetting (around 5%) and a smaller brush to retain detail. TheOpacityslider can further control the intensity of the smudge effect, or you can use a layer mask to apply it selectively. - Consolidate and Deselect: Create a new layer that combines all visible layers below it using
Cmd+Shift+Alt-E(Mac) orCtrl+Shift+Alt-E(PC). Then, deselect everything withCmd+D(Mac) orCtrl+D(PC).
Photoshop Tips and Tricks Smudge tool trick
Method 4: The Mixer Brush Tool for Realistic Paint Blending
The Mixer Brush Tool is designed to mimic the behavior of real paint on a canvas, allowing for natural color mixing and the simulation of wet or dry brush effects.
- Access the Tool: Select the
Mixer Brush Toolfrom the toolbar. - Configure Settings: Adjust the
Wet,Load,Mix, andFlowsettings to your preference. These parameters control how much paint is loaded onto the brush, how wet it is, how much color it picks up from the canvas, and the overall flow rate. - Paint and Blend: Use the
Mixer Brush Toolto paint directly onto your image. You can combine it with existing colors, pick up colors from different areas, and blend them together to create rich, textured strokes. This tool is particularly effective on detailed, high-resolution images where smooth color transitions are desired.
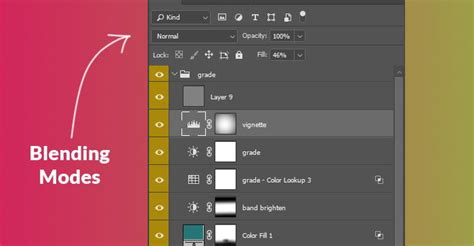
Method 5: Incorporating Textures and Blending Modes
Adding external textures can significantly enhance the painted feel of your image, making it appear as if it were rendered on a physical surface.
- Find Suitable Textures: Download or create textures that resemble canvas, paper, or other painting surfaces.
- Place the Texture: Import your chosen texture into Photoshop as a new layer. Position it above your image layer.
- Apply Blending Modes: Experiment with blending modes such as
Overlay,Soft Light, orMultiplyfor the texture layer. These modes allow the texture to interact with the image beneath in various ways, creating a cohesive look. - Adjust Opacity: Control the strength of the texture effect by lowering or raising the
Opacityof the texture layer. A lower opacity will result in a subtler effect, while a higher opacity will make the texture more prominent.
Advanced Techniques for Depth and Realism
Beyond the foundational methods, several advanced techniques can elevate your painterly effect, adding depth, drama, and refined detail.
Creating Simulated Paint Hatches and Shadows
This technique involves generating intricate patterns and shadows to further enhance the painted illusion.
- Duplicate and Threshold: Duplicate your main image layer and move it to the top of the layer stack. Apply
Image > Adjustments > Threshold, setting the threshold value to approximately 201. This will convert the image into a stark black-and-white representation, highlighting edges and details. - Select the Stencil: Use the
Magic Wand Tool, ensuring theContiguouscheckbox is unchecked in the tool options. Click on any black area to select the stencil-like form. - Refine the Selection: Open the
Refine Edgemenu for this selection. SetSmoothto 15,Featherto 3.5 px, andContrastto 15 for a smoother, more painterly edge. - Create Shadow Texture: Make this layer invisible again. With the area still selected, create a new layer and apply a layer mask (
Layer > Layer Mask > Reveal Selection). Now, select a different textured brush from your downloaded set (e.g., a brush from "Dither and Hatches CS2"). Use this brush to draw shadow textures within the masked area. Ensure the brush strokes extend beyond the selection slightly to create a more integrated look. - Sharpen the Texture: Apply an
Unsharp Mask(Filter > Sharpen > Unsharp Mask) with anAmountof 165%, aRadiusof 1.0 px, and aThresholdof 0. This will enhance the visibility and realism of the hatch texture.
Adding Angled Brush Strokes and Detail Enhancement
This method introduces dynamic brush-like lighting effects and refines details.
- Apply Filter Gallery: Create another copy of your original photograph layer and place it at the very top. Navigate to
Filter > Filter Galleryand select theAngled Strokeseffect from theBrush Strokessubfolder. AdjustDirection Balanceto 44,Stroke Lengthto 7, andSharpnessto 8. - Set Blending Mode: Change this layer's blending mode from
NormaltoDarker Color. This allows the details of the top layer to interact with and combine with the textures in the layers below. - Adjust Levels: Use
Image > Adjustments > Levels(Ctrl+LorCmd+L) and set the lowest input level to 60. This darkens the details, making them stand out more prominently against the underlying textures. - Masking for Refinement: Create a layer mask for this layer (
Layer > Layer Mask > Reveal All). Using the defaultBrush Tool(pressDto reset foreground/background colors to default black and white), paint with black on the mask in areas where you want more of the underlying texture to show through, such as around tricky shadows or where details aren't appearing as desired. Switch between black and white (Xkey) to control what is revealed or hidden. Pay close attention to dark lines around the model's skin. Apply similar masking techniques to the shadow layers created previously, using different opacities to fine-tune the texture's visibility.
Refining Eyes and Teeth for a Natural Look
Often, after applying numerous filters and textures, areas like eyes and teeth can develop an unnatural color cast. These can be refined with targeted adjustments.
- Brighten the Eyes: Create a new layer at the top of the stack. Select the default
Brush Toolwith white as the foreground color and an opacity of 30%. Carefully paint over the white areas of the eyes, including reflections in the pupils. Adjust the layer's opacity (e.g., to 85%) until the whiteness looks natural and not overly photographic. - Enhance the Teeth: Create another new layer specifically for the teeth. Use the same brush settings (default brush, white foreground, 30% opacity). Carefully fill in each tooth. Brighter white should be applied to the front teeth, which receive more light, compared to teeth further back. Lower the layer's opacity (e.g., to 70%) for a natural appearance.
Adding Dramatic Lighting Effects
The final touch often involves adding dramatic lighting to enhance the mood and visual interest of the image.
- Gradient Overlay: Create a new layer at the top and set its
Fillto 0%. Double-click the layer to openLayer Styleoptions. SelectGradient Overlay. Set the blend mode toOverlay. Use the default black-and-white gradient, but reverse the colors so black fades to transparency. Adjust the gradient's opacity settings in the color menu to ensure white is completely clear. This technique adds depth and drama by subtly manipulating light and shadow.
Embracing Experimentation and Advanced Features
Photoshop's capabilities extend beyond these specific techniques. The platform is continuously updated with powerful new tools that can aid in image manipulation.
Smart Objects for Non-Destructive Editing
For those who wish to experiment safely, converting your photo layer to a Smart Object (Right-click layer > Convert to Smart Object) is highly recommended. This allows you to apply filters non-destructively, meaning you can edit or remove them at any time without degrading the original image quality.
Photoshop Actions for Efficiency
For faster editing or to maintain a consistent style across multiple photos, Photoshop Actions can be invaluable. These pre-recorded sequences of commands can apply painterly effects with a single click. Numerous free and paid actions are available, often tailored for specific subjects like portraits or landscapes.
Exploring New Features
Recent Photoshop updates have introduced game-changing tools:
- Distraction Removal Tool: Effortlessly remove unwanted elements from your image in seconds.
- Text to Image Feature: Generate custom images by simply typing a description, ideal for building unique artistic elements.
- Adjustment Brush Tool: Combines masking, selection, and tweaking into a single, more accurate workflow.
- Smarter Contextual Task Bar: Provides quick access to common transformations like rotating, resizing, or changing shapes directly from the toolbar.
Conclusion: Your Artistic Journey with Photoshop
Transforming a photograph into a painting in Photoshop is a rewarding process that offers immense creative freedom. Whether you opt for the simplicity of built-in filters, the detailed control of custom brushes, or the sophisticated blending capabilities of the Mixer Brush Tool, the goal is to imbue your image with an artistic soul. Remember that practice and experimentation are key. Don't be afraid to deviate from tutorials and discover your own unique painterly style. The most compelling results often arise from a thoughtful combination of tools and techniques, allowing you to create images that truly resonate as works of art.