Corel VideoStudio Pro X9 stands as a testament to accessible yet powerful video editing, catering to a diverse user base ranging from novices taking their first steps into digital storytelling to seasoned creators seeking efficient workflows. This guide delves into the multifaceted features of VideoStudio, exploring its interface, core functionalities, and the wealth of tutorials available to enhance your video production capabilities. In the dynamic world of digital storytelling, Corel VideoStudio remains one of the most accessible and creative video editing solutions available today. Designed for both beginners and experienced editors, it bridges the gap between professional-grade features and user-friendly design. Whether using Corel VideoStudio Pro, Corel VideoStudio Ultimate, or exploring older versions like Corel VideoStudio Pro X9, users can expect an editing experience that feels seamless yet robust. At its core, video editing Corel VideoStudio emphasizes control and creativity. The latest editions provide improved playback, real-time preview, and enhanced color grading, features that help creators tell stories that feel polished and emotionally resonant.
Corel VideoStudio is a complete video editing software built to help creators, businesses, and filmmakers produce professional-quality videos without the complexity often seen in high-end editors. Its timeline-based interface supports drag-and-drop functionality, real-time previews, and a rich collection of Corel VideoStudio filters for enhancing color, tone, and motion. Users can adjust transitions, layer effects, stabilize shaky footage, or fine-tune sound with just a few clicks. The software handles multiple formats, from 4K videos to VR projects, allowing editors to create content for various platforms, social media, advertising, education, or entertainment.
Navigating the VideoStudio Interface: Capture, Edit, and Share Workspaces
Understanding the layout of Corel VideoStudio Pro X9 is the first step towards efficient video editing. The software is logically divided into distinct workspaces, each designed for a specific stage of the video production process: Capture, Edit, and Share. To ensure your windows are in the same locations we’ll be discussing, make sure your workspace layout is set to the default.
The Capture Workspace: Importing Your Media
Upon launching VideoStudio, you are greeted with the initial screen. The "Get More" section serves as your central hub for acquiring additional templates, media files, and effects to enrich your projects. The first primary workspace you'll encounter is the Capture workspace. Click on the Capture tab at the top center of your screen to access it. The Menu Bar, located at the top, provides a range of commands for customizing VideoStudio, managing movie projects, and working with individual clips. Depending on your specific version, you might see options like Live Screen Capture or MultiCam Capture, allowing you to record directly from your screen or multiple cameras simultaneously. The Preview Window in this tab is crucial for viewing and selecting the content you intend to capture.
The Edit Workspace: Bringing Your Vision to Life
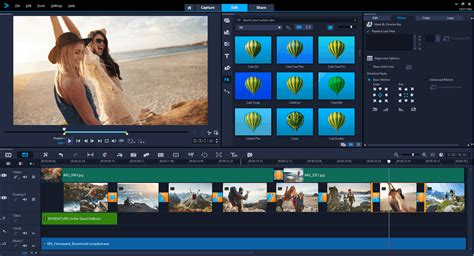
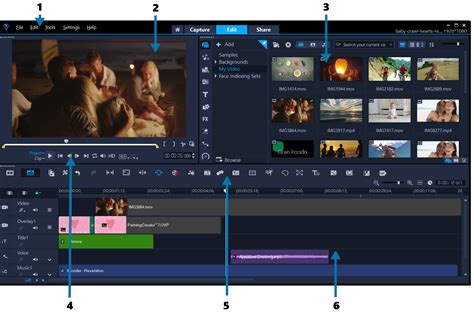
Transitioning from capturing footage, the Edit workspace is where the creative magic happens. Click the Edit tab at the top center of your screen to enter this robust environment. Here, the interface transforms to facilitate detailed editing. The Media Library, positioned in the top right, now populates with a vast array of media files, including video clips, audio tracks, images, titles, and effects. Media categories are listed vertically on the left side of the library, with each icon representing a different type of content. Dynamic icons along the top of the library change based on the selected category.
With any type of content in the library, you can simply drag and drop it onto the Timeline to incorporate it into your video project. The Timeline is the heart of the editing process, where you arrange, trim, and sequence your clips. To access the Options panel for a specific item on the timeline, simply double-click it. This panel, appearing to the right of the library, offers detailed controls for adjustments. You can toggle between the Library panel and the Options panel using the three icons in the lower right of the library. The Zoom in/Zoom out and Fit Project in Timeline icons are essential for adjusting the viewing area of your timeline content, ensuring you can work with precision.
Each panel within the Edit workspace functions as an independent window. You can customize their layout by grabbing the horizontal dotted line in the upper left corner of a panel and dragging it to a new location, guided by docking guides that appear as you move it. This flexibility allows you to tailor the workspace to your specific display preferences and workflow.
The Share Workspace: Exporting Your Masterpiece
Once your video project is complete and polished, the Share workspace is where you prepare it for distribution. This workspace provides the options to save your movie in various formats suitable for different platforms. The "Computer" option, for instance, allows you to save your movie to a file format optimized for playback on computers.
Corel VideoStudio Pro X9: Key Features and Capabilities
Corel VideoStudio Pro X9, and its subsequent iterations, offers a comprehensive suite of tools designed to empower creators. The software's philosophy centers on providing robust editing capabilities within an intuitive framework, allowing users to focus on their creative vision.
Timeline-Based Editing and Drag-and-Drop Functionality
The core of VideoStudio's editing experience lies in its timeline. This visual representation of your project allows for precise control over clip placement, sequencing, and timing. The drag-and-drop functionality makes it exceptionally easy to add video clips, audio, images, and effects directly onto the timeline. This simplifies complex tasks, making it accessible for beginners. The interface is structured for smooth, distraction-free editing. The timeline layout is clean, the icons are logically arranged, and navigation feels natural even for newcomers. Drag-and-drop features allow users to add clips, effects, and transitions in seconds, while real-time preview ensures accurate playback before final export.
Rich Media Library and Content Management
The Media Library is your central repository for all the assets you'll use in your video. It organizes video clips, audio files, images, titles, and effects into easily navigable categories. This organized approach ensures that finding and applying the right elements to your project is a streamlined process. With any type of content in the library, you can just drag and drop it on the Timeline to add to your video project.
Effects, Filters, and Transitions: Enhancing Visual Storytelling
Corel VideoStudio Pro X9 offers a vast collection of filters, effects, and transitions to elevate the visual appeal of your videos. From basic color correction and enhancements to sophisticated motion effects and artistic filters, these tools enable you to transform raw footage into polished, engaging content.
- Filters and Effects: Adding filters and effects is an easy but creative way to enhance your clips or correct flaws in your video. This VideoStudio tutorial will show you how. You can adjust color, speed, and length of your video clips using the various settings in VideoStudio’s Options panel. For editors who enjoy experimenting with visuals, Corel VideoStudio Ultimate delivers an impressive range of motion effects, transitions, and animated overlays. The filters go beyond simple enhancements; they bring cinematic expression through artistic layers, particle effects, and blending modes. These creative tools empower users to transform plain footage into visually engaging sequences.
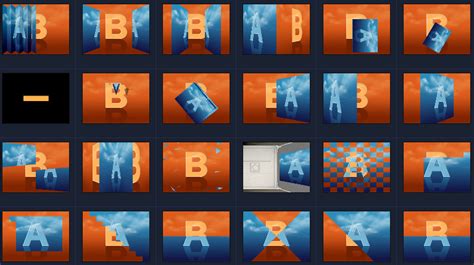
- Transitions: Adding transitions is a quick and easy way to add some visual impact and interest to your videos. Learn how to add and customize transitions in VideoStudio. Seamless Transitions in VideoStudio can create smooth transitions by aligning similar colors or objects in one scene with the next.
- Motion Graphics and Titles: Titles can help make your VideoStudio projects more professional and easier to follow. Learn how to create and edit basic titles in this tutorial. You can learn how to add text to motion graphics to create professional motion titles in VideoStudio, including tips for adding effects and changing colors. The enhanced Title Editor allows for the creation of custom titles with motion, text, and graphics, which can then be saved as presets. Boris Title Studio, exclusive to VideoStudio Ultimate, offers advanced 2D and 3D titling for fast and creative animations.
Multi-Camera Editing and Advanced Features
For those working with multiple camera angles, VideoStudio's multi-camera editing feature is invaluable. This function allows creators to synchronize up to six camera angles, switch perspectives in real time, and adjust transitions with ease, bringing production-level flexibility to a personal workspace. One of the biggest reasons creators appreciate Corel VideoStudio is its cost-efficiency. With lifetime access at a one-time price, users avoid ongoing subscription fees while still gaining access to premium effects and updates.
Audio Editing and Enhancement
Beyond visual elements, VideoStudio provides robust tools for audio editing. You can learn the basics of adding and editing audio, layering clips, balancing audio levels, and incorporating royalty-free soundtracks. Using audio cues in VideoStudio can emphasize key moments in your video projects by matching your clips to the beat of a music track. Recording a voice-over is essential for creating effective educational and descriptive movies, and VideoStudio's Voiceover tool simplifies this process.
Tutorials and Learning Resources for VideoStudio
Corel VideoStudio Pro X9 is accompanied by a wealth of tutorials and learning resources designed to guide users through its functionalities. These resources cater to all skill levels, from basic operations to advanced techniques.
Getting Started with VideoStudio
The initial steps in using VideoStudio involve importing media, arranging clips on the timeline, and applying basic edits.
- Installation and Setup: Start by downloading the software. After installation, launch the program and choose your preferred layout, Storyboard, Timeline, or Split view. Click the “Import Media” button to bring in videos, images, or audio. Simply drag your clips into the timeline area.
- Basic Editing Operations: Tutorials cover fundamental tasks such as trimming, cropping, resizing, and positioning media. Learn how to add or remove tracks using the Track Manager in the VideoStudio timeline editor.
Creative Techniques and Effects
VideoStudio empowers users to explore a wide range of creative effects and techniques.
- Smart Movie Creator and Highlight Reel: Learn how to create quick videos and showcase the highlights of your latest adventure with VideoStudio’s smart movie creator-Highlight Reel.
- Merging Videos and Transitions: Learn how to merge videos in VideoStudio by using transitions to blend smoothly from one video clip or image into the next for professional results.
- Masking and Blending: VideoStudio's masking tools can be used to create text masks, title reveals, and overlays, or to blur faces and backgrounds. Blend modes allow you to specify how overlay clips blend with the background to produce unique and amazing effects.
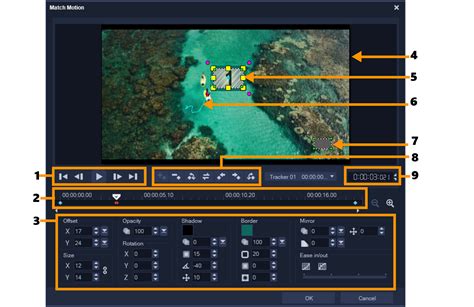
- Motion Tracking: The Track Motion feature allows you to capture a natural motion path and apply it to titles and video clips. This can be used to make a title follow a moving person or object, or to obscure objects you want to censor with a blur effect.
- Picture-in-Picture and Split Screen: Make your videos look more professional and polished by adding a picture-in-picture effect. VideoStudio Ultimate allows you to create dynamic split screen videos, with options to create your own layouts and customize with keyframes.
- Stop Motion and Time Lapse: Tutorials demonstrate how to create stop motion animation videos by capturing frame-by-frame and how to create time lapse videos from a series of photos.
- Color Correction and Grading: With the Color Corrections options in VideoStudio, you can fix dark or faded videos quickly and easily. VideoStudio Ultimate offers advanced color grading controls to correct color, adjust hue and exposure, and apply Look Up Profiles (LUTs) for professional cinematic looks.
- GIF Creator: VideoStudio's GIF creator allows you to easily capture a section of your video and convert it to a short, repeatable clip for sharing.
Advanced Editing and Workflow Enhancements
For experienced users, VideoStudio Pro X9 offers features that streamline complex workflows and enable advanced creative control.
- 4K and HD Editing: VideoStudio Pro allows you to maximize your high-definition footage and create Ultra HD 4K resolution projects. Smart Proxy can be enabled for a fast and fluid editing experience, allowing you to edit HD content without slowing down your computer.
- 360° Video Editing: The enhanced 360° video editing features enable you to import, edit, preview, and export directly to platforms like YouTube or VR headsets.
- Ripple Editing: Learn how to use Ripple Editing to keep your titles, overlays, and audio in sync when making an edit in the middle of your VideoStudio project.
- Grouping Capabilities: VideoStudio’s grouping capabilities make it easy to move clips across the Timeline or apply effects to a group of clips, saving time and effort.
- Instant Project Templates: Save time and energy by re-creating popular video styles in minutes with new Instant Project Templates.
Specialized Content and Tools
VideoStudio also includes specialized tools and content packs to enhance projects.
- Speech-to-Text Converter: With VideoStudio’s new speech-to-text converter, creating captions is easy, automatically transcribing dialogue instead of manual subtitle creation.
- Face Indexing and Effects: The Face Indexing feature automatically identifies faces in your video clips, making it easy to select scenes with specific people. New Face Effects allow for subtle skin smoothing and brightening, or more comical adjustments to face width and eye size.
- Painting Creator: The Painting Creator tool allows you to record your brushstrokes and create animated paintings to add to your video projects.
- DVD and Blu-ray Burning: Tutorials show how to burn your VideoStudio projects to DVD and AVCHD with customizable menus, chapters, and music.
- Screen Recording: Record your screen and capture system and microphone audio to create training videos and presentation content. MultiCam Capture Lite can record two different sources, like your screen and webcam, simultaneously, ideal for how-to videos.
External Resources and Learning Platforms
Corel partners with platforms like Studio Backlot to provide extensive training resources. With hundreds of courses and tutorials available, Studio Backlot offers content for all skill levels, helping users quickly learn new effects and become proficient with VideoStudio. A free 10-day all-access pass to Studio Backlot is often available with the purchase of VideoStudio.
Cost-Efficiency and Accessibility
A significant advantage of Corel VideoStudio is its cost-effectiveness. Offering lifetime access at a one-time price, it eliminates recurring subscription fees while providing access to premium effects and updates. This pricing structure appeals to freelancers, educators, and small studios seeking professional results without the expense of high-end editing software. Corel VideoStudio is built to cater to a broad audience, offering flexibility for beginners, hobbyists, and professional editors who want precision without the steep learning curve.
Conclusion
Corel VideoStudio Pro X9, and its evolving versions, continues to be a leading choice for video editing due to its blend of powerful features, intuitive interface, and extensive learning resources. From basic editing tasks to advanced cinematic effects, the software empowers creators of all levels to bring their visual stories to life efficiently and creatively. Its commitment to user-friendliness, coupled with professional-grade capabilities, ensures that VideoStudio remains a relevant and valuable tool in the ever-evolving landscape of digital content creation.
tags: #corel #videostudio #pro #x9