Typography is a cornerstone of effective graphic design. The ability to select, organize, and utilize fonts efficiently can dramatically impact the professional quality and aesthetic appeal of any project created within CorelDRAW Graphics Suite. Corel Font Manager, a powerful standalone application, serves as your central hub for managing your entire typeface collection, offering granular control over your typographic workflow. This guide delves into the functionalities of Corel Font Manager, providing a detailed tutorial for users of all levels, from beginners to seasoned professionals.
Understanding the Corel Font Manager
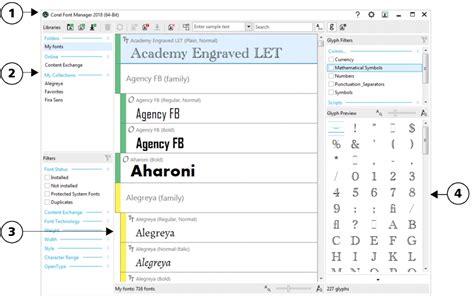
The Corel Font Manager is an integral component of CorelDRAW Graphics Suite, available for both Windows and Mac operating systems. It is designed to work seamlessly with CorelDRAW and Corel PHOTO-PAINT, empowering users to search, filter, organize, and manage their font libraries with unparalleled ease. The Font Manager can be launched directly from its dedicated icon or, for Windows users, conveniently accessed from within CorelDRAW or PHOTO-PAINT via the Application Launcher.
Launching the Font Manager
To initiate the Font Manager, you can navigate through the application launcher. Upon clicking the dropdown menu, select "Corel Font Manager." This action opens the application, presenting you with a suite of tools for font management.
Core Font Management Features
The Corel Font Manager provides a robust set of features to streamline your font handling process. These tools allow for efficient organization, previewing, and deployment of typefaces.
Watched Folders: Dynamic Font Integration
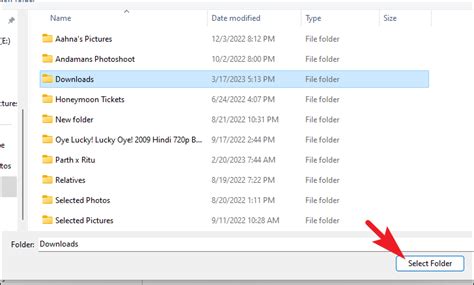
One of the most powerful features is the ability to create "watched folders." A watched folder is a designated directory where you can place font files. The Corel Font Manager will automatically recognize and make these fonts available for use within CorelDRAW and other compatible applications. By default, the watched folder is typically located at Documents > Corel > Corel Content > Fonts. This means any font file dropped into this specific folder will appear in CorelDRAW's font list without needing to be formally installed on your system. This is particularly useful for managing project-specific fonts or temporary font sets.
Installing and Uninstalling Fonts
The Font Manager simplifies the process of installing and uninstalling fonts. You can manage individual fonts, multiple selected fonts, or entire font families with just a few clicks. Simply select the desired font(s) in the Preview pane and utilize the toolbar icons to perform the install, uninstall, or delete actions. This granular control helps keep your system lean and your font library organized.
Font Collections: Curating Your Typefaces
While many users accumulate hundreds, if not thousands, of fonts on their computers, managing them can become a significant challenge. Keeping a large number of installed fonts can unnecessarily weigh down your system. The Font Manager addresses this by allowing you to create "collections." Collections are ideal for grouping fonts that reside in different physical locations on your hard drive. This enables quick and easy access to specific sets of fonts, such as those for branding projects, web design, or personal preferences, without cluttering your main font installation.
To remove a font from a collection, right-click on the font in the Preview pane and select "Remove from [collection name]." This ensures your collections remain relevant and efficient.
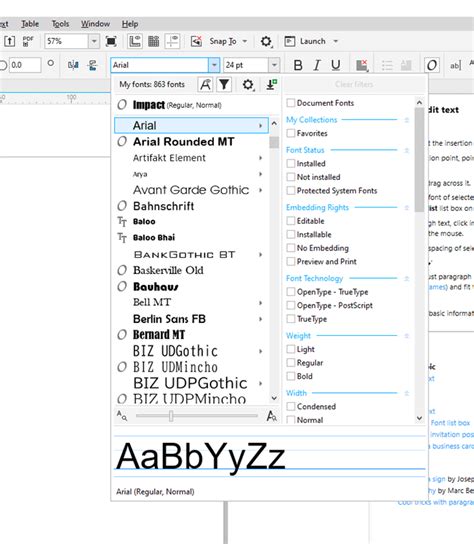
Previewing Fonts
Understanding how a font will appear with your specific text is crucial. The Corel Font Manager allows for comprehensive font previewing. By default, each font is displayed using its own font name. At the top of the Preview pane, you can enter sample text in the "Preview Font" window. This enables you to see precisely how each font will render with your chosen characters, words, or phrases. While preview is enabled, you can hover over any font to see how it looks with default characters.
Filtering and Glyph Management
The Glyph Filters area within the Font Manager provides advanced filtering capabilities. You can use checkboxes to narrow down the Glyph Preview list to display only specific types of characters, such as numbers, currency symbols, or other symbols. This is incredibly useful for designers who need to quickly locate a particular character for a logo or special text element.
Clicking on the arrows next to a filter category will open it, allowing you to select the filters you wish to apply. To remove individual filters, simply uncheck them.
Advanced Filtering Options
The "Show Filter List" option allows you to narrow down the font list according to a variety of criteria. This includes filtering by fonts that are "Not Installed" (meaning they are in CorelDRAW's watched folders but not system-installed), or by fonts that are editable or installable. You can also filter by font technology, weight, width, style, language, and more. This level of detailed filtering ensures you can pinpoint the exact font you need, even within an extensive library.
Typography and Fonts Master Class for CorelDRAW
Accessing More Fonts
The Corel Font Manager doesn't just help you manage existing fonts; it also provides a gateway to expanding your font library.
Getting More Fonts
The "Get More" icon on the toolbar allows you to download additional fonts directly from within the Font Manager. The "Get More" window presents a variety of new font packs. Some of these font packs are available for free, while others require a purchase. This integrated approach makes discovering and acquiring new typefaces a seamless part of your design workflow.
Font Management Best Practices for CorelDRAW
Effective font management is key to a productive and efficient design process. Here are some helpful font management tips specifically for CorelDRAW users:
Understanding System vs. Watched Folder Fonts
It's important to differentiate between fonts installed on your system and those residing in CorelDRAW's watched folders. Fonts installed on your PC are generally available to all applications on that computer. For example, if you open the Windows > Fonts folder, you'll see a list of all system-installed fonts. In contrast, fonts placed in CorelDRAW's watched folders, like the default "Fonts" folder within Corel Content, will appear in CorelDRAW's font list but may not be accessible in other applications like Microsoft Word or Outlook unless also installed in Windows.
While having many fonts available can be beneficial, keeping a large number of installed fonts can unnecessarily slow down your system's performance. The use of watched folders and collections in Corel Font Manager helps mitigate this by allowing you to access a vast array of fonts without overwhelming your operating system.
Avoiding Font Duplicates
Your folders or collections may inadvertently contain duplicates of the same font. The Font Manager assists in identifying and managing these duplicates, ensuring a cleaner and more organized library.
Licensing Considerations
When sharing CorelDRAW files with print shops or service providers, font licensing is a critical aspect to consider. If a recipient does not have a specific font installed on their system, the file may render incorrectly. While you can copy the font file and send it along with your design, this can raise licensing issues. Ensure you own the rights to use and distribute the font in such a manner. If licensing is a concern, embedding fonts within your document (where supported by the font and application) or using universally available system fonts can be alternative solutions.
The Font Sampler Docker
For users of previous CorelDRAW versions, the "Font Sampler" docker will be a familiar tool, previously known as the "Font Playground." This docker is invaluable for comparing fonts applied to the same text string. The default view is "Single Line," but you can switch to "Multi Line" to display your entire sample text.
To compare fonts using the actual text from your document, you can select and copy the text (Ctrl + C) and then paste it into a blank space in the Font Sampler (Ctrl + V) to replace the current default text. If the sample text uses an OpenType font, you can edit and select characters to check for available OpenType features, indicated by a triangle. Once you've decided on a font, you can select it in the Font Sampler and click the "Copy" button to apply it.
The Broader Landscape of Font Management
In today's digital age, there are literally hundreds of thousands of fonts available. While having access to such a vast library is empowering, it's essential to remember that installed fonts are specific to the computer they are installed on. This means that if you transfer a file to another system, you may not have access to the same fonts, potentially leading to design inconsistencies or rendering problems.
Consider sending a CorelDRAW file to a print shop. If they do not possess the exact font used in your design, the output might be compromised. This highlights the importance of robust font management strategies, whether through careful installation, organized collections, or by understanding font embedding and licensing.
Corel Font Manager provides a comprehensive solution for navigating this complex typographic world. By mastering its features, designers can ensure their fonts are always organized, accessible, and correctly implemented, leading to more professional and impactful visual creations.
Thanks for watching! We hope you found this tutorial helpful and we would love to hear your feedback in the Comments section at the bottom of the page. See whatâs new in CorelDRAW Graphics Suite!