Working within a vector environment like Inkscape unlocks a powerful advantage: the ability to manipulate text objects with a level of detail and creativity unattainable in pixel-based editors. However, to harness this granular control, a crucial first step is essential: converting your text into paths. This tutorial will guide you through the process of converting text to paths in Inkscape, exploring its benefits, implications, and common challenges.
Understanding Paths in Vector Graphics
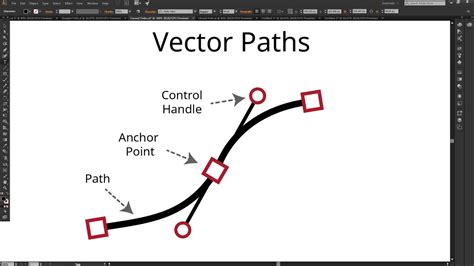
Before diving into the conversion process, it's vital to grasp what a "path" signifies in the realm of vector design. In essence, a path is an object defined by a series of coordinate points plotted on an X and Y axis. These points, known as nodes, dictate the shape and contours of the object. Unlike raster images, which are composed of pixels and can lose quality when scaled, vector paths are resolution-independent, meaning they can be scaled infinitely without any degradation in clarity or sharpness. This inherent scalability is one of the primary reasons why converting text to paths is a fundamental technique for designers.
Why Convert Text to Paths?
The question naturally arises: why go through the effort of converting text to a path in the first place? The benefits are numerous and significant, impacting everything from design flexibility to file compatibility.
Ensuring Consistent Typography Across Platforms
One of the most compelling reasons to convert text to paths is to guarantee that your text appears exactly as intended on any device or operating system, regardless of whether the recipient has the specific font installed. When you embed a font in a document, there's always a chance that the receiving system might not recognize or display it correctly due to licensing restrictions or simply the absence of the font file. Converting text to paths effectively "draws" the letters using vector shapes, eliminating the dependency on the original font file. This means a third party can open the document, and the text will appear the same on their screen as it does on yours. This is particularly crucial for logos and branding, where consistent visual representation is paramount. The name in a logo, for instance, often starts as a simple text object, but for final output and wider distribution, converting it to paths ensures its integrity.
Font Licensing and Permissions
Every font comes with its own set of usage permissions, dictated by the license it was distributed under. Some licenses restrict embedding or use in commercial projects, while others are more permissive. Converting text to paths circumvents these licensing limitations for the specific instance of the text within your design. Once converted, Inkscape no longer recognizes the object as a text element tied to a specific font, thus freeing it from those font-specific usage rights.
Unlocking Advanced Design Capabilities
Perhaps the most exciting aspect of converting text to paths is the expanded design freedom it affords. As a text object, its properties are limited to font type, size, color, and basic alignment. Once transformed into paths, each character becomes an editable object composed of nodes and bezier curves. This opens up a universe of possibilities:
- Distorting and Reshaping: You can individually manipulate the nodes of each letter to stretch, squash, twist, or warp them into entirely new shapes. This allows for highly customized typography that goes far beyond standard font variations.
- Creating Unique Letterforms: Designers can use path editing tools to craft entirely bespoke letterforms, blending elements from different fonts or drawing entirely new shapes that form words.
- Applying Path Effects: Once text is converted to paths, it can be subjected to a wide array of Inkscape's powerful path effects, enabling complex transformations and artistic treatments.
- Combining with Other Objects: Paths can be seamlessly integrated with other vector shapes, allowing for intricate graphic designs where text and imagery are interwoven.
- Precise Alignment and Spacing: While Inkscape offers text alignment options, converting to paths provides absolute control over the precise positioning and spacing of each letter, especially useful for detailed layouts.
Preparing for Specific Export Formats
Certain export formats, particularly those used in manufacturing processes like laser cutting or vinyl cutting, require vector data that is not font-dependent. Converting text to paths ensures that the cutting machine receives accurate path information, translating your text design into physical cuts without font-related errors.
The Conversion Process: A Step-by-Step Guide
Converting text to a path in Inkscape is a straightforward procedure, typically involving a single command. However, understanding the nuances and potential outcomes is key to a successful workflow.
The "Object to Path" Command
The primary method for converting text to paths is using the "Object to Path" command.
- Select the Text Object: Use the Selection Tool (the arrow icon) to click on the text object you wish to convert.
- Apply the Command: Navigate to the
Pathmenu and selectObject to Path. Alternatively, you can use the keyboard shortcutCtrl+Shift+C(Windows/Linux) orCmd+Shift+C(macOS).
Upon executing this command, Inkscape transforms the text object into a group of individual path objects, one for each character. Visually, you might not notice any immediate changes on your canvas. The text will still appear as it did before. However, the underlying structure has fundamentally changed.

Understanding the Result: Group vs. Compound Path
It's important to note that after applying "Object to Path," Inkscape typically creates a group of paths, not a single, unified compound path. This means that each letter is now an independent path object within a group.
If your intention is to treat the entire word or phrase as a single, cohesive shape for certain operations (like applying certain path effects or boolean operations), you might need to take an additional step:
- Ungroup the Paths: After converting text to a path, select the resulting group and use the
Objectmenu >Ungroupcommand, or the shortcutCtrl+Shift+G(Windows/Linux) orCmd+Shift+G(macOS). This will separate each character's path. - Combine into a Compound Path: With all the individual character paths still selected, navigate to the
Pathmenu and selectUnion. This operation will combine all selected paths into a single compound path. This is often achieved with the shortcutCtrl+K(Windows/Linux) orCmd+K(macOS).
A Better Way To Place Text On A Circle In Inkscape
The distinction between a group of paths and a compound path is significant. A group allows you to select and manipulate individual characters independently. A compound path, on the other hand, treats the entire collection of characters as a single entity, simplifying certain operations but making individual character edits more complex without first breaking the compound path.
When "Object to Path" Might Seem to Not Work: Common Pitfalls and Solutions
Occasionally, users report that "Object to Path" or related text manipulation features in Inkscape are "not working." This vagueness often points to a misunderstanding of the process or an incorrect application of the tools.
Debugging "Not Working" Scenarios
When a user states "my text to path is not working," it's crucial to gather more information. The "not working" description is too vague to diagnose effectively. To help, users should provide:
- Exact steps taken: A clear, sequential account of the actions performed.
- Observed results: What actually happened on the screen (or what didn't happen).
- Conclusion of failure: How the user determined it wasn't working.
Here are some common reasons why text-to-path operations might appear to fail, especially when users are trying to achieve specific effects like aligning text along a path:
Misunderstanding "Text to Path" vs. "Put on Path"
A frequent point of confusion arises between converting text into paths and placing existing text onto a path.
- "Object to Path" (
Ctrl+Shift+C): This converts the characters themselves into editable vector shapes. It does not change their position or relationship to any other objects on the canvas. - "Text and Path" > "Put on Path" (
Textmenu): This command takes a live text object and aligns it along a pre-existing vector path. This is what a user might be trying to achieve when they want curved text.
Scenario: A user tries to "Put on Path" after using "Object to Path" on the text. This is incorrect because "Put on Path" requires the text to still be a live text object, not converted paths.
Solution: If you want to place text along a path, ensure the text remains a live text object. Then, select both the text object and the path, and apply "Put on Path" from the Text menu. If you later want to modify the text's shape along the path with node editing, you can then convert the resulting text-on-path object to paths.
Issues with "Put on Path"
Even when the correct commands are used, users can encounter problems with "Put on Path":
- Text Placement Issues (Upside Down, Backwards): This is often related to the direction of the path. Vector paths have an inherent directionality (defined by the order in which nodes were created or manipulated). If the path's direction is reversed from what the text expects, the text might appear upside down or backwards.
- Solution: Select the path object and use
Path>Reverse. Experiment with this if your text is not orienting as expected. Also, try drawing the path in the desired direction from the start (e.g., left-to-right for text that should flow left-to-right).
- Solution: Select the path object and use
- No Visible Effect: Sometimes, after selecting text and a path and clicking "Put on Path," nothing appears to happen.
- Possible Causes:
- The text object was already converted to paths: As mentioned, "Put on Path" only works on live text.
- The path is too complex or has self-intersections: While Inkscape is robust, extremely complex paths can sometimes cause unexpected behavior.
- The path is not a single, continuous path: If the "path" is actually a collection of disconnected segments, "Put on Path" might fail.
- Inkscape version or environment issues: While less common, older versions or specific system configurations could introduce bugs.
- Solutions:
- Ensure the text is a live text object.
- Simplify the path if possible.
- Use
Path>Combine(Ctrl+K) on the path object if it's composed of multiple segments to ensure it's a single entity. - Ensure you are using a recent, stable version of Inkscape.
- Try the operation on a new, blank document to rule out file-specific corruption or complexity.
- Possible Causes:
File Size and Complexity
One user reported that text-on-path worked on a clean page but not in a complex design file. While Inkscape is generally efficient, extremely large or complex files (especially those originating from converted PDFs or other complex vector sources) can sometimes exhibit performance issues or unexpected behavior with certain operations.
- Solution: Try performing the text-to-path operation or text-on-path alignment on a new, blank document. If it works there, you can then copy and paste the result into your complex document. This can help isolate whether the issue is with the operation itself or the environment of the original file.
Advanced Techniques: Sculpting Text with Path Effects
For those seeking more sophisticated text manipulation, especially for creating curved or shaped text that deviates significantly from a simple path, Inkscape offers advanced tools. While some might believe it's not easily achievable, it is indeed possible with a combination of techniques.
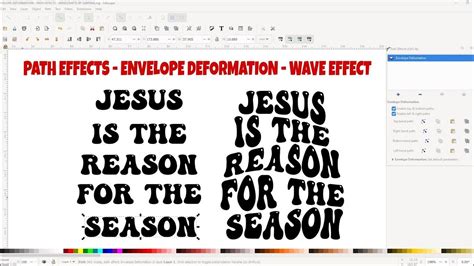
Envelope Deformation and Path Effect Editor
A powerful method involves using the Path Effect Editor, specifically the "Envelope Deformation" path effect. This allows you to "wrap" an object (in this case, text converted to paths) into a custom shape defined by control paths.
- Convert Text to Paths: As usual, convert your text object to paths (
Ctrl+Shift+C). If you intend to modify the entire word as one unit, you might want to group or combine these character paths into a single compound path. - Apply Envelope Deformation:
- Select the text-as-paths object.
- Open the Path Effect Editor (
Path>Path Effects...). - Add a new path effect and choose "Envelope Deformation."
- Define Control Paths: The Envelope Deformation effect typically uses four control paths: top, bottom, left, and right. You can draw these control paths to define the bounding box and curvature you want your text to conform to.
- For instance, to bend text into a curve, you might draw a curved path for the "top" and "bottom" controls, effectively squeezing the text between them.
- Adjust and Refine: Manipulate the nodes of these control paths to sculpt your text into the desired shape. This requires patience, as fine-tuning the deformation to maintain text legibility and proportion can be challenging.
- Apply to Path: Some variations of this technique involve using a target path and then applying a deformation effect that uses that path as a guide.
This method, while requiring more effort and understanding of Inkscape's path effects, provides immense control over text shaping, allowing for complex and artistic typographic designs that go far beyond simply aligning text along a line.
Considerations Before Converting
While the benefits of converting text to paths are compelling, it's crucial to understand the implications before committing to the conversion.
Text is No Longer Editable as Text
The most significant implication is that once you've converted your text to a path, Inkscape no longer recognizes it as a text object. This means:
- No Spell Checking: Inkscape's built-in spell checker will not function on converted paths.
- No Font Changes: You cannot change the font type, size, or style directly. Any modifications to these aspects must be done by manually editing the nodes of the paths.
- No Text Property Adjustments: Kerning, leading, tracking, and other text-specific properties are lost.
Therefore, it is vital to ensure that you will not need to edit your text again in its original text format before making the conversion. It's good practice to keep a copy of your original text object in a separate layer or off to the side until you are completely satisfied with the design and the conversion is final.
File Size Implications
Converting text to paths generally increases file size, especially for designs with a large amount of text or complex fonts. This is because each character is now represented by a series of nodes and vector data rather than a reference to a font file. For most web or display uses, this increase is negligible. However, for extremely large documents or in environments with strict file size limitations, it's a factor to consider.
Conclusion: A Powerful Tool in Your Design Arsenal
Converting text to paths in Inkscape is a fundamental technique that transforms static text into dynamic, editable vector shapes. It unlocks a vast array of creative possibilities, from ensuring consistent display across different platforms to enabling intricate typographic manipulations and artistic distortions. While the conversion process itself is simple, understanding its implicationsâparticularly the loss of text editabilityâis crucial. By mastering "Object to Path" and exploring advanced techniques like envelope deformation, you can elevate your text-based designs in Inkscape to new levels of sophistication and originality. Remember to always consider your workflow and keep original text objects accessible until the conversion is final, ensuring you retain the flexibility to refine your typography before committing to the powerful world of vector paths.