Adobe InDesign offers powerful tools for designers to manipulate text and create visually appealing layouts. One such technique, often sought after for its ability to add dynamic flair to designs, is curving text. Whether you're aiming for elegant arched lettering on a poster or intricate text paths for branding, understanding how to "type on a path" in InDesign is a fundamental skill. This guide will walk you through the process, from creating simple curved paths to fine-tuning your text's appearance, ensuring your InDesign projects achieve the desired aesthetic.
Laying the Foundation: Creating Your Curved Path
Before you can curve text, you need a guide for it to follow. This guide is known as a "path." InDesign provides versatile tools for path creation, allowing for both simple and complex curves. For the purpose of this tutorial, we will focus on creating a basic curved path, which can then be adapted to more intricate shapes.
Utilizing the Ellipse Tool for Simple Curves
A straightforward method to create a curved path for your text is by using the Ellipse Tool. This tool is ideal for generating circular or elliptical shapes, which naturally lend themselves to arched text.
Accessing the Ellipse Tool: Locate the Ellipse Tool in your InDesign toolbar. It might be nested under the Rectangle Tool. If so, click and hold the Rectangle Tool icon to reveal a dropdown menu where you can select the Ellipse Tool. Alternatively, you can use the keyboard shortcut 'L' to activate it directly.
Drawing the Path: With the Ellipse Tool selected, click and drag on your InDesign workspace. To create a perfect circle, hold down the 'Shift' key while dragging. This ensures equal width and height for your shape.
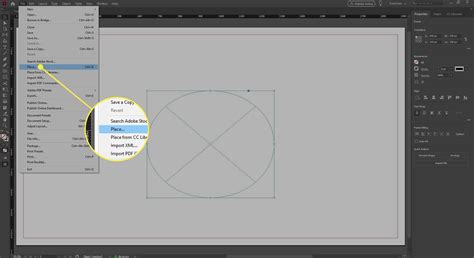
Making the Path Invisible: For your text to appear curved without an obtrusive shape underneath, the path itself needs to be invisible. Paths in InDesign are often defined by a fill color and a stroke color. To make the path invisible, you must ensure both the fill and stroke colors are turned off. You can achieve this through the Properties panel. With the circle path selected using the Selection Tool, navigate to
Window > Properties. In the Properties panel, you will see options for Fill and Stroke. Set both to 'None' by clicking on the color swatch and selecting the diagonal red line indicating 'None.' This ensures that only the text will be visible, following the invisible curve of your path.
Alternative Path Creation: The Pen Tool
While the Ellipse Tool is excellent for simple curves, the Pen Tool offers greater precision and flexibility for creating custom, complex paths. If your design requires a more unique curve that isn't a perfect arc, the Pen Tool is your go-to instrument.
Selecting the Pen Tool: The Pen Tool is found in the InDesign toolbar, often grouped with other drawing tools. Its icon typically resembles a fountain pen nib. The keyboard shortcut for the Pen Tool is 'P'.
Drawing a Custom Curve: To draw a curve with the Pen Tool, click once to set the starting point. Then, click and drag to create a smooth curve, adjusting the direction and extent of the curve with the drag handles. Continue clicking and dragging to add more anchor points and shape your desired path. To close the path, click back on the starting anchor point.
Refining the Path: Once you've drawn your path with the Pen Tool, you can refine it using the Direct Selection Tool (keyboard shortcut 'A'). This tool allows you to select individual anchor points and adjust their positions or manipulate the Bezier handles to fine-tune the curve's shape.
Bringing Text to Life: Typing on a Path
With your invisible curved path created, you're ready to add text that will follow its contours. InDesign's "Type on a Path" feature is designed precisely for this purpose.
Activating the Type on a Path Tool
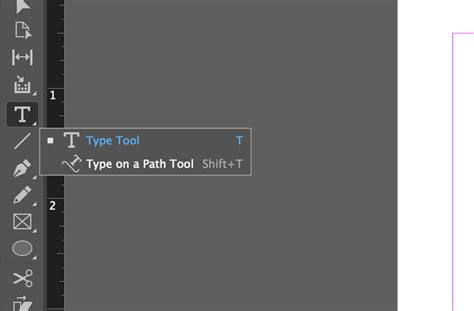
Locating the Tool: The Type on a Path tool is usually nested within the Type Tool group in the InDesign toolbar. Click and hold the Type Tool icon to reveal a flyout menu, and select the "Type on a Path Tool." The keyboard shortcut for this tool is
Shift + T.Applying Text to the Path: Select the Type on a Path Tool. Move your cursor over the path you created (in our case, the invisible circle). When your cursor is correctly positioned over the path, it will change to indicate that you can begin typing. You will typically see a small plus icon next to the tool's cursor. Click on the path. A blinking cursor will appear, indicating that you can now start typing your text.
Formatting Your Curved Text
Once your text is on the path, you have a range of options to control its appearance and position.
Adjusting Font, Size, and Color
To modify the fundamental characteristics of your text, such as font, size, and color, you'll use InDesign's Character and Color panels.
Accessing Character Settings: Go to
Window > Type & Tables > Characteror use the keyboard shortcutCtrl + T(Windows) orCommand + T(Mac). This panel allows you to select different fonts, adjust font sizes, leading, kerning, and other typographic attributes.Modifying Text Color: To change the color of your text, open the Color panel by navigating to
Window > Color > Coloror using the shortcutF6. From here, you can select any color from your Swatches panel or define a custom color.
Controlling Text Position and Alignment on the Path
InDesign offers several options to precisely control how your text sits on the path. These are accessed through the "Type on a Path Options" window.
Opening Type on a Path Options: With your text on the path selected using the Selection Tool, go to
Type > Type on a Path > Options. Ensure that the "Preview" checkbox is ticked in this dialog box so you can see the changes in real-time.Understanding the "Effect" Dropdown: The "Effect" dropdown menu offers different ways to apply the path to your text.
- Rainbow: This is the default setting and generally provides a balanced curve.
- Stair Step: This effect can create a staggered or stepped appearance along the path.
- Skew: This option can skew the text along the path, creating a slanting effect.
- Flip: This is a particularly useful option. If you want the text to appear on the inside of a circular path, for example, you can use the "Flip" option. You might also need to adjust the alignment to achieve the desired result.
Utilizing "Align Options": The "Align options" dropdown is crucial for fine-tuning the text's placement relative to the path.
- Baseline: This is the default alignment. It places the baseline of your text along the path, typically on the outside of a curved path like a circle.
- Center: This option centers the text on the path.
- Ascender: This alignment places the ascender of your text (the parts of letters like 'h' or 'd' that extend above the main body) along the path. This is often the best choice for placing text neatly inside a circular path.

Adjusting Spacing Between Characters
You may find that when you apply different alignment or effect options, the spacing between your characters changes. InDesign allows for manual adjustment of this spacing.
Manual Spacing Adjustment: While the Type on a Path Options window is open, you can manually adjust the spacing between characters. Look for options related to "Spacing" or "Distribute." You can often type in specific values or use sliders to fine-tune the kerning or tracking of the text along the path to ensure it looks aesthetically pleasing and evenly distributed.
Moving Text Along the Path: To reposition your text along the path, select the path with the text on it using the Selection Tool. Hover your cursor over the beginning or end bracket of the text path until you see an icon with an arrow. You can then click and drag to move the entire block of text backward or forward along the path.
How to Curve Text in InDesign
Beyond the Circle: Advanced Applications and Tips
The technique of typing on a path is not limited to simple circles. You can apply these principles to any path you create, opening up a world of design possibilities.
Creating Complex Text Arcs and Shapes
By using the Pen Tool to create more intricate paths, you can achieve sophisticated text arrangements. Imagine curving text around an object, following the contour of a logo, or creating a spiral effect. The key is to draw the path first, then apply the text to it and fine-tune the alignment and effects.
Working with Layers for Organization
When your design involves multiple elements, including curved text and graphics, it's good practice to organize your layers. This makes it easier to select, edit, and manage different parts of your design.
Accessing the Layers Panel: Go to
Window > Layersor use the keyboard shortcutF7.Creating a New Layer: In the Layers panel, click the "Create New Layer" icon at the bottom. You can then rename this layer (e.g., "Curved Text") and place all your text and path elements onto this dedicated layer. This keeps your project tidy and prevents accidental modifications to other design elements.
Integrating with Other Adobe Creative Cloud Applications
Adobe InDesign is part of the powerful Creative Cloud suite. Understanding how it interacts with other applications like Adobe Illustrator and Photoshop can enhance your workflow. For instance, you might create a complex vector shape in Illustrator and then import it into InDesign to use as a text path. Similarly, text effects created in Photoshop could be incorporated into your InDesign layout.
Exploring Design Templates
If you're looking for inspiration or a head start on projects that require curved text, consider exploring InDesign templates. Many resources offer pre-designed templates for flyers, brochures, magazines, and more, often featuring creative uses of text on paths. These templates can serve as excellent learning tools, allowing you to deconstruct their design and understand how specific effects were achieved. For example, an Art Gallery flyer template, a magazine template, a healthcare flyer, a promotional template, or an event flyer template might all showcase innovative ways to incorporate curved text.
By mastering the art of typing on a path in InDesign, you gain a versatile skill that can elevate the visual appeal and professionalism of your designs. Experiment with different path shapes, text alignments, and effects to discover the full potential of this powerful typographic tool.