CorelDRAW Graphics Suite offers a robust set of tools for image manipulation, with background removal being a frequently utilized and highly sought-after function. Whether you're aiming to isolate a subject for a new design, clean up a product shot, or simply enhance an image, CorelDRAW provides multiple avenues to achieve this. This tutorial delves into various methods, from straightforward techniques to more intricate solutions, empowering users to effectively remove backgrounds from their images within the CorelDRAW ecosystem.
The PowerClip Method: Encapsulating Your Subject
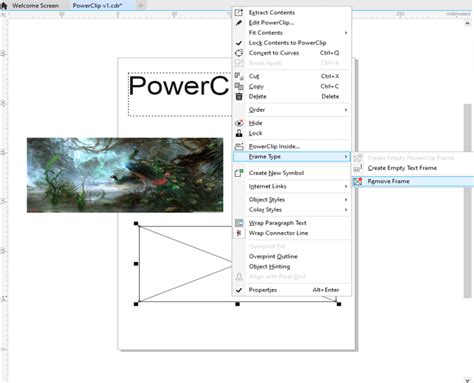
One of the more intuitive and widely adopted techniques for background removal in CorelDRAW involves the PowerClip feature. This method essentially allows you to place one or more objects "inside" a vector object, effectively masking out anything outside the confines of that vector.
To begin, ensure you have both your target image and a vector object that will serve as your "frame." For instance, if you have an Earth image with a simple, single-color background, you can easily create a vector shape that encompasses the Earth. The easiest way to create an outline around a subject, like a flower, is to draw it. You can use the Freehand tool (F5) and trace it, although this is not always straightforward, especially for beginners, as it can take considerable time and effort.
Alternatively, for simpler, high-contrast images, logos, or clipart, CorelDRAW's Quick Trace functionality can be a significant time-saver. You can access Quick Trace by right-clicking on the image and selecting the option, or by navigating through the property bar to Trace Bitmap > Quick Trace. This process generates a vector object based on the image's content.
Once you have your vector frame, select the image you wish to modify. Navigate to the Object menu, then select PowerClip, and finally choose Place inside frame. Click on the vector object you created to act as the frame. This action will meticulously remove everything outside the boundaries of your chosen vector object. The PowerTRACE result is a group of objects that are on top of the original image; use the Pick tool to move the group off to the side. With the Pick tool, move the outline object over top of the original image. With that, you will have eliminated the background of the image, but also perfected the edges of it, helping to increase the quality.
Leveraging PHOTO-PAINT for Precise Selections
CorelDRAW Graphics Suite is complemented by PHOTO-PAINT, a powerful raster image editor that integrates seamlessly with CorelDRAW. You can open your image directly in PHOTO-PAINT from within CorelDRAW by selecting the image and clicking the Edit Bitmap icon on the property bar.
Masking Uniform Backgrounds
For images with a uniform background color, PHOTO-PAINT offers a streamlined approach to masking. In the example of masking a flower against a solid background, the background is often easier to select than the flower itself due to its consistent color. You can utilize selection tools like the Magic Wand tool. TIP: You can increase or decrease the tolerance (the degree of difference between one color and another) that the Magic Wand tool identifies.
Once you have made your initial selection, you can refine it using various Mask tools as needed. When you are satisfied with your selection, click the Finish Editing button on the property bar to exit PHOTO-PAINT. This action returns you to CorelDRAW with your edited image, ready for further enhancements or the addition of a new background.
Handling Complex Backgrounds with Magic Wand
When backgrounds are not uniformly colored, the process requires a more nuanced approach. Again, select the image in CorelDRAW and click the Edit Bitmap icon to open it in PHOTO-PAINT. In such scenarios, the Magic Wand tool can be employed in Additive mode. This mode allows you to click on different colors within the background, with each click adding to your existing selection. By strategically clicking on various shades, you can gradually isolate the background. After completing your selection, you will typically need to invert the mask (Mask > Invert Mask or Ctrl+I) to select the subject, and then proceed to remove the background. Finally, click the Finish Editing button to return to CorelDRAW.
How to remove background in CorelDRAW/PhotoPaint 2022 using Smart Selection Mask
The Cutout Lab for Intricate Details
For more complex selections, such as images with fine details like hair or when the background is particularly challenging to isolate, PHOTO-PAINT's Cutout Lab is an invaluable feature. After opening your image in PHOTO-PAINT via the Edit Bitmap icon, navigate to Image > Cutout Lab.
The Cutout Lab opens in a new dialog box. Here, you'll use the Highlighter tool to trace the edge of the area you wish to separate. While the tracing doesn't need to be perfectly exact, a well-defined outline will yield better results. NOTE: It’s important that the selected area is a "closed" area, since next you are going to be filling it in. TIP: You can change the Highlight color and Fill color to fit your preference. After tracing, click OK in the Cutout Lab to apply your changes. Then, similar to previous examples, click the Finish Editing button or close the program to return to CorelDRAW.
To achieve a more realistic composite, you can then use PHOTO-PAINT to apply a new background. Select the entire image (Mask > Select Entire Image or Ctrl+A), then copy it (Edit > Copy or Ctrl+C). Open your desired new background image (File > Open or Ctrl+O) and paste your cut-out subject onto it (Edit > Paste or Ctrl+V).
CorelDRAW Go: AI-Powered Background Removal
For users seeking an exceptionally fast and automated solution, CorelDRAW Go offers an AI-powered background removal tool. This web-based application simplifies the process to a single click.
To utilize this feature, launch CorelDRAW Go in your browser and open your design file. You can upload an image from your device or select a royalty-free stock photo from the library. Place the image onto your canvas. With the image selected, click Remove background in the Properties menu. CorelDRAW Go's AI will automatically detect the photo's subject and remove the background, eliminating the need for manual tracing or masking. The AI is designed to preserve fine lines like hair and soft outlines, ensuring they integrate naturally into your design.

Once the background is removed, you can proceed to build the rest of your project by adding text, shapes, or additional images. You can even remove backgrounds from other images within CorelDRAW Go. When you are finished, save and export your project, or share it directly from the application.
Frequently Asked Questions about CorelDRAW Go Background Removal
Can I use background removal on any photo?Yes. You can upload your own images or choose from the stock image library in CorelDRAW Go. The background remover is designed to detect fine edges and complex details automatically.
Do I need any design experience to use this tool?Not at all. Background removal is completely automatic; one click is often all it takes. The interface is simple and beginner-friendly.
What file types can I save my cutouts as?Once the background is removed, you can place your subject on a solid color, a gradient, or another image to create custom designs. With AI background removal in CorelDRAW Go, it only takes a click to transform your photos into professional assets. Master marketing graphics, polish product shots, snap up social media attention-and save time on top of it all-with the AI background removal tool in CorelDRAW Go.
Advanced Refinements and Workflow Integration
Beyond the primary removal techniques, CorelDRAW Graphics Suite provides a comprehensive toolkit for further refining your cut-out images. After removing the background, you'll have a stand-alone image ready for embellishment. PHOTO-PAINT offers extensive capabilities for image adjustments, layering, cloning, and more, allowing you to perfect your newly refined subject.
For instance, you might want to trim the edges of your photo to remove stray pixels or tighten its outline. This can be achieved using various tools within CorelDRAW or PHOTO-PAINT. Once your edits are complete, you can save the enhanced photo and prepare it for sharing or uploading.
CorelDRAW's versatility ensures that you can frame your image, adjust its canvas size, and integrate it seamlessly into new designs. The suite empowers users to transform any photo into a professional, ready-to-use asset, whether for marketing graphics, product shots, or social media content.
CorelDRAW Graphics Suite offers multiple options for removing backgrounds, catering to a wide range of complexity and user expertise. From the straightforward PowerClip and PHOTO-PAINT's versatile masking tools to the cutting-edge AI of CorelDRAW Go, you have the power to achieve impressive results efficiently. Depend on CorelDRAW Graphics Suite to be your ultimate background remover; it's fast, easy, and produces professional-grade outcomes.
tags: #coreldraw #remove #background