Adobe Photoshop, a powerhouse in image manipulation, offers a versatile array of tools and techniques for precisely cutting out logos or any unwanted elements from photographs. Whether you aim to create a clean product shot, prepare an image for further design work, or simply enhance the aesthetic appeal by removing distractions, understanding these methods is crucial. This guide delves into several effective strategies for achieving seamless logo removal and precise image cutouts, ranging from fundamental selections to advanced masking, suitable for users from beginners to seasoned professionals.
Understanding Photoshop's Layer-Based Workflow
At its core, Photoshop operates on a system of layers, akin to stacking transparent sheets of paper. Each layer can contain different image elements, allowing for non-destructive editing. When working with logos or specific objects, understanding this layered approach is fundamental.
Initially, an image might be presented as a single "Background" layer. To enable flexible editing, it's often beneficial to convert this into a regular layer. This is typically achieved by double-clicking the "Background" layer in the Layers panel and confirming the action. Once converted, this layer can be duplicated or manipulated without altering the original image data.
Isolating Elements with Selection Tools
The first step in cutting out a logo or any object is to define its boundaries accurately. Photoshop provides a suite of selection tools, each suited for different scenarios.
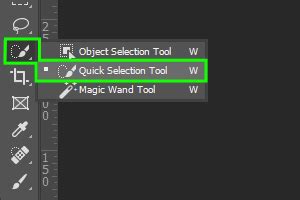
Object Selection Tool & Quick Selection Tool: These intelligent tools can often automatically detect and select subjects within an image. By simply hovering over or dragging across the item of interest, Photoshop attempts to create a precise selection. This is particularly useful for well-defined objects.
Magic Eraser Tool: For images with a distinct background color, the Magic Eraser Tool can be highly effective. When applied to a layer, it removes contiguous areas of similar color. Holding the Alt key while using this tool allows for more targeted deletion of background sections, effectively making them transparent.
Lasso Tools (Lasso, Polygonal Lasso, Magnetic Lasso): These tools offer more manual control. The standard Lasso tool allows for freehand drawing of selections. The Polygonal Lasso tool is ideal for objects with straight edges, enabling selections by clicking to create anchor points. The Magnetic Lasso tool attempts to snap to edges based on color contrast.
Elliptical Selection Tool: As noted in some workflows, this tool is perfect for creating circular or oval selections, which can then be refined.
Refining Selections with "Select and Mask"
Once an initial selection is made, it rarely is perfect. The "Select and Mask" workspace is an indispensable environment for refining these selections.
Perfect Hair Selection in Photoshop | Select and Mask Tool tutorial #PhotoshopTutorial
Within "Select and Mask," users can fine-tune the edges of their selection using various sliders:
- Radius: Controls the width of the area Photoshop analyzes for edge refinement.
- Smooth: Softens jagged or pixelated edges.
- Feather: Blurs the edges of the selection, creating a softer transition.
- Contrast: Sharpens the edges of the selection.
- Shift Edge: Expands or contracts the selection boundary.
For intricate details like hair or fur, the "Refine Edge" tool (often accessed within "Select and Mask") is invaluable, allowing Photoshop to intelligently delineate complex boundaries. The output of this refinement process can be set to a "Layer Mask," which is a non-destructive way to hide parts of a layer without deleting them.
Advanced Techniques for Logo Removal and Object Extraction
Beyond basic selections, several powerful tools and methods are employed for more complex logo removal and image cutouts.
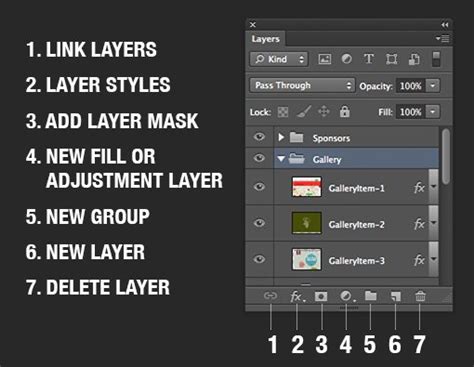
Utilizing Layer Masks for Non-Destructive Editing
A layer mask is a grayscale image attached to a layer, determining the layer's transparency. White areas of the mask reveal the layer's content, black areas conceal it, and shades of gray create partial transparency.

Creating a layer mask from a selection is straightforward: after making a selection, click the "Add Layer Mask" icon at the bottom of the Layers panel. This effectively "cuts out" the selected area by masking out everything else on that layer. Subsequent editing can then be done directly on the mask using brush tools (painting with black to hide, white to reveal).
Healing Brush and Spot Healing Brush Tools
These tools are designed to remove blemishes and imperfections by sampling pixels from one area and painting them over another.
- Spot Healing Brush Tool: This tool works automatically. Simply paint over the area you want to fix, and Photoshop samples surrounding pixels to blend the correction. It's excellent for small, isolated flaws.
- Healing Brush Tool: Similar to the Spot Healing Brush, but requires you to manually define a source area by holding
Alt(orOptionon Mac) and clicking. This gives you more control over the source of the pixels used for healing, which is crucial when matching textures and tones precisely.
When using the Healing Brush, aligning the sampled pixels with the surrounding image is key. This often involves multiple small strokes and resetting the source area frequently to maintain consistency.
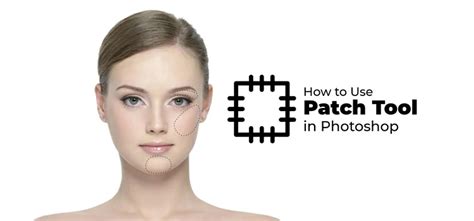
The Power of the Patch Tool
The Patch Tool is a sophisticated tool for removing unwanted objects or logos by intelligently replacing them with surrounding texture and color.
The workflow typically involves:
- Selecting the Patch Tool.
- Drawing a selection around the logo or area to be removed.
- Clicking and dragging this selection to a clean area of the image that contains the desired texture and color.
- Releasing the mouse button. Photoshop then blends the sampled area into the selected region.
This method is highly effective for larger areas and complex patterns, as it leverages Photoshop's content-aware technology to create a natural-looking repair. Careful selection of the source area is paramount to achieving seamless results. For instance, when removing a logo from a water bottle, sampling from the bottle's surface is essential, avoiding areas with leaves or reflections that would look unnatural.
Cloning and Content-Aware Fill
Clone Stamp Tool: This tool allows for precise duplication of pixels from one area to another. It's a manual process where you define a source point (
Alt/Option+ click) and then paint over the target area. This is particularly useful for replicating patterns or textures where automated tools might struggle. When using the Clone Stamp for logo removal, it's often best to work on a new, empty layer above the original image. This allows for non-destructive cloning. You'll need to ensure "Sample All Layers" is enabled in the Clone Stamp's options to draw from the original image data.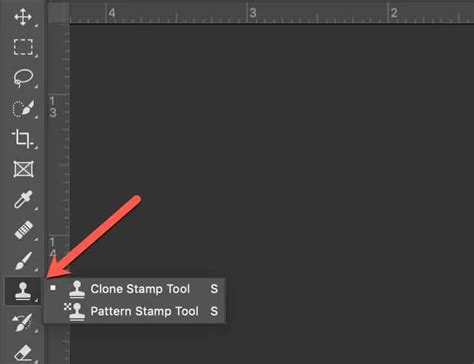
Content-Aware Fill: While not explicitly detailed in all provided snippets for logo removal, Content-Aware Fill is another powerful option. After making a selection around the logo, you can go to
Edit > Content-Aware Fill. Photoshop analyzes the surrounding pixels and intelligently fills the selected area, attempting to match the context. This can be very effective, though it sometimes requires further refinement with other tools.
Dealing with Resolution and Enlargement
A common issue when manipulating images, especially for print, is resolution. If an image is low resolution, its quality will suffer when enlarged.
Understanding Resolution for Print and Screen
Images intended for web use (on-screen) can often tolerate lower resolutions (e.g., 72 pixels per inch). However, for high-quality printing, a resolution of 300 pixels per inch is typically recommended. If a logo is removed from a low-resolution image, the resulting cutout will also be low resolution, limiting its practical use for anything larger than a few centimeters.
Third-Party Enlargement Software
For situations where an image or cutout needs to be enlarged significantly without a drastic loss of apparent sharpness, specialized software like ON1 Perfect Resize can be beneficial. These tools employ advanced algorithms to intelligently interpolate missing detail, often yielding better results than Photoshop's standard scaling methods, particularly for graphics or images with smooth gradients. The process usually involves enlarging the image first using such software, then performing the logo removal in Photoshop.
Preparing Logos for Specific Uses
When the goal is to create a transparent logo for use in various designs, the process focuses on isolating the logo itself.
Creating Transparent PNGs
To ensure a logo retains its transparency when saved, the "Save for Web (Legacy)" option in Photoshop is recommended. Within this dialog, selecting "PNG-24" is crucial, as this format supports alpha channel transparency, preserving the transparent background.
Warning: When copying and pasting a transparent PNG into Photoshop, it might sometimes appear with a black background. This is usually due to the destination layer's blending mode or the way Photoshop interprets the transparency in that specific context. Ensuring the destination layer is set to "Normal" blending mode and has no active selections usually resolves this.
Dealing with Complex Backgrounds and Ellipses
For logos with intricate details, such as the "ellipses" mentioned, precision is key. Tools like the Elliptical Marquee Tool, combined with "Select > Transform Selection," allow for precise drawing and manipulation of shapes. The Smudge Tool can then be used to blend colors along selection edges, pushing them towards the desired color to create a cleaner boundary.
Combining multiple techniques is often the most effective approach. For example, one might use the Magic Eraser for broad background removal, the Polygonal Lasso for sharp edges, and the Smudge Tool or Healing Brush for fine-tuning.
A Practical Workflow Example: Removing a Logo from a Water Bottle
Let's consider a scenario where a logo needs to be removed from a product image, like a water bottle:
- Open the Image: Load the image (e.g., "Water Bottle with Logo.jpeg") into Photoshop.
- Duplicate Layer: Create a new layer from the background layer. Rename the original "Background" layer to "Water Bottle Original" and the new layer to "Water Bottle Without Logo." Lock the original layer to prevent accidental edits.
- Select a Removal Tool: Choose a suitable tool. For this example, let's explore both the Healing Brush and the Patch Tool.
- Using the Healing Brush Tool:
- Zoom into the logo area.
- Select the Healing Brush Tool.
- Hold
Alt(orOption) and click on an area of the bottle with a similar color and texture to the area surrounding the logo. - Carefully drag the brush over the logo. You might need to repeatedly sample source areas to match tones precisely. This method can be time-consuming and may result in slight inconsistencies.
- Using the Patch Tool:
- Create a new layer named "Water Bottle Patch Tool." Hide the "Water Bottle Without Logo" layer and unlock the new "Water Bottle Patch Tool" layer.
- Select the Patch Tool.
- Draw a selection around a portion of the logo (e.g., a letter or number).
- Click and drag the selection to a clean area of the bottle with matching texture and color. Photoshop will blend the sampled area into the selection.
- Deselect (
Ctrl+DorCmd+D). Repeat this process for all parts of the logo, carefully selecting source areas to ensure natural blending. Pay attention to shadows, highlights, and textures.
- Refining the Edges: After using the Patch Tool, you might notice slight imperfections or smudges. Use the Patch Tool again, or the Healing Brush, with smaller selections and carefully chosen source areas to clean up these residual marks. Zooming in closely is essential for this stage.
- Comparing Before and After: Toggle the visibility of the original "Water Bottle Original" layer to compare the result with the original image. The goal is to make the logo disappear seamlessly.
- Saving the Work: Save the image as a Photoshop file (
.PSD) with "adjusted" in the filename to preserve layers and enable future edits. For web or final output, save as a PNG (for transparency) or JPEG (for photographic images).
Advanced Techniques for Selections and Cutouts
Beyond the direct removal of logos, achieving clean cutouts with crisp edges often involves advanced selection techniques and the strategic use of filters.
Applying Grain for Consistency
When removing elements, especially from textured surfaces, the repaired area might appear smoother or different from the surrounding image. To combat this, one can apply a subtle grain effect.
- Convert to Smart Object: Right-click on the layer containing the repaired area and choose "Convert to Smart Object." This allows for non-destructive application of filters.
- Add Noise: Go to
Filter > Noise > Add Noise. Choose "Uniform" and "Monochromatic" for a natural grain effect. Adjust the amount of noise to match the original image's texture. - Duplicate Filter: If you need to apply the same grain to another layer or object, you can duplicate the Smart Filter by holding
Alt(orOption) and dragging the filter from the Layers panel onto the target layer.
Masking and Blending with Layer Masks
When using tools like the Clone Stamp Tool or when parts of a repair are too harsh, layer masks become essential for blending.
- Create a Layer Mask: Select the layer containing the repaired or cloned area and add a layer mask.
- Use a Soft Brush: Select a soft black brush (Hardness set to 0%).
- Paint on the Mask: Paint with black on the mask over areas that need to be softened or hidden, blending the edges of the repair into the underlying image. If you paint too much, switch to a white brush to reveal the masked area again.
- Adjust Tones: Use adjustment layers, such as Levels or Curves, clipped to the repaired layer, to fine-tune the brightness and contrast of the edited area to match the surrounding image perfectly.
Conclusion
Mastering logo removal and image cutouts in Photoshop involves a combination of understanding fundamental tools, practicing advanced techniques, and knowing when to employ specific features like layer masks, healing tools, and selection refinement. From the precise selections offered by the Quick Selection and Object Selection tools to the intelligent blending of the Patch Tool and the non-destructive power of layer masks, Photoshop provides a comprehensive toolkit for achieving professional results. By combining these methods and understanding the nuances of image resolution and texture, users can effectively clean up images, isolate subjects, and prepare graphics for a multitude of applications.