Photoshop's clipping masks are a versatile and powerful technique used to control the visibility of a layer. They function by linking a layer (or group of layers) to the transparency of another layer, known as the base layer. The bottom layer defines where the clipped layers are visible, depending on its shape or layer mask. Understanding clipping masks can drastically improve your ability to work with layers in Photoshop, offering creative control for a variety of tasks, such as applying adjustments to specific layers or altering the shape of an image.
The Fundamental Concept: What is a Clipping Mask?
At its core, a clipping mask is a way to confine the visibility of one or more layers to the boundaries of a base layer. Imagine you have a photograph and you want it to appear only within the shape of a star. By using a clipping mask, the photograph layer will only be visible in the areas where the star layer has content. Any part of the photograph that lies outside the star's shape will be hidden.
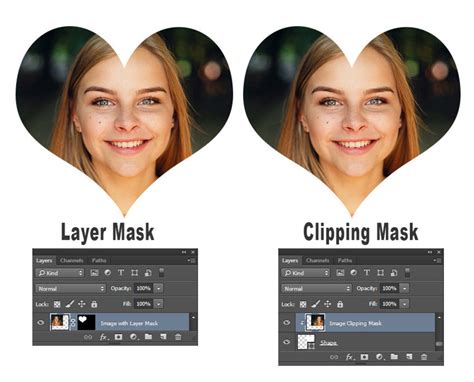
There are two primary types of masks in Photoshop: clipping masks and layer masks. While they share some conceptual similarities and can achieve similar visual results, their functioning and application differ significantly. A layer mask controls the transparency of its own layer by painting with black, white, and shades of gray. Black hides, white reveals, and gray creates semi-transparency. In contrast, a clipping mask utilizes the transparency of the layer beneath it to dictate the visibility of the layer above it.
The bottom layer, or base layer, dictates the visible boundaries for all layers directly above it that are clipped to it. For example, if you have a shape in the base layer, a photograph in the layer above it, and text in the topmost layer, only the areas where the base layer is visible will show the photograph and text layers. This creates a unified masked effect across multiple layers.
Creating Your First Clipping Mask: A Step-by-Step Guide
Creating a clipping mask in Photoshop is a straightforward process, requiring at least two layers in your project.
Step 1: Prepare Your Layers
First, ensure that the layer you want to clip (the content layer) is placed directly above the layer that will define the mask's shape (the base layer). The base layer can be a shape, text, a bitmap image, a vector object, or even a Smart Object.
Step 2: Establish the Clipping Mask
There are several ways to create a clipping mask:
- Using the Layer Menu: Select the top layer (the one you want to clip) in the Layers panel. Then, navigate to
Layer > Create Clipping Mask. - Using a Keyboard Shortcut: A faster method involves hovering your mouse cursor between the two layers in the Layers panel. Your cursor will change to a small arrow pointing downwards. Press and hold the
Alt(Windows) orOption(Mac) key on your keyboard, and then click.
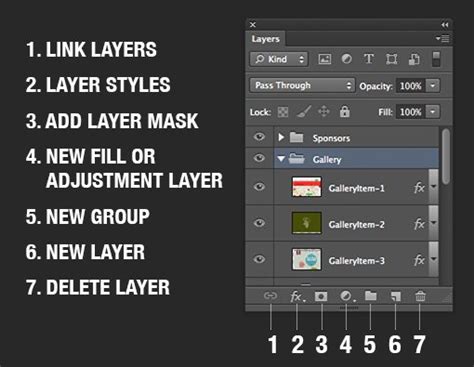
Once the clipping mask is created, the clipped layer will appear indented in the Layers panel, with a small downward-pointing arrow indicating its connection to the base layer below. The base layer itself will not appear to change visually, but its transparency or content now dictates what is visible in the clipped layer.
Step 3: Editing and Adjusting Your Clipping Mask
The beauty of clipping masks lies in their flexibility. You can easily edit the position and content of the clipped layers, as well as the base layer itself.
- Repositioning the Clipped Layer: To reposition the clipped layer, simply select it in the Layers panel and use the Move tool (
V) to drag it to a new location. Only the area of the clipped layer that moves over the visible content of the base layer will remain visible. - Editing the Base Layer: To edit the shape or content that determines the clipping mask, select the base layer (the shape or content layer) and use Photoshop's various tools to adjust its form. Remember that only the non-transparent part of the base layer will reveal the content of the layers above it.
- Editing the Clipped Layer's Content: If you wish to edit the content of the clipped layer itself, you can double-click on its layer thumbnail. This will often open the layer in its own window or as a Smart Object, allowing you to make changes that will then update within the clipping mask.
Advanced Clipping Mask Techniques for Creative Effects
Clipping masks are not just for simple shape containment; they can be employed for a wide range of creative applications.
Incorporating Textures and Patterns
Textures have a world of uses, whether you're editing or digitally painting. They can be effectively used as clipping masks to add intricate detail or artistic flair to your designs.
To use a texture as a clipping mask, you'll typically need to ensure the texture layer is in a format that defines its visible areas. For example, if you have a greyscale texture with white backgrounds, you might need to adjust its layer style to remove the white space, making it transparent. Then, place your desired image or graphic layer above this prepared texture layer and create a clipping mask. Whatever is black in the texture will reveal the image clipped to it.
Filling Vector Shapes and Text
Clipping masks are particularly useful for filling vector shapes or text with images.
- Create your shape or type: Use Photoshop's Shape tools or Type tool to create your desired element on a layer.
- Place your image: Drag and drop your chosen image onto a layer positioned directly above your shape or text layer.
- Create the clipping mask: Select the image layer and create a clipping mask. The image will now be confined to the boundaries of your vector shape or text.
This technique is ideal for social media posts, creating eye-catching graphics, or adding visual interest to typography. The original text remains fully editable, allowing for easy revisions.
Blend Image With Text in Photoshop (Tips & Tricks) - #DESIGN
Using Brush Strokes as Masks
The Hand Painted Brush Clipping Masks pack, mentioned in the provided information, offers 20 hand-painted brush strokes that can be used as clipping masks for an artistic effect. These are available as transparent bitmap .png files and scalable vector .svg files.
To use these:
- Create a new document in Photoshop.
- Place your chosen image on one layer.
- Import the brush stroke
.pngor.svgfile onto a layer above your image. - Create a clipping mask, linking the image to the brush stroke.
This method allows you to apply artistic, organic shapes to your photographs, producing unique and creative results, especially for social media content.
Combining Clipping Masks with Adjustment Layers
Clipping masks can be used in conjunction with adjustment layers to apply color, tonal, or curves adjustments to only specific areas of your image. By clipping an adjustment layer to a base layer that defines a particular shape or region, you can precisely control where the adjustments are applied, without affecting other parts of your composition.
Utilizing Blending Modes with Clipping Masks
Experimenting with different blending modes for your clipped layers can further enhance your creative possibilities. Blending modes alter how the pixels of a layer interact with the pixels of the layers beneath it, allowing for unique visual effects when combined with the masking provided by the clipping mask.
Understanding the Difference: Clipping Masks vs. Layer Masks
While both clipping masks and layer masks control visibility, their fundamental mechanisms differ:
- Layer Masks: These are painted directly onto the mask itself using grayscale values. Black hides the layer, white reveals it, and gray creates partial transparency. They are applied to a single layer.
- Clipping Masks: These are controlled by the transparency or content of the layer below them. The base layer acts as a stencil for all layers clipped to it. This allows for a group of layers to be masked by a single base layer.
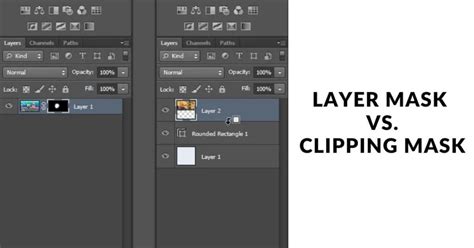
For instance, when you need to blend layers with soft, natural transitions, a layer mask is often the preferred choice. However, when you want an image to fit precisely within a clearly defined shape, such as text or a vector graphic, a clipping mask excels.
Troubleshooting Common Clipping Mask Issues
Occasionally, you might encounter issues with clipping masks, such as unwanted visible portions or transparency problems. Here are some common solutions:
- Check Layer Arrangement: Ensure the layer you want to mask is directly above the base layer.
- Verify Base Layer Content: The base layer must have defined content or transparency. A completely empty layer won't act as a mask. If you're using a shape or text, ensure it's not set to "no fill."
- Transparency Issues: If parts of your clipped layer are unexpectedly visible, examine the transparency of your base layer. Use the Brush tool with black to paint over any areas on the base layer that you want to hide. Conversely, if parts are hidden that shouldn't be, ensure those areas of the base layer have content.
- Editing the Shape: If you need to edit the shape that determines the clipping mask, select the base layer and use Photoshop's editing tools. Remember that only the non-transparent parts of the base layer will reveal the clipped content.
Beyond Photoshop: Clipping Mask Functionality in Other Software
The concept of clipping masks is not exclusive to Photoshop. Similar functionalities exist in other creative software:
- Adobe Illustrator: In Illustrator, clipping masks are used to mask a vector object or a group of objects. They work by defining a clipping path, which is the shape that masks the artwork.
- Procreate: The Procreate app also supports clipping masks, allowing users to confine artwork to the shape of a layer below it, mirroring the functionality found in Photoshop.
By mastering clipping masks, you unlock a powerful avenue for creative expression within Photoshop, enabling you to craft sophisticated visual effects and precisely control image composition.