Procreate offers a robust and intuitive system for managing layers, a fundamental aspect of digital art creation. Understanding how to effectively control, organize, and manipulate layers is crucial for artists of all levels, from beginners to seasoned professionals. This guide delves into the multifaceted world of Procreate's layer features, including essential actions like moving, locking, duplicating, and deleting layers, as well as the powerful capabilities of bulk editing and the specific process of unstacking artworks.
The Foundation of Layers in Procreate
At its core, Procreate's layer system allows artists to build up their artwork piece by piece, treating each element as an independent entity. This non-destructive workflow provides immense flexibility, enabling edits and adjustments without permanently altering other parts of the composition. Each layer exists in a stack, and their order significantly impacts the final appearance, with layers higher in the stack obscuring those beneath.
Understanding Layer States and Selection
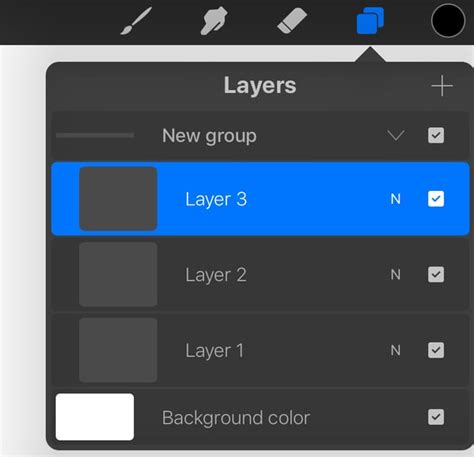
Within the Layers panel, you'll encounter different visual cues indicating a layer's status. Your Primary layer - the one you are currently actively working on - will be highlighted in bright blue. Secondary layers, which are selected alongside the primary layer for bulk actions, will appear in dark blue. When you select a Secondary layer, two new options become available at the top right of the Layers panel: Delete and Group.
A particularly useful feature for efficiently managing complex artworks is Layer Select. This function uses touch gestures to display all the layers associated with a specific area of your canvas. When Layer Select is active, as you move your finger or Apple Pencil across the canvas, layer-specific content will be highlighted. Lifting your finger or Pencil will then select the highlighted layer. If multiple layers overlap in that area, a pop-up panel will appear, listing all the available layers for you to choose from.
To enable Layer Select, navigate to Actions > Prefs > Gesture Controls > Layer Select. Here, you can configure touch and Apple Pencil shortcuts to seamlessly integrate this feature into your workflow. For users of the Apple Pencil Pro, Layer Select can even be assigned to the squeeze function within Gesture Controls, offering a hands-free way to select layers without direct screen interaction. It's important to note that the squeeze gesture can only be assigned to one function at a time.
Grouping and Ungrouping Layers
Procreate allows you to organize your layers into groups, which is invaluable for managing complex projects. You can select a Secondary Group by swiping right on it, or tap a Primary Group to select it. Once a group is selected, you can perform various Selection and Transform actions on all layers within that group simultaneously.
When you are painting, smudging, or erasing with a group selected in the Layers Panel, Layer Select will also become active, allowing for precise adjustments within that group. To ungroup layers, simply open the Layers Panel, tap on the group name, and then select Ungroup from the pop-up menu.
Manipulating Layer Order and Content
The ability to rearrange layers is fundamental to digital art. You can pick up a layer or Layer Group by tap-and-holding it, and then drag it up or down in the layer order to change its position in the stack. This "pick up and drag" functionality extends to selecting multiple layers. After tap-and-holding one layer to pick it up, you can then tap other layers to add them to your selection. While holding your selected layers, you can then tap your destination canvas with another finger to drop them into a new position.
To protect a completed layer from accidental edits, you can use the Lock function. A small padlock symbol will appear next to the layer name when it is locked. To reproduce an existing layer, the Duplicate option is available.
Layer Options: Rename, Select, Copy, Fill, and Clear
Tapping on a layer in the Layers panel brings up Layer Options, providing access to a range of actions. You can Rename layers, which is essential for keeping your projects organized. Layers added by default have sequentially numbered titles, but renaming them to descriptive labels greatly improves workflow.
The Select option within Layer Options is based on the alpha channel, or opacity level, of the layer's content. The higher the opacity of the content, the more of that area will be selected. This allows you to perform various actions on the selected area. However, for simply moving or copying all of a layer's content, using the direct selection methods is generally more efficient than relying on "Select" in the layer options.
Once image data is copied to the clipboard, you can paste it into another layer or a different Procreate canvas. The Fill Layer option will fill your entire layer with the currently selected color. If Alpha Lock is enabled on a layer, Fill Layer will only color the existing artwork on that layer, effectively filling only the opaque areas. The Clear option will remove the contents of the entire layer.
Advanced Layer Techniques: Masks and Clipping Masks
Procreate offers powerful tools for non-destructive editing through masks. Tapping your active layer in the Layers panel and selecting Mask creates a Layer Mask. The greyscale values of a Layer Mask control the visibility of the content on the layer beneath. Brighter values reveal more of the layer's content, while darker values hide it. By using different shades of grey, you can modify the opacity of the underlying content in a non-destructive manner.
A Clipping Mask functions similarly to an Alpha Locked layer but is not attached to a single specific layer. Instead, a Clipping Mask acts as a separate layer that can be linked to any other layer. This means you can move a Clipping Mask from one layer to another or stack multiple Clipping Masks above a single base layer. Clipping Masks are an excellent way to modify your content non-destructively, as you can easily remove or adjust them if you dislike the result.
Working with Multiple Layers and Bulk Actions
Procreate is designed to streamline your workflow, and bulk actions are a testament to this. You can control and edit multiple layers at once, performing bulk moving, grouping, deletion, or transformation.
To perform bulk actions, tap the Select button in the Layers panel to enter multiple selection mode. Then, tap on the layers you wish to select. Once multiple layers are selected, you can use the toolbar buttons to perform actions like Delete or Group.
Moving Multiple Layers
To move multiple layers simultaneously, first select them using the multiple selection mode. Then, tap and hold on one of the selected layers to "pick them up." While holding them, drag them to your desired position in the layer stack.
Merging Layers
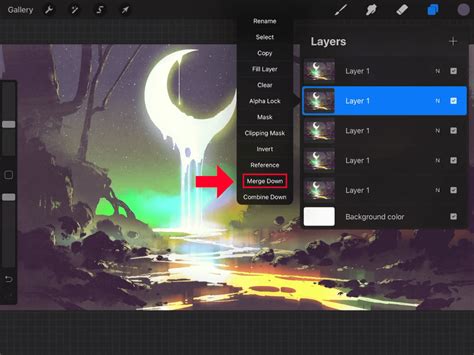
Merge Down combines the active layer with the layer directly below it. This action can be undone immediately with a two-finger tap. You can also merge multiple groups with a simple Pinch gesture. Pinch together the top and bottom layers you wish to merge. Merging layers will apply any blending mode to the pixels below. If you reach your layer limit, merging layers is an effective way to reduce the count. If you use "Combine Down" on a layer that sits directly above a Layer Group, the layer will merge into the group.
How To Merge Layers In Procreate
Organizing Your Gallery: Stacks and Unstacking Artworks
Beyond individual layers within a canvas, Procreate's Gallery provides a space to organize your entire collection of artworks. Bulk actions in the Gallery save significant time. Tap the Select button to enter multiple selection mode. You can then tap on canvases to select them. Once multiple artworks are selected, you can use the toolbar buttons to Share, Duplicate, and Delete.
Creating and Managing Stacks
To rearrange selected artworks and Stacks in your Gallery, tap and hold on an artwork to pick them all up. You can easily move artwork around by dragging and dropping an artwork thumbnail onto another thumbnail to merge them into a new stack. When you drag the first artwork over the top of another, the bottom artwork will turn blue, indicating it's ready to form a stack.
To drag and drop an artwork onto an existing Stack, use the same method. However, you must hold the top thumbnail for a moment longer until the Stack flashes blue twice to confirm the addition.
The Process of Unstacking Artworks
Stacking your artwork by project in Procreate is a great way to keep things tidy. However, situations arise where you need to move some or all of your artwork out of a stack. This process, known as unstacking, is straightforward.
Step 1: Open Your StackThe only way to extract artwork from a stack is by opening it first. Once Procreate is open, simply tap on a stack you have created to view the artwork inside.
Step 2: Select Artwork to MoveWith your stack open, begin selecting the artwork you wish to move out. There are two primary methods for selection:
- Select Method: Tap on the word "Select" in the top right corner of the screen. Checkboxes will appear next to each artwork, allowing you to tap and select individual pieces.
- Gesture Select Method: Press and hold down on one artwork. You will see it lift towards your finger. While still pressing down, use your other hand to tap on other artworks. They will automatically select and "pull up" as well. A number counter will display the quantity of artwork you have selected.

Step 3: Move Artwork Out of StackThe final step involves moving the selected artwork out of the stack. The exact method depends on how you selected the artwork:
- Using the Select Method: For individually selected artwork, you will need to hold your finger or Apple Pencil down on the selected artwork to move them all together. Tap on the (< Stack name) button at the top left of the toolbar to navigate out of your stack. Crucially, do not lift your finger while holding the artwork. Once you are out of the stack, simply drop your artwork into the desired location in the Gallery.
- Using the Gesture Select Method: Still holding down with your selected artwork, simply tap on the (< Stack name) button at the top left of the toolbar to exit the stack. Again, do not lift your finger while holding the artwork. Once you are out of the stack, release your finger to drop the artwork.
By mastering these layer and gallery management techniques, you can significantly enhance your efficiency and creative control within Procreate, ensuring your digital art projects are both organized and beautifully executed.