For photographers and designers working with digital images, the ability to quickly generate a visual overview of multiple photos is invaluable. This overview, commonly known as a contact sheet, allows for efficient browsing and selection of images. Adobe Photoshop, a leading image editing software, offers functionalities to create these contact sheets, though the process has evolved across different versions and may require specific steps depending on your software. This guide aims to provide a thorough understanding of how to create a contact sheet in Photoshop, drawing on the experiences and solutions shared by users.
Understanding the Contact Sheet and Its Evolution in Photoshop
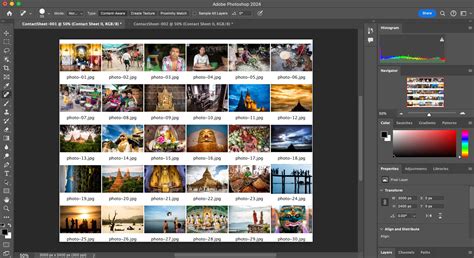
A contact sheet, in essence, is a grid of thumbnail images, each representing a larger photograph. Historically, this term originated from the practice of printing small, uncropped versions of film negatives directly onto photographic paper, allowing photographers to review their shots without needing to make full-size prints. In the digital age, contact sheets serve a similar purpose: providing a compact visual index of a collection of images.
Photoshop CS5 Contact Sheets
Adobe recognized the utility of this feature and integrated it into Photoshop, often through a dedicated tool or plugin. The "Contact Sheet II" plugin was a popular and effective solution for many users. However, it's important to note that Adobe has, at times, removed or altered the availability of certain features, including the Contact Sheet II plugin, from mainstream versions of Photoshop. This has led to a fragmented user experience, where some versions include the feature directly, while others necessitate additional steps for installation or may rely on alternative software.
Navigating Photoshop Versions: CS5 and Beyond
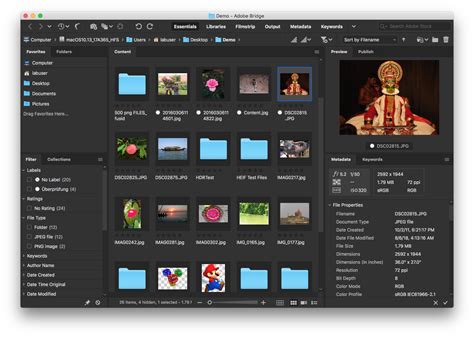
The user experience with creating contact sheets in Adobe Photoshop has varied significantly across different versions. For instance, in Adobe Photoshop CS5, the Contact Sheet II functionality was notably absent from the standard installation. This led many users to seek out workarounds. One common approach was to utilize Adobe Bridge, a digital asset management application that often comes bundled with Photoshop. By selecting the desired images within Bridge, users could then access the "Contact Sheet" option, typically found under the "Tools" menu. This method leverages Bridge's ability to interact with Photoshop's automation features.
Another significant observation from user experiences is that when attempting to install downloaded Contact Sheet II files, they often do not automatically integrate into Photoshop's "Automate" menu as one might expect. Instead, these files frequently launch Adobe Elements, another Adobe product that includes its own functional contact sheet creator. This redirection highlights a key challenge: the plugin files themselves might be functional, but their integration into the primary Photoshop application is not always seamless, especially in versions where the feature was intentionally omitted.
The Plugin Installation Process: A Deeper Dive
For users who found the Contact Sheet II plugin missing from their Photoshop installation, particularly in versions like CS5, a common solution involved manual installation. The process generally entails downloading the plugin files, which often come in a ZIP archive. Once unzipped, these files need to be placed in the correct directory within the Photoshop installation folder.
The typical path for this involves navigating to the "Plug-ins" folder within the Adobe Photoshop CS5 (or relevant version) directory. The exact location can vary slightly depending on the operating system and installation choices, but a common route on Windows would be something like: Users > Program Files > Adobe > Adobe Photoshop CS5 > Plug-ins. Users are instructed to copy the downloaded plugin file (or folder) directly into this "Plug-ins" folder. After the files are placed, it is crucial to restart Photoshop for the new plugin to be recognized and appear in the software's menus, usually under "File > Automate."
The success of this manual installation method has been confirmed by users who have successfully re-loaded older versions of Photoshop, downloaded the necessary plugin package, and found it working as expected. This method underscores the importance of understanding the underlying file structure of Photoshop and how plugins are integrated.
Alternative Solutions and Workarounds
When direct integration proves challenging, or when a particular Photoshop version lacks the desired feature, users often turn to alternative software or methods. As mentioned, Adobe Elements provides a built-in contact sheet generator that is often triggered when attempting to use downloaded Photoshop contact sheet plugins. For those who have access to Elements, this can be a straightforward and effective solution. Images can be moved over to Elements, where the contact sheet creation process is typically more intuitive and directly accessible.
Another avenue explored by users is the "Goodies" disc that sometimes accompanied older versions of Photoshop, such as CS5. These discs often contained supplementary software, plugins, and assets that were not part of the core installation but could be added manually. If a "Goodies" disc is available, it's a prime location to search for the Contact Sheet II plugin.
Furthermore, the Photoshop online help resources, often accessible through the "Help" menu within the application, can be a valuable source of information. These resources sometimes include links to downloadable PDF User Guides. For example, PDF User Guides for CS4 and CS5 have been known to detail the inclusion and usage of Contact Sheet II, often referencing specific page numbers (like page 569 for CS5) where the feature is explained. Accessing these guides can provide explicit instructions on how to locate and utilize the contact sheet functionality, even if it's not immediately apparent in the software's menus.
Step-by-Step Guide for Contact Sheet Creation (General Approach)
While the exact menu paths may differ slightly between Photoshop versions, the general process for creating a contact sheet, especially when the plugin is correctly installed or accessed via Bridge, follows a logical sequence.
Image Selection: The first step involves identifying and selecting the images you wish to include in your contact sheet. This can often be done within Adobe Bridge by navigating to the folder containing your photos, selecting them all (or a specific subset), and then initiating the contact sheet process. Alternatively, if the plugin is directly integrated into Photoshop, you might select files within Photoshop or be prompted to choose a folder.
Accessing the Contact Sheet Tool:
- Via Adobe Bridge: With images selected in Bridge, go to the "Tools" menu, then navigate to "Photoshop," and select "Contact Sheet."
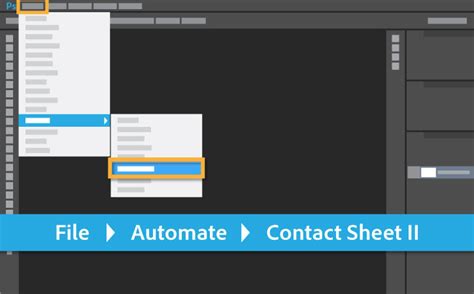
- Via Photoshop's Automate Menu: If the Contact Sheet II plugin is correctly installed in Photoshop, you would typically go to "File" > "Automate" > "Contact Sheet II."
Configuration Options: Once the Contact Sheet II dialog box opens, you will be presented with several options to customize your contact sheet:
- Document Settings: Specify the width, height, and resolution of the final contact sheet document. You can also choose the color mode (e.g., RGB or Grayscale) and bit depth.
- Thumbnail Placement: This is a crucial setting that determines how the images are arranged. You can define the number of columns and rows, or the number of images across and down the page.
- Image Placement Options: You can choose to maintain the aspect ratio of the thumbnails, add captions (often derived from file names), and control the spacing between images.
- Font Settings: If you opt for captions, you can select the font, size, and color.
Execution: After configuring all the desired settings, click "OK" or "Create." Photoshop will then process the selected images and generate the contact sheet as a new document.
Considerations for Optimal Results
When creating contact sheets, several factors can influence the final output and usability:
- Image Quality: While contact sheets are primarily for visual reference, starting with reasonably sized and well-exposed images will yield a clearer overview. Extremely small or poorly exposed source images will result in illegible thumbnails.
- Resolution of the Contact Sheet: For print purposes or detailed review, a higher resolution for the contact sheet document is recommended. For web use or quick previews, a lower resolution might suffice.
- Layout and Spacing: Experiment with the number of columns and rows, as well as the spacing between thumbnails, to find a balance between fitting many images on one page and ensuring each thumbnail is distinct enough to be identifiable.
- Captions: Adding file names as captions can be extremely helpful for quickly referencing specific images, especially when dealing with a large number of files. Ensure the font and size are legible against the thumbnail background.
By understanding the history of the contact sheet feature in Photoshop, navigating the variations across different software versions, and employing the correct installation and usage procedures, users can effectively create these valuable visual indexes for their image collections. Whether through direct integration, the use of Adobe Bridge, or manual plugin installation, the ability to generate a contact sheet remains a powerful tool in the digital imaging workflow.