You see them all the time. Those awesome looking YouTube thumbnails with the white outlines around the images without backgrounds. I love the way these look. If you’re reading this, you probably do too. This seemed like it would be an easy thing to do. It wasn't as easy as I expected. After a quick Google search, I realized that it was actually a bit more involved than it seemed on the surface. This article was written because I wanted to simplify it as much as possible for you. For this tutorial, you will need to buy Photoshop, as a free alternative that can achieve the same quality of white outlines around images has not yet been identified.
Preparing Your Image for a Clean Cut: The Importance of Contrast
Removing backgrounds is much easier if you have a strong contrast between the background (what you want to remove) and the foreground (the part you want to keep). This principle is fundamental to achieving a clean separation, which is crucial for a professional-looking outline. If you don't have a green screen, try to create a strong contrasting background that doesn't have similar colors to the foreground. This will significantly simplify the selection process in the subsequent steps. A well-chosen background can be the difference between a tedious editing session and a quick, efficient workflow.
I Sucked at Editing Photos, Until I Learned This.
Step 1: Opening Your Image in Photoshop
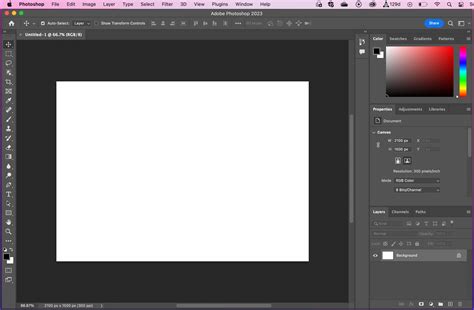
The journey begins with opening the image you intend to work with. Open Photoshop, select "Open," and then choose the picture that you want to work with. Alternatively, you can create a new file and drag the image onto the background. However, opening the image directly is often preferred as it typically requires removing only one background layer, simplifying the process compared to managing multiple layers from the outset. This initial step sets the stage for all subsequent manipulations.
Step 2: Isolating the Foreground with Precision
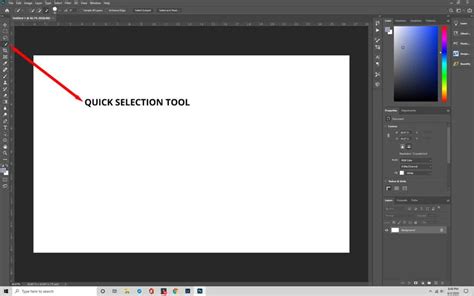
Once your image is open, the next critical step is to accurately select the foreground from the background. The Quick Selection Tool is an excellent starting point for this task. If you have a well-defined background with clear distinctions, this tool often performs admirably. However, if the separation is less obvious, you will need to dedicate more effort to precisely crop the foreground from the background.
Should parts of your image not be identified correctly by the Quick Selection Tool, you will need to utilize its "+" and "-" features. These allow you to meticulously add or subtract from the selected area, ensuring that only the desired foreground elements are included.
The zoom feature is an indispensable ally during this fine-tuning process. Zoom in as close as possible to ensure there are no rough edges or unwanted background artifacts remaining. Leaving too many imperfections will ultimately result in a less polished and potentially "weird" looking final product. Strive to remove the background and keep the foreground with the utmost accuracy. While precision is key, it's also important not to get bogged down by minor imperfections. Often, cropping the image further can be a more efficient way to avoid excessive editing on small details. This stage may require a bit of practice, especially when working with images that lack strong shadows or distinct contrasts. However, with a clear subject and a contrasting background, the Quick Selection Tool can be remarkably effective.
Step 3: Separating the Foreground onto Its Own Layer
After successfully selecting your foreground, the next action is to "bring it forward" by copying and pasting it as its own distinct layer. This action effectively isolates the selected portion from the original background.
- On a Mac: Use the keyboard shortcut CMD + C to copy and then CMD + V to paste.
- On a PC: Use the keyboard shortcut CTRL + C to copy and then CTRL + V to paste.
This operation will "separate" the part you’ve selected from the background, and it will now appear as its own independent layer within your Photoshop document. This is a pivotal moment where your desired subject is truly isolated.
Step 4: Decluttering Your Layers: Removing the Original
With your foreground now on its own layer, it's time to clean up your workspace. You should now have at least two layers if you opened the image directly, and potentially three if you initially pasted the image into a new project. These layers typically include:
- The original image.
- The foreground image you've selected (the part you want to keep).
- The original background (this layer is only present if you dragged the file into a new document).
Your next action is to delete the original image layer and, if applicable, the original blank background layer. By doing so, you will be left with only the selected foreground, now presented against a transparent background. This transparency is the foundation for applying outlines effectively.
Step 5: Accessing Layer Styles: The Gateway to Outlines
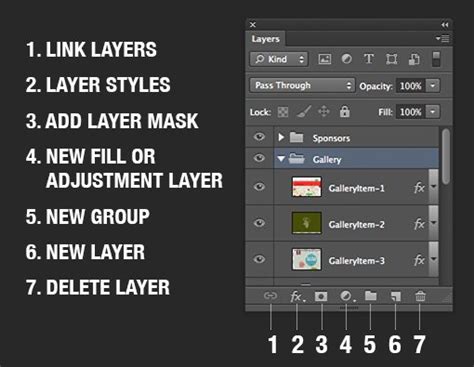
Now that your layer contains only the isolated foreground with a transparent background, you can begin applying stylistic effects. Right-click directly on this layer in the Layers panel. From the context menu that appears, select "Blending Options." This action opens a powerful dialog box that allows for a wide range of visual modifications to your layer.
Step 6: Applying the "Stroke" Effect for Your Outline
Within the "Blending Options" dialog box, locate and select the "Stroke" option. As soon as you apply this, you should observe an outline appearing around your image. The "Stroke" effect is precisely what creates the desired outline.
From within the "Stroke" settings, you have the ability to edit the appearance of the outline to your exact specifications. This includes adjusting the width of the stroke, which determines how thick the outline is, and the color of the outline itself. While this tutorial focuses on a white outline, you can choose any color to match your design needs. Once you have configured the stroke to your liking, you can save these settings as a default. This means that the next time you need to apply the same type of outline, you can simply recall these saved preferences, saving you time and ensuring consistency across your projects.
The "Stroke" option in Photoshop offers several parameters to fine-tune:
- Size: This directly controls the width of the hard-edged outline. A larger size results in a thicker outline, while a smaller size creates a more subtle edge.
- Position: You can choose whether the stroke is applied to the inside, outside, or center of the layer's edges. For most outline effects, "outside" is the common choice.
- Color: This is where you select the hue for your outline. For the popular YouTube thumbnail look, white is the typical choice.
- Opacity: This setting determines the transparency of the stroke. A 100% opacity means the outline is fully solid, while lower values will make it semi-transparent.
- Blend Mode: Similar to other layer blending modes, this controls how the stroke interacts with any underlying pixels. "Normal" is usually sufficient for standard outlines.
It's important to understand that the "Stroke" effect primarily applies to areas containing opaque pixels on a layer. This is why having a clean selection with a transparent background is crucial; the stroke will only appear around the actual content of your image.
Step 7: Exporting Your Masterpiece for Wider Use
With your outline successfully applied and your background removed, the final step is to export your completed image. To ensure that the transparency is preserved and the outline is visible as intended, export the file as a .png file. This format is widely supported and maintains transparency, making it ideal for use in other design tools.
You can then seamlessly import this .png file into other applications such as Canva or RelayThat to finalize your YouTube thumbnails or other graphic designs. While this tutorial focuses on Photoshop for the outline creation, feel free to use Photoshop for the entire design process if you prefer. For those exploring alternative image generation tools, Depositphotos AI image generator is another option worth investigating.
Here is an example of an end product that can be created by following these steps, often finished in tools like Canva after the Photoshop outline process:

Understanding the Tools: Fill Layers and Color Selection
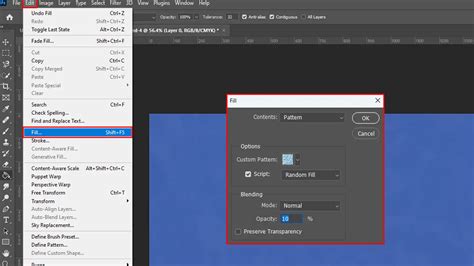
While the "Stroke" layer style is the primary method for creating outlines, understanding related Photoshop tools can enhance your editing capabilities. For instance, the Paint Bucket Tool is designed to fill an area with a color that is similar in value to the pixels you click on. This tool is particularly useful when dealing with solid color areas or when preparing a base for further manipulation.
When using fill or pattern applications, you might encounter the concept of a fill layer. A fill layer allows you to apply a solid color, gradient, or pattern to your image without directly painting on the image pixels. This non-destructive approach offers greater flexibility for adjustments later on.
The process of selecting a color from the Color Picker is fundamental to any graphic design work. This universally recognized dialog allows you to choose precise hues, saturation, and brightness values for your colors, ensuring accuracy in your designs. When using fill options, you'll often be prompted to "Select a color from the Use menu" and then choose "Color," followed by selecting from the Color Picker. This ensures that the fill adheres to your chosen color scheme.
It's also worth noting the nuances of color similarity. The "Use menu" in color selection tools often has a setting that defines how similar in color filled pixels must be to the clicked pixel. This tolerance level, often referred to as "Tolerance" or "Fuzziness," dictates how broadly the fill tool will spread. Adjusting this can be crucial for selecting specific areas or for avoiding unintended fills in areas with subtle color variations. The "contiguous" option within fill tools determines whether the fill extends only to pixels that are touching the initial click point or if it will fill all similar pixels in the entire image, regardless of proximity.
By mastering these fundamental tools and techniques, you can not only create striking outlines but also gain a deeper understanding of Photoshop's broader capabilities for image manipulation and graphic design. The ability to create a clean, well-defined outline is a valuable skill for anyone looking to enhance their visual content, from social media graphics to professional presentations.