DaVinci Resolve color grading is an indispensable tool for anyone looking to elevate their video content. It empowers creators to correct, enhance, and artfully manipulate the colors, contrast, and brightness of their footage, transforming ordinary clips into visually compelling narratives. This guide delves into the intricacies of DaVinci Resolve's color grading capabilities, from fundamental color correction to advanced AI-driven enhancements, making it accessible for both beginners and seasoned professionals.
Understanding the Foundation: What is Color Grading and Why is it Important?
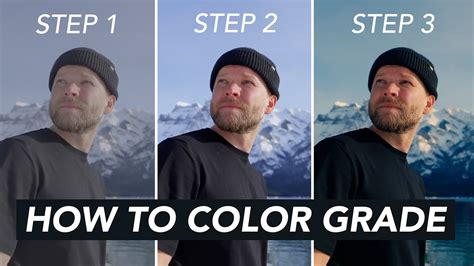
Color grading is the process of altering and enhancing the color of a video, often for aesthetic reasons. It's not just about making things look pretty; it's a powerful storytelling tool that can dramatically affect the mood, tone, and emotional impact of a scene. While often stemming from color theory, the practical application begins with basic color correction.
Color correction is the crucial first step, aiming to recover elements that may have been lost during shooting, especially when filming in a "flat" or log profile. This involves adjusting aspects like tones, saturation, and contrast to achieve a balanced and neutral starting point. Without proper color correction, the subsequent grading process can be significantly hindered. DaVinci Resolve is a beneficial tool for both color correction and grading, offering precise control over these elements.
The DaVinci Resolve Color Page: Your Creative Hub
The DaVinci Resolve Color page is where the magic happens. It provides a comprehensive suite of tools designed for both artistic expression and technical precision. Whether you're a student experimenting with your first video or a professional colorist working on a Hollywood feature, the Color page offers hundreds of artistic tools within an intuitive, node-based interface. This node-based system allows for complex grading workflows without compromising image quality, a significant advantage over traditional layer-based systems.
The software supports a vast range of formats, including wide color gamut and HDR images, all processed with DaVinci's renowned 32-bit image processing for exceptional, professional results. The color page allows you to manipulate color in creative and artistic ways that dramatically affect the mood of a scene, making it an incredibly powerful part of the storytelling process.
Essential Tools for Color Correction and Grading
DaVinci Resolve equips users with a robust set of tools to achieve any desired look. Understanding these tools is key to unlocking the full potential of your footage.
Primary Correction Tools: The Building Blocks
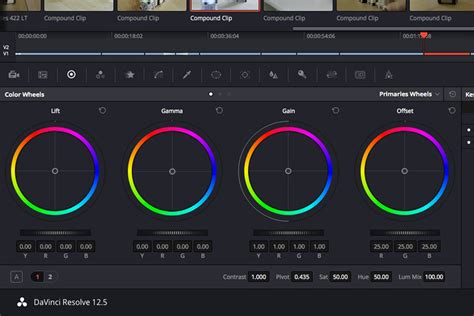
Balancing color is the foundational step in the color correction process, and this is where the primary correction tools come into play. Located at the bottom left of the Color page, these tools affect the entire image and are used to adjust brightness and color levels to remove unwanted tints and establish a neutral starting point.
- Color Wheels: The primary color wheels are central to this process. Each wheel is mapped to a different part of the tonal range: lift (shadows), gamma (midtones), and gain (highlights). You can click and drag within a wheel to adjust its color, and use the master dial below each wheel to change its overall level. These wheels allow you to adjust balance and brightness in overlapping tonal ranges. The primary palette also includes adjustment controls, primary bars, and log controls for more nuanced adjustments.
- Primary Palette Controls: Beyond the wheels, the primary palette offers incredibly powerful adjustment controls. You can quickly adjust image contrast, saturation, hue, temperature, tint, midtone detail, color boost (vibrance), shadows, highlights, and more. Midtone detail, for instance, allows you to adjust contrast in areas with high edge detail to increase or decrease image definition or sharpness. Color boost, or vibrance, intelligently adjusts areas of an image with low saturation, providing a subtle and more natural-looking increase in color.
- Primary Bars: These offer an alternative to the color wheels, allowing for more subtle changes to individual color channels and luminance.
- Log Grading Wheels: These wheels provide more tightly defined tonal ranges for shadows, midtones, and highlights compared to the primary wheels, offering another layer of control.
Auto Balance and Shot Match: Consistency is Key
Achieving consistent color and exposure across different shots can be time-consuming. DaVinci Resolve offers automated solutions:
- Auto Balance: With a simple click of the "Auto Color" button, Resolve can quickly balance the color and contrast of a group of similar shots, providing a solid starting point.
- Shot Match: This feature is invaluable for matching the color, contrast, and brightness between different shots. Simply select a clip, right-click on another clip, and choose "Shot Match to This Clip." Resolve will then attempt to harmonize the selected clip with the reference clip.
Curves Tool: Sculpting Your Image
While primary wheels offer broad control, the Curves tool provides a much finer level of control for sculpting the color and contrast of an image. Accessible by clicking the first icon in the center palette, each curve allows you to adjust specific regions of the image based on hue, luminance, or saturation.
- Custom Curves: The default "custom" curves allow independent adjustment of red, green, blue, and luminance curves, guided by a live histogram.
- Specialized Curves: Beyond the custom curves, DaVinci Resolve offers five specialized curves for more targeted adjustments:
- Hue vs. Hue: Alter any hue to any other hue, ideal for subtle changes.
- Hue vs. Sat: Adjust the saturation of any hue within the image.
- Hue vs. Lum: Modify the lightness of elements of a specific color.
- Lum vs. Sat: Increase or decrease saturation in different tonal areas with a smooth falloff.
- Sat vs. Sat: Adjust a specific range of saturation without affecting the rest of the image.
The Curves tool lets you adjust luminance and color based on user-defined tonal areas, offering immense creative flexibility.
Color Grading using Curves | DaVinci Resolve Tutorial
Secondary Grading: Precision Targeting
Secondary grading involves isolating and adjusting specific areas of an image without affecting the rest. This is crucial for targeted corrections and creative enhancements.
- Qualifier Palette: This tool allows you to select and adjust a part of an image based on its hue, saturation, or luminance. By using an eyedropper tool, you can select an area, and Resolve highlights it. The "magic wand" icon lets you visualize your selection or "key."
- Power Windows: While qualifiers target areas based on color, luminance, or saturation, Power Windows allow you to define selections by drawing shapes (circles, squares, custom shapes using a pen tool, or gradients) around specific objects. You can then adjust the size, soften the edges, and track these windows to follow moving objects in a scene using the built-in tracker. The tracker analyzes the camera's movement (pan, tilt, zoom, rotation, 3D perspective) and animates the Power Window accordingly.
Nodes: The Backbone of Resolve Grading
Nodes are fundamental to organizing and managing color grades in DaVinci Resolve. Each node acts as a separate step in the grading process. The first node is typically used for initial image balancing, while subsequent nodes are dedicated to more creative work, such as isolating and enhancing the sky or smoothing skin tones. This node-based workflow allows for complex, non-destructive grading, enabling you to create unique looks without compromising image quality. The node editor, resembling a flowchart, illustrates how the image progresses through each correction and effect.
- Applying Adjustments: A common workflow involves applying Exposure adjustments in the first node, Contrast and Saturation in the second, and Hues in the third.
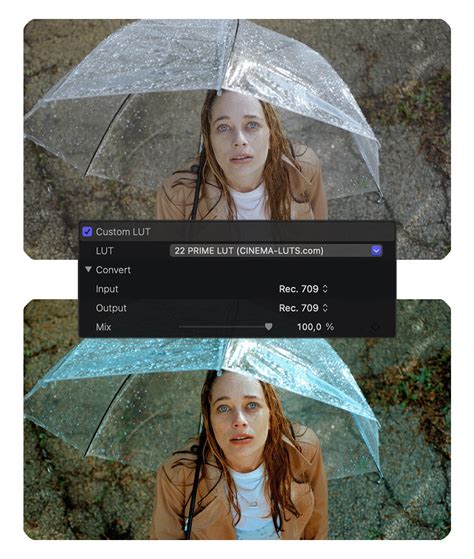
LUTs (Look-Up Tables): Instant Style
LUTs are preset color templates that can instantly give your footage a polished and consistent look. They are incredibly useful for matching colors across different cameras or achieving a specific aesthetic quickly. DaVinci Resolve supports the application and creation of LUTs, allowing for rapid stylistic changes.
Leveraging AI for Enhanced Color Grading
Artificial intelligence is increasingly influencing post-production workflows, and color grading is a prime example. DaVinci Resolve integrates AI-powered tools to streamline and enhance the grading process.
DaVinci Neural Engine: Intelligent Processing
The DaVinci Neural Engine is at the core of Resolve's AI capabilities. It uses machine learning to analyze footage and make intelligent decisions, automating complex tasks and freeing up creators to focus on their artistic vision.
- AI-Powered Editing Tools: While this guide focuses on color grading, it's worth noting Resolve's AI editing tools. Tools like Scene Cut Detection automatically slice up long footage, and AI Set Extender can expand scenes using text prompts. The intelligent subject tracking and reframing also contribute to efficient editing.
- Magic Mask: This powerful AI tool allows you to isolate a subject with a simple stroke. Resolve's AI then analyzes and tracks the subject frame by frame, creating a mask without manual rotoscoping. This is invaluable for targeted color adjustments or lighting enhancements.
- Depth Map: This AI feature can create sophisticated background blurs or subtly alter lighting on your subject, adding a professional, cinematic depth to your footage.
- Auto Color and Shot Match: As mentioned earlier, these AI-driven features provide automated color balancing and matching, saving significant time.
Third-Party AI Enhancers: Pushing the Boundaries
Beyond Resolve's native AI, external tools can further elevate your color grading. AnyEnhancer is an AI color grading and video enhancer that offers advanced tools for achieving the highest quality results. Its Color Enhancement Model adds vibrancy and polish, making footage stand out. AnyEnhancer also provides other useful AI features, including Face Restoration, Frame Interpolation, Denoise, and Resolution Enhancement.
Using AnyEnhancer (General Steps):
- Download and install the application.
- Open the application.
- Import your video file.
- Select the desired AI enhancement model (e.g., Color Grading).
- Preview the changes.
- If satisfied, export the enhanced video.

Advanced Techniques and Workflows
DaVinci Resolve offers advanced features for professionals and those seeking deeper control.
High Dynamic Range (HDR) Grading
DaVinci Resolve Studio provides advanced tools for grading Wide Color Gamut and High Dynamic Range (HDR) images. This is made possible through 32-bit image processing, industry-standard HDR output, and Resolve Color Management. The software supports Dolby Vision, HDR10+, and HDR Vivid metadata palettes, along with HDR mode node adjustments, HDR color space transforms, and HDR monitoring using built-in scopes.
Modern digital cinema cameras capture a vast dynamic range, offering incredible potential. However, balancing extremely bright highlights or very dark shadows can be challenging. The HDR palette in Resolve allows for precise adjustments across different tonal ranges, from shadows and highlights to super blacks and specular whites. You can even create custom tonal ranges for unique media requirements.
RAW Image Processing
DaVinci Resolve works with virtually all native camera RAW formats, allowing you to process files directly from the camera's sensor without compression. The RAW palette provides complete control over highlight recovery, white balance, gamma, exposure, color temperature, tint, sharpness, and more. This RAW image processing is non-destructive and occurs before the node editor input, ensuring you're reinterpreting the original sensor data.
ResolveFX and Plug-ins
The Color page features a library of over 90 GPU and CPU accelerated ResolveFX plug-ins. These can be added to any node to enhance images and add effects, ranging from blurs and color effects to glows, lens flares, vignettes, beauty tools, sharpening, stylization, and transformations.
- Face Refinement Tool (Studio): This AI-powered tool automatically detects faces, creates masks for different facial features, and tracks them, saving countless hours of manual work. You can then use sliders to sharpen eyes, remove bags, smooth skin, add blush, and more.
- ResolveFX Beauty: This tool offers advanced control for corrective beauty work, with stronger filtering algorithms for more natural results.
- Object Removal (Studio): Using Power Windows, tracking, and the object removal plug-in, you can remove unwanted objects from a shot. The DaVinci Neural Engine analyzes the scene using machine learning to determine how to remove the object.
- Patch Replacer: This tool acts like a clone or rubber stamp, allowing you to quickly paint over and replace parts of an image, ideal for removing blemishes or small imperfections.
- RGB Mixer: This tool allows for precise adjustments to the presence of red, green, and blue within your image.
Scopes: Objective Measurement
Color is perceived differently by everyone and under various lighting conditions. Professional scopes provide an objective way to measure and evaluate color data. The scopes palette includes:
- Parade Scope: Shows if one color channel is stronger than others.
- Waveform: Displays luminance and color values overlaid on each other.
- Vectorscope: A circular graph representing hue and saturation levels.
- Histogram: A graphical representation of each channelâs tonal distribution.
- Chromaticity Scope: Helps determine if colors are within the boundaries of your project's delivery format.
Gallery and Comparisons: Refine and Review
The Color page's "gallery" allows for efficient organization, sharing, and reuse of grades. You can quickly copy grades by middle-clicking a clip, save grades as "stills," and organize them into albums. Comparison tools like "image wipe" and split-screen modes allow for side-by-side comparisons of different grades or versions of a grade. The "lightbox" view displays every clip in your timeline as a thumbnail with its applied grade, providing a holistic view of the project's color flow and helping to spot inconsistencies.
AI-Driven Workflow Example
Here's a simplified workflow incorporating AI tools:
- Media Import: Bring clips, audio, and reference files into the Media Pool.
- Scene Cut Detection: Use this AI tool to automatically slice up long footage if needed.
- Fairlight Tab: Employ Voice Isolation and Dialogue Leveler for clean audio.
- Color Page:
- Use Magic Mask to isolate subjects for targeted adjustments.
- Apply Auto Color for a quick, balanced starting point.
- Utilize Shot Match to ensure consistency across clips.
- Experiment with AI-driven Depth Maps for creative depth.
- Graphics and Text: Integrate motion graphics or text, potentially created in Resolve or imported from other software.
- Deliver Tab: Choose platform presets and export your final video.
This AI-powered workflow significantly reduces the time spent on technical tasks, returning valuable creative freedom.
The Future of Color Grading: AI and Beyond
The integration of AI into DaVinci Resolve is not about replacing human creativity but augmenting it. Tools like VideoGen and ImageEdit, alongside Resolve's native AI features, offer unprecedented efficiency and creative possibilities. As AI continues to evolve, we can expect even more sophisticated tools that further blur the lines between technical execution and artistic vision in color grading. Whether you're a novice or a seasoned professional, embracing these tools will undoubtedly enhance your ability to craft visually stunning and impactful videos.