In the realm of digital art and photo manipulation, the ability to precisely alter an image's background is a fundamental skill. Photopea, a powerful and accessible web-based image editor, offers a versatile toolkit for achieving this, from simple solid color changes to more complex textured background replacements. This tutorial delves into the various methods Photopea provides, empowering users to transform their images with new backgrounds and refined subject isolation.
Understanding the Background in Image Editing
In image editing, the background refers to the area behind the main subject of a photo. It provides context, depth, and atmosphere to an image but is often altered or removed to enhance the subject's focus. A background can be a simple solid color, a detailed landscape, or a textured pattern. A background is not always static; what is considered a background in one image may be the main subject in another. For example, a scenic beach might be the focus in a landscape photo but serve as the background when highlighting a person in a portrait. Altering a background can dramatically change an image's purpose. A product photographer may remove background distractions to create a clean, professional look for e-commerce. A digital artist may replace a dull sky with a vibrant sunset to add drama to a scene. The complexity of a background also affects how it is removed or replaced. A simple white backdrop is easy to remove, while a busy background with intricate details requires more advanced selection tools.

The Crucial First Step: Subject Selection
To effectively change or add a new background, the initial and most critical step is to accurately select the main subject of the image. Photopea offers a range of selection tools, each suited to different scenarios. Artificial Intelligence can be a great time-saver, but there are instances when it doesn’t function as expected. For many images, the automatic selection tools are the quickest and most efficient.
Leveraging Automatic Selection Tools
Photopea offers several selection tools. For our image, the "Select Subject" option will work great. This AI-powered feature analyzes the image and attempts to automatically identify and select the primary subject. When you select any of the above available tools for selection, a new Options Bar will appear, offering further control.
The quickest method is to select the Magic Wand, Quick Selection, or Object Selection tools. That will bring up the "Select Subject" option in the Options Bar. If the results from the "Select Subject" feature are not too great, you can use another selection tool to refine the selection.
Precision with Manual and Semi-Automatic Tools
If the automatic selection isn't perfect, or for more intricate subjects, manual and semi-automatic tools provide greater control.
- Magnetic Lasso Select: This tool is particularly useful for selecting subjects with well-defined edges. Simply click on the edge of the subject, then move the cursor around the edges of the subject. The tool will attempt to "snap" to the edges of contrasting pixels, creating a selection that adheres closely to the subject's outline.
- Quick Mask Mode: To ensure you never miss an area and to refine your selection with precision, Photopea offers Quick Mask Mode. Press the 'Q' key on your keyboard to enter this mode. In Quick Mask Mode, you can use the Brush Tool to paint over areas you want to add to or exclude from your selection. Anything you paint in black will turn red and will be hidden (excluded from the selection), while painting in white will add to the selection. This provides a visual representation of your selection, making it easier to spot and correct errors.
- Unite Feature: When using selection tools that allow for multiple selection actions, the "Unite" feature in the Options Bar is invaluable. With the image still selected, go to the Options Bar and select "Unite." Unlike when using the selection tool in other cases, with the Unite feature turned on, you don’t need to join the first and last point to complete a selection; it automatically merges new selections with the existing one.

Changing the Background Color: Solid and Textured
Once your subject is precisely selected, the process of altering the background becomes straightforward. Photopea offers methods for both solid color backgrounds and more complex, textured ones.
Replacing a Solid Background Color
Now that the subject is selected, the next step is to change the background color. With your subject selected, you can invert the selection to target the background. Go to Select > Inverse. Now, the background is selected.
The Color Picker will pop up. From there, select the color that you want and click "OK." You will notice that the color will be applied to your selection. This method is effective for creating a clean, uniform background.
Addressing Shadows and Depth
As you might notice, sometimes when changing the background, the original shadows that gave depth to the subject can be lost. To add the shadow back, we need to use a blending mode. This often involves creating a new layer for the shadow and adjusting its opacity and blend mode (e.g., Multiply) to make it appear natural.
How to Remove Backgrounds & Keep the Shadows in Photoshop | Quick Tips!
Changing the Color of a Textured Background
Not every photo you work on will have a solid color background. For images with textured backgrounds, the approach to color alteration shifts from direct replacement to color adjustment of the existing texture.
Using Hue/Saturation Adjustment Layers
Photopea's Adjustment Layers are non-destructive and highly effective for color manipulation.
- Open your image: Download an image for practice (e.g., "Dog on Pexels" or "Cat on Pexels") and open it in Photopea via
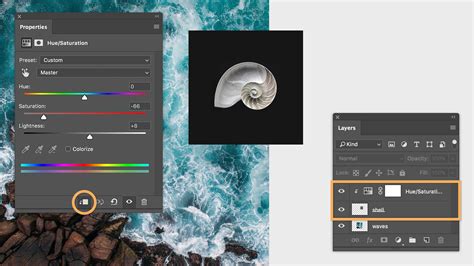
File -> Open. - Create a Hue/Saturation Adjustment Layer: In the Layers panel, click on the half-white circle icon at the bottom and select "Hue/Saturation." This creates a new layer above your image layer.
- Target Specific Colors: In the Properties panel for the Hue/Saturation layer, click on the little two-sided arrow button to activate the color sampling. Then, click on a color within your image that you wish to change. For instance, if working with the "Cat on Pexels" image, click on the cat's eyes. The "Range" text in the Properties panel will update to reflect the detected color range (e.g., "Yellow").
- Adjust the Hue: Click and drag the "Hue" slider in the Properties panel. You will see the color of the sampled area change in real-time.
Refining Color Adjustments with Masks
A common challenge when adjusting colors is that the adjustment might affect unintended areas of the image. This is where layer masks become essential.
- Isolating the Adjustment: For the "Cat on Pexels" example, if the yellow "bokeh" lights and grass also change color along with the cat's eyes, you need to isolate the adjustment to just the eyes.
- In the Layers panel, click on the white square (the mask) of the Hue/Saturation layer to ensure it is selected (indicated by dashed lines).
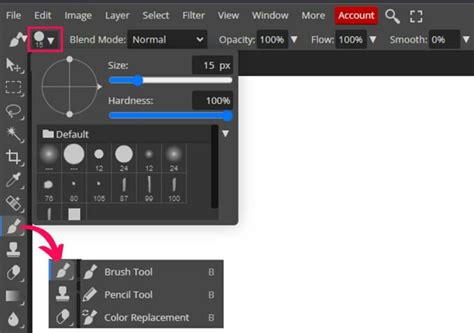
- Select the Brush Tool from the left sidebar.
- Choose black as your foreground color using the Color Picker.
- Adjust the brush size as needed in the dropdown menu at the top.
- Brush over the areas of the image where you do not want the color change to occur (e.g., the cat's fur, the background lights, the grass). As you paint with black, the white mask thumbnail will turn black in those areas, effectively hiding the Hue/Saturation adjustment from those parts of the image.
- If you accidentally mask an area you wanted to change, simply switch the brush color to white and paint over it again to unmask it.
- Fine-Tuning the Range: The Properties panel for the Hue/Saturation adjustment also offers sliders within a color spectrum. These sliders allow you to precisely define the color range that the adjustment will affect. By dragging these handles, you can exclude natural colors from the subject's body or other areas that might have been inadvertently included in the initial sampling. For instance, if parts of the dog in the "Dog on Pexels" example become blotchy due to natural colors being affected, adjusting these spectrum sliders can correct the distortion.
By mastering the Hue/Saturation adjustment layer and its associated masks, you can selectively alter colors within textured backgrounds, creating sophisticated and nuanced edits.
Advanced Background Removal Tools
Beyond the standard selection and adjustment tools, Photopea offers dedicated features for more efficient background removal, especially for complex images.
Magic Cut Tool
The "Magic Cut" tool is an advanced selection feature in Photopea designed to remove background elements quickly by automatically detecting the subject. It analyzes color, contrast, and edges to create an accurate selection. Magic Cut is smart enough to detect what areas need to be removed with minimal input. In many cases, it is not necessary to fully draw over an area. A single click with a 26px brush is often enough to mark an area for removal. However, using a brush that is too large may cause undesired parts of the image to be selected. Adjusting the brush size carefully ensures precise background removal.
Magic Cut is not perfect. It utilizes a system where:
- Green Brush: Marks areas to keep in the final selection.
- Red Brush: Marks areas to remove from the selection.
- Gray Brush: Used to erase green or red marks when adjustments are needed.
If green and red markings touch, the tool may misinterpret the selection and an error message will be received. The Brush Size slider controls the precision of selections. A larger brush affects a broader area, even extending to pixels that are not directly touched. Unlike some selection tools, Magic Cut does not have a built-in way to create straight lines by holding down the Shift key or using other shortcuts. This means that when using a mouse, precise selections require steady hand movement. Magic Cut allows users to preview the selection with three different background options: Transparent, White, or Black. This setting does not change the final output but helps visualize how the selection will look against different backgrounds. A "Raster Mask" option keeps the original image intact with a mask applied. Magic Cut requires some practice to master.
RemoveBG Tool
"RemoveBG" is another automatic background removal tool in Photopea that instantly removes the background without the need for manual selection. Unlike Magic Cut, RemoveBG does not require users to mark areas with a brush. While RemoveBG can be a useful tool for quick background removal, it is a premium feature that requires a monthly subscription or watching a quick advertisement, which will require any ad blockers to be disabled. For images with clear contrast between the subject and background, RemoveBG provides quick and accurate results.
Other Background Removal Options
Photopea also includes other background removal options:
- Lasso Tool: Allows for manual selection of areas to remove background details precisely.
- Erase Tool: Allows users to manually remove remaining background elements after an automatic selection. It works by painting over unwanted areas to erase them permanently. The tool's brush settings, such as size, hardness, and opacity, can be adjusted to control the precision of the erasure. Since the Erase tool permanently deletes pixels, it is best used sparingly. When making fine adjustments, using a layer mask instead of direct erasure provides more flexibility. A layer mask allows users to hide or reveal parts of an image without permanently altering the original pixels.
Integrating the Subject with the New Background
After successfully removing the old background and adding a new one, the final crucial step is to ensure the subject seamlessly integrates with its new environment. This involves blending techniques to avoid an artificial "cut and paste" look.
Adding the New Background
Ensure the background layer is below the subject layer in the Layers panel by clicking and holding the mouse button down on the layer. To resize the background, use Alt + Ctrl + T (Windows) or Option + Cmd + T (Mac). Another way to resize is by selecting the Move tool and checking the "Transform Controls" box. The bounding box will appear, allowing adjustments. Keep in mind the composition rules, such as centering the subject or positioning it according to the Rule of Thirds. Understanding how to add a background to a photo is essential for creating visually appealing compositions. Adding a background is the foundation of image compositing.
Natural Blending Techniques
If the subject looks out of place, the composition will appear artificial.
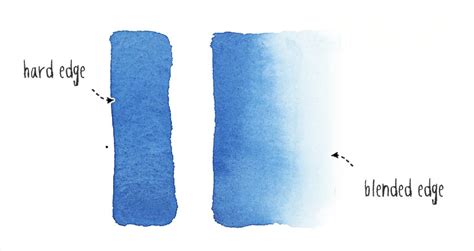
- Soften Hard Edges: Hard edges can make the subject look like it was cut out and pasted onto the background. To soften edges, select the Blur Tool from the toolbar, set it to a low strength (10-20%), and gently paint along the subject's edges.
- Recreate Shadows: Without shadows, the subject may appear as if it is floating above the background. Create a new layer by going to
Layer > New Layer. Use a soft black brush to paint a subtle shadow beneath the subject, then adjust the layer's opacity and blending mode (e.g., Multiply) to make it look natural. - Match Lighting and Color: Ensure the lighting on the subject matches the lighting of the new background. If the background is brightly lit, the subject should also appear well-lit. Similarly, color casts from the background should be subtly applied to the subject. This can often be achieved with adjustment layers like Color Balance or Curves.
- Blurring the Background: If the subject is sharp, a slightly blurred background can enhance the sense of depth and focus on the subject. Select the background layer and go to
Filter > Blur > Gaussian Blur. Adjust the radius to achieve a subtle blur.
Blending a subject into a background requires attention to detail. It's about creating a cohesive image where the subject and its new environment feel like they belong together.
Photopea offers a robust set of tools to change background colors and replace backgrounds entirely. From the intuitive "Select Subject" to the precise control offered by Quick Mask Mode and the powerful capabilities of Magic Cut and RemoveBG, users have multiple avenues to achieve professional-looking results. By combining these selection and background manipulation techniques with careful blending, you can transform your images and unlock new creative possibilities. It needs slight bit of practice, and once you get the hang of it, then sky is the limit.