It’s easy to forget that audio is an integral part of a great video. But sometimes, your recorded audio needs some help. Stuck with recorded background noise? Don’t fret. In this tutorial, you’ll learn how to reduce audio noise in DaVinci Resolve Studio. With a few clicks, you can dramatically improve your audio quality. You can amplify the sounds you want, and you can eliminate the ones that you don’t.
The Power of Fairlight: DaVinci Resolve's Audio Suite
Fairlight is the audio editing suite contained in DaVinci Resolve Studio. It’s part of why Resolve stands out from other apps. Even though it’s a video editor, it also comes with fully-featured audio tools. Fairlight contains adjustments and tools that help you work with audio quickly and efficiently. Many are part of the Effects panel within Fairlight. Think of these as audio presets that you can apply to tracks. One of the included options is the Noise Reduction effect.
Noise Reduction in DaVinci Resolve Studio is really the best of both worlds. But it also gives you full creative control! Need to fine-tune your audio adjustments? You can do just that. The Noise Reduction tool includes an array of controls that help you precisely adjust any audio track that you’re working with. Clearly, DaVinci Resolve Studio makes it easy to reduce audio noise in any project.
Why Noise Reduction is Crucial for Professional Video
Why is noise reduction so important? Noise reduction is a critical edit that you should never skip over. Reducing noise makes your videos more watchable. Unwanted noise is unwelcome! When you have background noise, you’ll distract your audience. They’ll miss the good parts of your audio, put off by noise. It enhances professionalism. If you don’t remove background noise, your audio will sound less professional. Think about it. Pro productions always take the time to polish their audio tracks too. You’ll meet broadcast standards. If you’re planning to broadcast videos, audio noise reduction is almost mandatory. Only the best productions make it to broadcasts. As you can see, it’s imperative to reduce audio noise in videos. Luckily, that’s easy to do in DaVinci Resolve Studio.
Step-by-Step Guide: Applying Noise Reduction in DaVinci Resolve Studio
Working with the Noise Reduction effect in DaVinci Resolve Studio is easy. Let’s walk through the process. You can do this with any audio clip. Most often, the clips will be those that you’ve recorded.
Step 1: Project Setup and Audio Import
- Go ahead and open DaVinci Resolve Studio on your computer. When you do, you’ll find yourself on the Project Manager panel. Projects are individual video workspaces in Resolve Studio. On the Project Manager, you can open an existing project. Here, let’s click New Project. Give it a name, then click Create.
- Locate the toolbar menu at the bottom of Resolve Studio. Choose the second button from the left. It’s labeled Cut. Click Cut.
- In the upper left corner, you’ll see the Media Pool controls. Browse to an audio file stored on your computer. Then, drag and drop it onto the Media Pool panel.
- With audio in place, right-click on the clip’s thumbnail. At the top of the listed options, choose Create New Timeline Using Selected Clips. Right-click and choose Create New Timeline Using Selected Clips. Just like that, you’ve imported audio into DaVinci Resolve Studio!
Step 2: Accessing the Fairlight Audio Panel
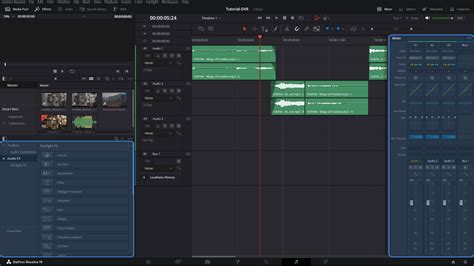
- Next, you’ll need to open the Fairlight audio controls in Resolve Studio. Remember the toolbar where you selected the Cut menu? Look to the right and you’ll see a music note icon button. Click on the music note, and the Fairlight audio panel will launch.
- Again, you can think of this as the nerve center for audio editing in Resolve Studio. With Fairlight open, spend some time exploring. On the left side, you’ll see dropdown menus for the Toolbox and Audio FX options. In the center, you’ll see audio meters, a timeline with waveforms, and more. On the right is the Mixer panel.
Step 3: Applying the Noise Reduction Effect
- To reduce audio noise in Resolve, locate the Audio FX dropdown. It’s found in the upper left corner of the Fairlight panel.
- On the Fairlight FX sidebar, you’ll see a long list of audio effects. They’re in alphabetical order, so scroll down until you find Noise Reduction.
- Click and drag the Noise Reduction effect over to your audio Timeline. Drop it onto the green audio track. You’ve applied noise reduction in DaVinci Resolve! When you add the effect, the Noise Reduction panel opens up.
Step 4: Fine-Tuning Noise Reduction Parameters
You’ve applied noise reduction to your DaVinci Resolve Studio audio. But you aren’t finished making adjustments. The beauty of Fairlight is the creative flexibility it allows you. Notice there are several controls on the Noise Reduction panel. Spend some time exploring each of them. There’s no single recipe for success in noise reduction. Much of it is really a trial-and-error process.
- Presets: For example, you can choose different presets. They’re found on the dropdown menu in the upper left corner. There’s a Default option for noise of all kinds.
- Threshold: Think of this as the trigger for noise reduction. It determines the level where reduction effects kick in.
- Attack: This parameter controls how quickly the noise reduction engages once the threshold is met.
- Sensitivity: Sensitivity specifies how noise reduction is targeted. Higher values will remove the most background noise. But they also risk removing parts of the audio that you want to keep.
- Ratio: Ratio works to control how strong the reduction effects are, once the defined Threshold value is reached.
- Smoothing: Smoothing spreads noise reduction effects over a longer time period.
- Output: Noise reduction effects can alter the overall volume of your tracks.
When you’re finished, give your audio a final listen. You’ll be impressed with the results. Above, you learned how to use the powerful Noise Reduction effect in DaVinci Resolve Studio. As you can see, it automatically reduces noise in Resolve.
This Fairlight Trick in Davinci Resolve Will TRANSFORM YOUR AUDIO! 🎧
Best Practices for Effective Audio Noise Reduction
While working with the Noise Reduction effect in DaVinci Resolve Studio, keep these best practices in mind:
- Plan Ahead and Identify Noise: The best way to reduce audio noise in DaVinci Resolve Studio is to plan ahead. Don’t apply reduction effects blindly. Be sure that you’re fully aware of what the background noises are. Locate them within the clip.
- Consider Audio Effects Holistically: Audio effects shouldn’t be considered in a vacuum. Noise reduction is no exception. As mentioned, Fairlight has plenty to choose from.
- Avoid Over-Processing: Yes, it’s possible to take noise reduction too far. If you use the effect too much, you’ll end up with audio tracks that sound unnatural. Sure, remove as much background noise as you can. But remember, in any natural sound, there is a certain amount of background audio.
Noise Reduction in DaVinci Resolve: Studio vs. Free Version
DaVinci Resolve Studio is loaded with cool features and tools. But it can be daunting to learn how to use the app well. Fortunately, you don’t have to go it alone.
Studio Version: Advanced Noise Reduction Tools
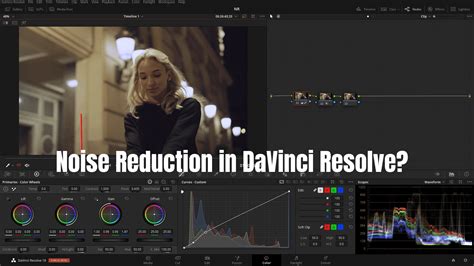
The Studio version of DaVinci Resolve offers more advanced noise reduction capabilities, particularly within the Color page.
- Add Your Clip and Go to the Color Tab: After adding your clip, navigate to the Color tab.
- Add a New Node: Right-click on the first node and click Add Node > Add Serial Before.
- Apply Noise Reduction: We’ll apply noise reduction to the first of the nodes in the line. With the first node selected, go to the Motion Effects panel. Click on the Noise Reduction tool.
- Temporal Noise Reduction: Start by modifying the Temporal Noise Reduction. Increase the number of Frames, but pay attention to the fact that it will be harder to process for your GPU and DaVinci can even show an error message if the number of frames is too high for your device to process.
- Quality Settings: Next, change the mode from Faster to Better Quality. You can also customize the Motion Range parameter depending on the amount of movement in your video.
- Threshold Adjustments: Here you can go to Temporal Threshold settings and increase Luma and Chroma parameters. It would be especially helpful if your video is filmed in the evening or at night with a drastic amount of noise. Play around with settings to find the balance, since setting the values to maximum will also take texture and quality out of your video.
- Spatial Noise Reduction: In the Spatial Noise Reduction section, you can remove chromatic noise if your video has any. To do this, set the mode to Faster. In the Spatial Threshold, deactivate the link icon between Luma and Chroma, and increase the Chroma amount.
- Sharpening: Finally, create a new node and click on the Blur icon. Lower the Radius amount to add your clip contrast and sharpness.
Free Version: Utilizing Available Tools
You can also reduce the noise in your video in the free version of DaVinci Resolve. While it might not have the same dedicated "Noise Reduction" effect as the Studio version's Color page, you can still achieve good results using other tools.
- Fusion Tab for Color Noise: To reduce color noise, go to the Fusion tab and hit Spacebar+Shift to find the Remove Noise tool. Add it between Media In and Out nodes.
- Channel-Specific Adjustments: Click on the Show Color Channel icon at the top of the preview window and select Show Color Channel > Red. Drag Softness Red and Detail Red till it’s balanced. Make sure to drag the Detail slider enough to bring back the focus and sharpness, but not too much so the noise will appear back. Repeat the same with Green and Blue channels (make sure you switch to them via the Color Channel tab). Go back to the Show Color Channel > Color menu.
- Luminance and Chromatic Channels: Now we can reduce additional noise on the luminance and chromatic channels. Switch to the Chroma menu in the Inspector. Now, increase the Softness Luma and Detail Luma like we previously did in the color panel.
Alternative Audio Noise Reduction Methods in Fairlight
Beyond the primary Noise Reduction effect, Fairlight offers other tools that can assist in cleaning up audio:
Auto Speech Mode vs. Manual Mode
When using the Noise Reduction effect in Fairlight, you have two primary modes to consider:
- Auto Speech Mode: This mode is useful if you don't have any "room tone" (a sample of the ambient sound of your recording environment without dialogue). DaVinci Resolve attempts to automatically distinguish between speech and background noise and remove the latter. While convenient, it can sometimes remove desirable audio frequencies from the voice, making it sound muffled or distorted. You can enable "Listen to Noise Only" to hear exactly what DaVinci is identifying as noise.
- Manual Mode (Learning Room Tone): This is generally the preferred method for its precision. It requires you to record at least 10 seconds of room tone before or after your dialogue. In Manual mode, you press the "Learn" button while the playhead is on the room tone section. DaVinci Resolve analyzes this audio sample to identify the specific noise profile. Then, when applied to your dialogue, it intelligently removes only those identified noise frequencies. This method typically yields more natural-sounding results.

Using EQ and Noise Gates
Sometimes, noise reduction alone isn't sufficient. You can further refine your audio using other Fairlight tools:
- Equalization (EQ): Open the EQ panel in Fairlight. A High-Pass Filter can be used to remove low-frequency rumble (often around 80-100 Hz for voices). You can also identify and gently reduce hiss, which typically occurs at higher frequencies (above 8-10 kHz). Subtle changes are key to maintaining a natural sound.
- Noise Gate: If your audio has quiet gaps where noise is still present, a Noise Gate can be beneficial. Add a Noise Gate from the Fairlight FX library. Set the Threshold just above the noise floor so that only actual speech or music passes through. This effectively silences the background noise during pauses without affecting the primary audio.
Clip Gain for Consistency
Even after noise reduction and other processing, you might need to balance the volume levels of your audio clips. Select the clip and adjust its Clip Gain to ensure speech is at a consistent and comfortable level throughout. This contributes to a smooth and professional final audio track.
The Importance of Production Quality
While DaVinci Resolve offers powerful tools for post-production cleanup, it's crucial to remember that the best audio is captured at the source.
- Record Clean Audio from the Start: Use a good quality microphone, a pop filter, and record in a quiet environment to minimize the need for extensive noise reduction.
- Room Tone is Essential: Always record at least 10-15 seconds of room tone without any dialogue or significant ambient noise. This provides DaVinci Resolve with a clean sample of the background noise to effectively remove.
- Be Realistic: Understand that there are limits to what noise reduction can achieve. Severely noisy audio may not be salvageable.
By combining good production practices with the powerful tools available in DaVinci Resolve, you can significantly enhance the audio quality of your videos, making them more engaging and professional.