Editing is often the most important phase of the filmmaking process. The editor builds momentum and pace, which determines the audience’s engagement. Today, we will be focusing on the Edit tab and some of the useful features it has to offer for audio manipulation within DaVinci Resolve. DaVinci Resolve is a versatile and powerful video editing software that is widely used by both amateur and professional editors. While it’s primarily known for its robust video editing capabilities, it also offers a comprehensive suite of audio editing tools. This introductory guide walks you through the process of audio editing in DaVinci Resolve, making it perfect for beginners. Audio editing in DaVinci Resolve can be overwhelming, especially for beginners, as this editing tool offers a comprehensive suite of audio editing features that can sometimes be confusing to use. In this blog post, learn how to edit audio using DaVinci Resolve.
Setting Up Your Project: Importing and Timelines
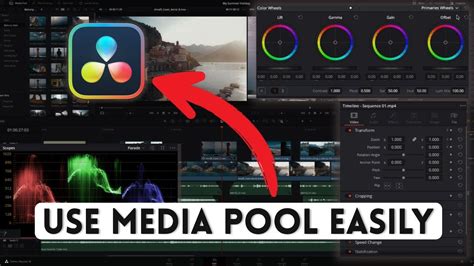
When you first open DaVinci Resolve, you’ll be automatically presented with the Media tab. To import your audio and video files, simply drag and drop them into the media pool. Another way to import is to go to File > Import > select files > Open.
The next crucial step is to create a timeline where you will perform most of your audio editing. There are a few tabs in DaVinci Resolve, but for audio editing, the Edit tab is central. To create a new timeline, right-click in the Timelines section of the Media Pool and select "Create New Timeline." You can rename the timeline to something descriptive, as well as select the number of tracks you want to include.
When setting up your timeline, consider the type of audio you'll be working with. For ambient sound, sound effects, or music, it's recommended to choose either a Stereo Track or a 5.1 Surround Soundtrack option. For dialogue or voiceover, it's best to add a mono track for the cleanest sound possible. You can add tracks on the Create New Timeline window, or if you haven't already, you can do so while in the timeline section. To add audio tracks, double-click on the left side of the timeline > Add Track > choose the audio track type. Naming each audio track is highly recommended for better organization.
Navigating the Edit Tab: Essential Tools and Views
Once your timeline is created, you'll move to the Edit tab. To enhance your workflow, turn on the Audio Waveform view as a helpful tool. This is located under the Timeline View Options tab, just above the timeline itself. The Audio Waveform view is typically the first option on the left. It's also recommended to select the Video View Option, which is usually in the middle or first on the left, to see your video alongside your audio.
To effectively work with your audio files, you can adjust the height of your audio tracks in the Timeline View Options tab by dragging them up or down to rescale them. This provides a clearer visual representation of the audio waveforms, making it easier to pinpoint specific sections.
Basic Audio Editing: Cutting, Trimming, and Fades
Editing audio in DaVinci Resolve involves several fundamental techniques. One of the most common is cutting and trimming audio segments. The goal is to remove sections that will not be included in the final project, or to separate and/or connect audio segments.
Trimming the end of an audio track is essential for removing unwanted details or for matching the desired duration of your project. One of the usual ways to trim the end of an audio track is to drag the right edge of the clip. A simple way to achieve precise trimming is to ensure that Snapping is turned off. To do this, click the Snapping tool icon at the top of your timeline. Once snapping is disabled, hover your mouse cursor over the right edge of the audio clip in the timeline. Click and drag the edge of the clip to trim it to your desired length.
To make precise cuts, you can use the Blade tool. The shortcut for the Blade tool is Cmd or Ctrl + B. With the Blade tool selected, click on the audio waveform at the point where you want to make a cut. This allows you to splice the section you want to keep.

Fading audio in or out is another crucial technique for smooth transitions. You can achieve this by moving the white edge of the keyframe on the audio track. This action adjusts the speed of the audio fade, allowing you to create gradual introductions or conclusions to your audio clips.
When creating a smooth transition between the changing levels across tracks, especially after using the Blade tool to splice tracks, you can right-click where you made the splice and use the drop-down menu to create a CrossFade. A 12-frame CrossFade is often a good starting point for a natural-sounding transition. You can also lengthen or shorten the crossfade to fine-tune the transition curve and better match the timing of your audio.
Adjusting Audio Levels: Volume Control and Keyframes
Inconsistent volume levels within an audio track can lead to an unpleasant listening experience. DaVinci Resolve provides robust tools to address this. In most cases, you will just need to lower or increase the volume of the whole track. To do this, select the audio clip in the timeline, go to the Inspector on the top right, where you’ll find the "Adjust Volume" section under the "Audio" category. Here you can bring the level of the background music up or down to fit with the voiceover, or adjust the overall volume of any clip.
Another powerful way to adjust audio levels is by using keyframes and manually decreasing or increasing the volume for specific sections. This is extremely useful when you want to adjust the volume of a certain section of a clip, such as lowering background music during dialogue.
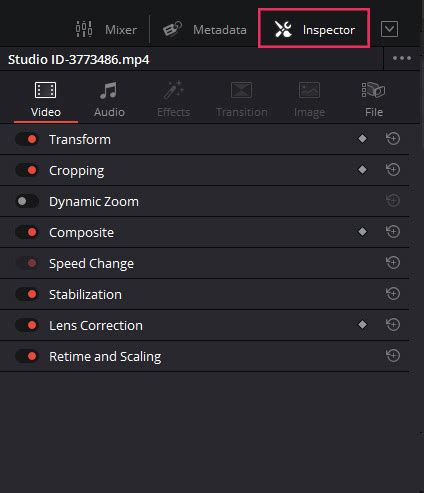
When you need to adjust the volume for specific sections of audio clips that you want to make louder, select the desired sections (using Ctrl or Cmd + Select), go to the Inspector, and use the "Clip Volume" slider.
A useful technique for maintaining consistent volume across different sections is to copy and paste volume settings. If you've adjusted the volume in one section, you can copy it by selecting that cut (Cmd or Ctrl + C), then select the section of the clip where you want to paste the volume, and click Alt + V. In the pop-up window, go to "Audio Attributes" and select the checkbox for "Volume." Ensure that "Retime Effects" is unchecked.
Advanced Audio Techniques and Synchronization
DaVinci Resolve offers advanced features for audio synchronization and layering. If you ever need to separate or unlink audio from your video clips, you can hit Ctrl + Shift + L or right-click over the Link symbol on the audio/video file in the timeline and deselect "Link Clips."
DaVinci Resolve Audio Sync Tutorial - Perfect Alignment Each Time!
For syncing multiple audio clips with video, DaVinci Resolve provides efficient tools. You can batch-sync clips by importing both audio and video into the media pool, selecting all the clips, and right-clicking to choose from options based on Timecode or Waveform. If your video clip has in-camera audio, a good option is to choose "Auto Sync Audio > Based on Waveform" and "Append Tracks." This syncs the external audio to the video clip without replacing the original in-camera audio. When the clips are placed on the timeline, you will see both the in-camera audio and the synced audio attached to the video clip.
A significant feature is the ability to nudge audio by less than one frame. This is invaluable when audio doesn't line up perfectly with the video, and the discrepancy is less than a full frame. DaVinci Resolve solves for this by offering the ability to nudge audio by fractions of a frame for a more accurate sync.
When auditioning multiple audio takes, it's useful to be able to stack the takes on top of each other and toggle between them to select the best parts from different takes. This is where DaVinci’s Audio Layering comes in. With this mode enabled, you can superimpose multiple audio clips in the same track. The clip on the top layer will take precedence and non-destructively mute the overlapping section of what’s on the bottom layer. When Audio Layering mode is off, adding a clip on top of an already existing clip will cause the new clip to overwrite the overlapping section of the existing clip.
Enhancing Audio with Effects and Recording
DaVinci Resolve's Fairlight section is a powerful Digital Audio Workstation (DAW) that comes equipped with a vast array of tools for audio enhancement and repair. The Fairlight FX library includes tools to repair problematic audio, such as Noise Reduction to eliminate background noise, a De-Esser to tackle sibilance, and a De‑Hummer to remove hums generated by power sources.
An Equalizer (EQ) is another essential tool that adjusts the balance between different frequencies in your audio recording. With an EQ, you can enhance certain frequencies or reduce others to improve clarity and tone. Dynamics, such as compressors, are also great audio effects within DaVinci Resolve. A compressor can compress the higher frequencies of your voice, making it easier to listen to and more consistent.
If you need to record additional voiceover directly within DaVinci Resolve, you can utilize the "Patch Input/Output" settings. Go to the "Input" section, select your desired "Source," and under "Destination," keep "Track Input" selected and choose the track you want to record to.
For projects requiring Automated Dialog Replacement (ADR), DaVinci Resolve's in-built ADR functionality allows you to re-record dialog within the program itself, simplifying the post-production process.
Sourcing Audio Assets and Finalizing Your Project
If you’re looking to source high-quality, royalty-free music or sound effects for your project, consider exploring libraries like Motion Array or Artlist.io. These platforms offer extensive collections of audio assets that can significantly elevate your production value.
When you are done editing your audio, don’t forget to save your project. Saving allows you to come back in the future and make changes. Exporting your project is what enables you to permanently embed the edits you've made into the audio file. Audio editing in DaVinci Resolve shouldn’t be stressful. While it can be confusing, especially for beginners, the process from importing raw files to exporting the final output is straightforward.
DaVinci Resolve is a great option for up-and-coming editors because it has no barrier-to-entry when it comes to price. It sounds almost too good to be true, but DaVinci Resolve is free. While certain color grading functions are limited in the free version, there are no restrictions on the audio editing functions in this version, making it an accessible and powerful tool for all creators. Now you know the basics of audio editing in DaVinci Resolve and can experiment with all the audio editing capabilities that DaVinci has to offer. Learn how to cut and trim audio using DaVinci Resolve. This step-by-step tutorial is perfect for beginners.