DaVinci Resolve's render cache is a powerful feature designed to streamline the video editing workflow, particularly when dealing with demanding projects. This article delves into the intricacies of cache clips, their functionality, how to effectively utilize them, troubleshoot common issues, and manage their storage footprint.
Understanding the Cache Clip in DaVinci Resolve
At its core, a cache clip in DaVinci Resolve is a mechanism for temporarily storing processed sections of your project. This feature allows for the temporary storage of processed clips for smoother playback. Essentially, it's a rendered version of a specific segment of your timeline. This is particularly useful when working with complex visual effects, intricate color grading, or high-resolution footage that would otherwise demand significant processing power in real-time, thereby slowing down the editing process. By creating a cache clip, the software bypasses the need to re-render that specific portion of the timeline on the fly. This pre-rendered output acts as a stand-in during playback, replacing the original, computationally intensive elements with a readily accessible video file. It is crucial to understand that the creation of cache clips does not alter your original footage or impact the final exported video; its sole purpose is to enhance the fluidity and efficiency of the editing experience. However, it's important to note that cache clips consume disk space, necessitating careful management to prevent storage depletion.
The concept behind cache clips is akin to creating shortcuts for complex calculations. Imagine a scene with multiple layers of effects, demanding color corrections, and perhaps even 4K or 8K footage. Without caching, every time you scrub through this section or attempt to play it back, DaVinci Resolve would have to perform all these intensive rendering tasks anew. This can lead to stuttering playback, dropped frames, and a generally frustrating editing experience.
By enabling render caching and specifically caching a clip, you instruct DaVinci Resolve to perform these rendering operations once and save the resulting video data. When you next play back that section, DaVinci Resolve simply accesses this pre-rendered file, which is optimized for playback, leading to a significantly smoother and more responsive editing session. This is especially beneficial for editors working on tight deadlines or those who prioritize a fluid, uninterrupted creative flow.
The visual indicator for a cached clip in the DaVinci Resolve timeline is typically a colored line above the clip. Initially, this line might be red, signifying that the clip needs to be rendered. Once the caching process is complete, this line transforms into a different color, commonly blue, indicating that the clip is now cached and ready for smooth playback. This visual cue provides an immediate understanding of which parts of your timeline are optimized for performance.
Implementing Cache Clips for Enhanced Workflow
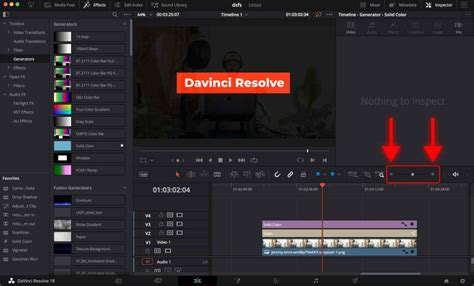
DaVinci Resolve provides users with the flexibility to leverage cache clips to optimize their editing process. The initial step involves configuring your project settings to enable caching. This is achieved by navigating to the "Playback" menu located at the top of the DaVinci Resolve interface. Within this menu, select "Render Cache" and then choose the "User" option. This selection empowers you to manually designate which specific clips you wish to cache, offering granular control over your cache management.
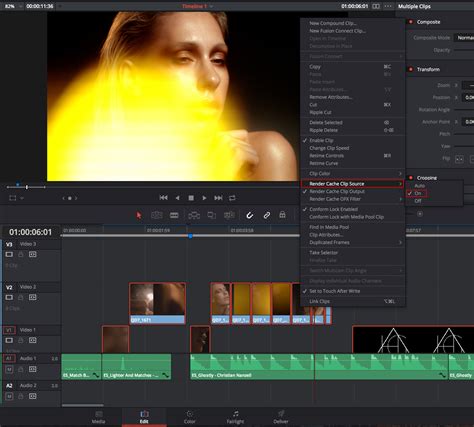
Once caching is enabled at the project level, you can proceed to cache individual clips. Navigate to your timeline and identify the clip you want to cache. Right-click on the selected clip, and from the context menu that appears, choose the option "Render Cache Clip Output." Upon selecting this, a visual indicator, typically a red line, will appear above the clip in the timeline. This red line signifies that the clip is in the process of being cached. Once the caching operation is fully completed, this line will transform into a blue line, confirming that the clip has been successfully pre-rendered. Caching a clip in this manner can substantially improve its manageability, particularly if it involves high-resolution media or incorporates complex effects and adjustments. It is imperative to maintain sufficient available storage space, as cached clips can accumulate to occupy a considerable amount of disk real estate.
The decision to use "User" render cache over "Smart" or "All" render cache is a strategic one. "Smart" render cache attempts to automatically cache clips that it deems computationally intensive, while "All" render cache attempts to cache every clip on the timeline. "User" cache, however, gives the editor complete control, allowing them to cache only the sections that are causing performance bottlenecks. This is often the preferred method for experienced editors who have a good understanding of their project's demands and can precisely identify areas that would benefit most from caching.
Beyond individual clips, DaVinci Resolve also allows for the caching of specific effects or even entire sections of the timeline. This can be particularly useful when working with complex Fusion compositions or multi-layered timelines. By strategically caching these elements, editors can ensure a fluid playback experience even when dealing with the most demanding visual effects.
Troubleshooting Cache Clip Functionality
Several factors could contribute to your cache clips in DaVinci Resolve not functioning as expected. A prevalent issue often stems from incorrectly configured cache settings. It is essential to verify that you have selected the appropriate cache format and designated a valid storage location within the DaVinci Resolve preferences. Furthermore, ensure that the "User" cache setting is actively enabled within your project settings, as previously outlined.
Another common impediment to proper cache clip functionality is insufficient storage space on your system. DaVinci Resolve requires a substantial amount of free disk space to effectively cache clips. If your system's storage is nearing capacity, it may be unable to complete the caching process, leading to playback issues or errors. A thorough check of your available disk space is therefore a crucial diagnostic step.
In instances where settings and storage appear to be in order, the problem might lie with the DaVinci Resolve software itself. Software glitches or bugs can occasionally interfere with the render cache functionality. If you suspect this to be the case, consider updating DaVinci Resolve to its latest available version, as updates often include bug fixes and performance enhancements. In more persistent cases, a complete reinstallation of the software might be necessary to resolve underlying software conflicts.
Don't make this one RENDER CACHE Mistake!
Beyond these common causes, consider the specific media you are working with. Some highly compressed or unusual video codecs might present challenges for the caching system. Ensuring your media is in a well-supported format can sometimes resolve unexpected caching behavior. Additionally, the speed and configuration of your storage drives play a role. If your cache drive is slow or experiencing issues, it can bottleneck the caching process.
It's also worth noting that certain complex Fusion effects or third-party plugins might not be fully compatible with the render cache, or they might require specific settings to be enabled for proper caching. Consulting the documentation for those specific effects or plugins can sometimes provide valuable insights.
Managing and Clearing DaVinci Resolve Cache Clips
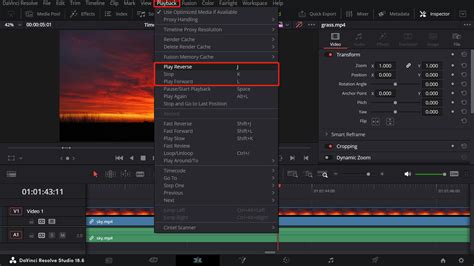
To effectively manage disk space and maintain optimal performance, it is often necessary to clear the cache clips in DaVinci Resolve. The process for doing so is straightforward. Begin by opening DaVinci Resolve and loading the project for which you wish to clear the cache. Once your project is accessible, navigate to the "Playback" menu at the top of the screen. Within this drop-down menu, you will find an option labeled "Delete Render Cache." Clicking on this option will reveal a sub-menu. From this sub-menu, select "All."
Executing this command will initiate the deletion of all render cache files associated with your current project. It is important to be aware that this operation may take a few minutes to complete, with the duration depending on the overall size of your project and the sheer volume of cache files that have accumulated. Crucially, deleting cache files will not affect your original media files in any way; it exclusively removes the temporary files that DaVinci Resolve generated during the editing process. Following the cache clearance, you may find that you need to re-render certain sections of your project to restore smooth playback, as the previously cached data will no longer be available.
Beyond simply clearing the cache, DaVinci Resolve also offers the capability to change the location of your render cache folder. This is particularly useful for users who have multiple storage drives or wish to dedicate a high-speed drive solely for caching purposes. To do this, navigate to "DaVinci Resolve" > "Preferences" (or "Project Settings" depending on your OS and Resolve version) and look for the "User" or "System" settings related to "Path" or "Storage." Here, you can specify a new directory for your render cache files. For instance, if you have an external drive labeled "I:" and you've created a folder named "CacheClip" on it, you can direct DaVinci Resolve to use this location. This strategic placement can significantly improve cache read/write speeds and free up space on your primary system drive.
The decision of when to clear the cache is often project-dependent. For smaller, less demanding projects, clearing the cache might be an infrequent necessity. However, for larger projects with extensive effects, numerous edits, and high-resolution footage, clearing the cache periodically can be essential for maintaining system responsiveness. Some editors develop a routine of clearing the cache at the end of each editing session or before exporting the final project.
The implications of not managing cache files can extend beyond just running out of disk space. A severely bloated cache folder can sometimes lead to slower application startup times or even instability within DaVinci Resolve itself, as the software might struggle to manage such a large volume of temporary data. Therefore, proactive cache management is not just about freeing up space but also about ensuring the overall health and performance of your editing environment.
One user's experience highlights this point: "Recently I had to work on a very big project with 4k proxy footage, graphical assets etc. One morning I turned on my pc and I saw that the most important disc partition was on red with practically 0 bytes free space. I never thought that I may need to clear my old cache files so far. Part of me was thinking that some of these files which I have been using for all my projects are into this Cache folder so I was afraid to not delete by mistake some important files." This anecdote underscores the importance of understanding what the cache folder contains and how to manage it without compromising project integrity. The total amount of free space after deleting all cache clip files was approximately 250 GB in this instance, demonstrating the significant storage impact render cache can have.
The function of the cache memory, as understood by this user, is to load the entire timeline very fast. This "timeline memorization" is stored in the cache folder. Settings within the program panels allow users to designate how source materials are rendered while working on the timeline. Setting these to render everything, as this user preferred, leads to faster work without waiting for the timeline to load, but it is also one of the reasons for more occupied storage. This illustrates a trade-off between immediate workflow speed and long-term storage management.