Achieving a consistent visual aesthetic across video footage is a hallmark of professional filmmaking. Wild swings in color profiles can detract from the viewing experience, making content appear amateurish. DaVinci Resolve, a powerful and free video editor, offers robust color matching features that allow editors to bridge these visual gaps, creating a cohesive and cinematic flow. This tutorial delves into how to effectively utilize DaVinci Resolve's built-in tools for seamless color matching, transforming disparate clips into a unified visual narrative.
The Importance of Color Matching in Video Editing
Color matching is more than just an aesthetic choice; it's a fundamental skill for producing visually stunning work. It builds consistency, which is essential for maintaining audience engagement. Think of your favorite movies or television shows. They often possess a distinct visual style, characteristic of a specific series, director, or even a broader genre. This consistency helps to reinforce the mood and narrative of the content.
Furthermore, color matching provides crucial flexibility during production. It's nearly impossible to film every scene under identical lighting conditions. Differences in time of day, weather, and artificial lighting can lead to significant color variations between shots. DaVinci Resolve's color match tools empower editors to address these discrepancies in post-production, ensuring that the final video maintains a unified look and feel. By matching colors, you can create a distinctive visual "vibe" that elevates the professionalism of your videos and introduces a specific aesthetic that defines your work.
Understanding DaVinci Resolve's Color Matching Capabilities
DaVinci Resolve began its journey as a dedicated color grading tool, and its color capabilities remain exceptionally deep. The application offers a suite of features designed to manipulate color in creative and artistic ways, dramatically affecting the mood of a scene and serving as a powerful storytelling element. For video editors, aspiring colorists, or seasoned professionals, DaVinci Resolve provides hundreds of artistic tools within an intuitive, node-based interface, making color experimentation fast and exciting.
The core principle behind DaVinci Resolve's color matching is its ability to analyze the color profile of one clip and apply it to another. This process can be automated, eliminating the hours that would otherwise be spent manually adjusting individual color parameters. While the ideal scenario might involve shooting a color chart under controlled lighting conditions for every shot, this is often impractical on set. DaVinci Resolve bridges this gap, allowing for sophisticated color adjustments in post-production.
Step-by-Step Guide to Automatic Color Matching
For those looking to follow along, this tutorial will utilize two stock video clips from Envato Elements. The process is straightforward and designed to yield impressive results quickly.
Project Setup and Media Import:Begin by opening DaVinci Resolve. You will initially be presented with the Project Manager tab. To start a new project, click "New Project" in the lower-right corner of the Project Manager panel. DaVinci Resolve will then open a new project, typically defaulting to the Cut tab. In the upper-left corner, you'll find the Media Pool panel. Treat this new project as a blank canvas. Browse to your stored video files on your computer and drag and drop them into the Media Pool panel. DaVinci Resolve will import these videos, and you can then drag their thumbnails onto the Timeline at the bottom of the screen, placing them end-to-end.
Accessing the Color Page:The primary tools for color matching in DaVinci Resolve are located on the Color editing page. To access this, navigate to the "Workspace" dropdown menu at the top of the screen. Click "Workspace," then go to "Switch to Page" and select "Color." You are now in the Color settings environment.
Selecting Clips for Matching:On the left side of the Color page, you will see thumbnails of all the video clips currently on your timeline. For this tutorial, imagine one clip features a sports car in a distinctive desert scene, characterized by specific colors and lighting.Begin by clicking on the thumbnail of the clip you wish to edit or match. This is your "source" or "target" clip. Next, hold down the "Shift" key on your keyboard and click on the thumbnail of the second clip. This second clip is the "reference" clip, the one whose color and lighting you want to emulate.
Executing the Shot Match:With both clips selected, right-click on the thumbnail of the clip you want to color match to (this is the reference clip). From the contextual menu that appears, select "Shot Match to this Clip."Observe the Preview window, which typically appears on the Cut panel. You will notice that the urban cityscape clip (the source clip) now adopts the warm, burnt orange hues of the desert scene (the reference clip). Your clips are now color matched, a task that would have been incredibly difficult, if not impossible, to achieve with such precision directly from the camera.
Advanced Color Matching Techniques and Considerations
While the automatic "Shot Match to this Clip" feature provides a quick and effective starting point, DaVinci Resolve offers a deeper toolkit for more nuanced color correction and matching.
Understanding the Color Page Tools
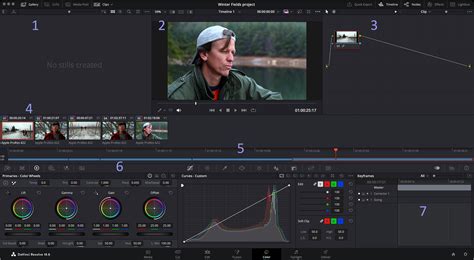
The Color page is where the true magic happens. It's organized into several key areas:
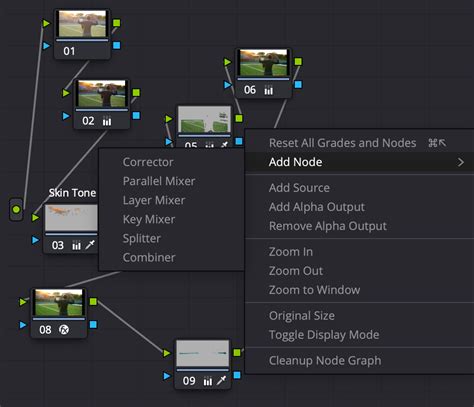
- Node Editor: Located at the top right, this acts like a flowchart. Each node represents a step in the color correction process. You can chain nodes together to apply multiple effects or adjustments without degrading image quality, unlike layer-based systems. The first node is often used for initial balancing, while subsequent nodes can be dedicated to creative grading, isolating specific elements, or refining details.
- Primary Correction Tools: Found at the bottom left, these include the Primary Color Wheels (Lift, Gamma, Gain) and Primary Bars. These tools affect the entire image and are used to adjust brightness and color levels, remove unwanted tints, and establish a neutral baseline. The wheels allow for precise adjustments within specific tonal ranges (shadows, midtones, highlights), while the bars offer a more subtle approach to individual color channels and luminance. Tools like "Color Boost" (vibrance) intelligently increase saturation in less saturated areas for a natural look, and "Midtone Detail" can sharpen or soften image definition.
- Curves: Accessible via the center palette, curves provide finer control over color and contrast sculpting. You can adjust red, green, blue, and luminance curves independently, with a live histogram to guide your adjustments. Specialized curves like "Hue vs. Hue," "Hue vs. Sat," and "Hue vs. Lum" allow for targeted adjustments to specific colors or tonal ranges.
- Qualifiers and Power Windows: These tools enable secondary grading, allowing you to isolate and adjust specific parts of an image. Qualifiers target areas based on hue, saturation, or luminance, while Power Windows let you draw shapes (circles, squares, custom shapes) around objects to confine your adjustments. The tracker feature can then animate these Power Windows to follow moving objects, saving immense amounts of manual work.
- Resolve FX Plug-ins: The Color page also features a library of GPU and CPU accelerated Resolve FX plug-ins. These can be dragged onto nodes to add a wide range of effects, from blurs and glows to beauty enhancements and object removal.
Introduction to Color Page — DaVinci Resolve Color Grading Academy 1/8 — MotionVFX
Auto Color and Manual Adjustments
DaVinci Resolve also features an "Auto Color" function, accessible via the primary correction tools. While it provides an immediate result without requiring manual sampling, its usefulness can be hit-or-miss. When it works, it can offer a good neutral starting point for further grading. However, it lacks specific guidance, making it less predictable than manual methods.
When performing manual color correction, it's crucial to set black and white levels accurately. Use the eyedropper tool to sample an area that should be gray or white, ensuring it's not over-exposed. Clicking on the darkest part of the image with the "Lift" cross-hair can set the black level, and clicking the lightest part with the "Gain" cross-hair can set the white level. Resetting these changes is possible via the curved arrow next to "Lift."
The Role of Scopes
Professional scopes are indispensable tools for objective color evaluation, especially when dealing with inconsistent monitor calibration or varied viewing conditions. They provide a consistent way to measure and analyze image data.
- Parade Scope: Quickly shows if one color channel is stronger than others.
- Waveform Scope: Displays luminance and color values overlaid, offering insights into brightness and contrast.
- Vectorscope: Presents a circular graph of hue and saturation levels, ideal for checking color balance and skin tones against the skin-tone line.
- Histogram: A graphical representation of each channel's tonal distribution.
- Chromaticity Scope: Helps determine if colors fall within the boundaries of your project's delivery format.
Using these scopes ensures that your color matching is technically sound, not just visually appealing on a single calibrated display.
Leveraging the Gallery and Stills
The Color page's "Gallery" is a powerful feature for organizing, sharing, and reusing grades, significantly speeding up workflows.
- Copying Grades: The fastest way to copy a grade is to middle-click a clip's thumbnail in the filmstrip to copy its grade to the current shot in the viewer.
- Creating Stills: You can save grades by right-clicking anywhere in the viewer and creating a "still." These stills are stored in the Gallery and can be organized into albums. The "Apply Grade" command allows you to copy a saved grade to other shots.
- Group Grading: For a series of shots from the same camera, you can select them, right-click, and create a group. This allows for consistent grading across multiple clips simultaneously.
- Comparison Views: DaVinci Resolve offers "Image Wipe" and "Lightbox" modes in the viewer for comparing shots. Image Wipe allows side-by-side comparisons of two clips, with options for horizontal, vertical, or mixed wipes. The Lightbox displays every clip in your timeline as a thumbnail with applied grades, making it easy to spot inconsistencies and evaluate the overall look across the sequence.
Advanced Features for Professional Results
DaVinci Resolve Studio, the paid version, offers even more advanced tools that can further enhance color matching and creative grading.
HDR and Wide Color Gamut Workflows
For projects requiring High Dynamic Range (HDR) and wide color gamut support, DaVinci Resolve Studio excels. Its 32-bit image processing, industry-standard HDR output, and Resolve Color Management provide tools for Dolby Vision, HDR10+, and HDR Vivid metadata palettes. HDR-specific adjustments, tone mapping, and monitoring using built-in scopes are all supported, enabling professionals to work with the full potential of modern cinema cameras that capture extensive dynamic range. The HDR palette allows for precise adjustments across super blacks, shadows, midtones, highlights, and specular whites, with the ability to define custom tonal ranges.
Color Warper and RAW Image Processing
The Color Warper tool offers advanced control, allowing for Hue vs. Hue adjustments based on specific saturations, effectively giving images a completely new feel. It also enables warping color based on luminance. This tool displays a web or grid of hues and saturations, allowing users to select and drag ranges to new points.
DaVinci Resolve also works with virtually all native camera RAW formats. By choosing a RAW file and accessing the RAW palette, users gain total control over highlight recovery, white balance, gamma, exposure, color temperature, tint, and sharpness. This RAW image processing is non-destructive and interprets the camera's original sensor data before it enters the node editor.
Face Refinement and Beauty Tools
For projects involving people, the Face Refinement tool in DaVinci Resolve Studio can automatically detect faces, create masks for different facial features, and track them. This significantly reduces the manual effort required for retouching. Users can then sharpen and brighten eyes, remove bags, smooth skin, add blush, and color lips using simple sliders. The ResolveFX Beauty tool, with its "ultra beauty" mode, offers advanced control for corrective beauty work, featuring stronger filtering algorithms for more natural results.
Object Removal and Patch Replacer
Removing unwanted objects from a shot can be achieved using a combination of Power Windows, tracking, and the Object Removal plug-in in DaVinci Resolve Studio. By drawing a window around the object, tracking its movement, and applying the plug-in, the DaVinci Neural Engine can analyze the scene and intelligently remove the object. The Patch Replacer tool acts like a clone or rubber stamp, allowing users to copy pixels from one area of an image to another for cleanup tasks.
Conclusion: Mastering Consistency with DaVinci Resolve
DaVinci Resolve's color matching capabilities are a powerful asset for any video editor. From the quick and effective "Shot Match to this Clip" feature to the granular control offered by nodes, curves, and scopes, the software empowers creators to achieve a consistent, professional, and visually compelling look across all their footage. By understanding and utilizing these tools, you can transform disparate clips into a unified narrative, enhancing the storytelling and overall impact of your video projects. Experimentation with these features will undoubtedly lead to a deeper appreciation for the art and science of color grading and matching.