Exporting your video projects from DaVinci Resolve is a critical step that directly impacts the final presentation of your work. The choices you make during the export process determine the quality, compatibility, and suitability of your video for its intended platform. Whether your goal is to upload a polished video to YouTube, share a captivating piece on Instagram, deliver content for television broadcast, or fulfill specific client requirements, understanding and applying the correct export settings in DaVinci Resolve will ensure your vision is translated accurately and effectively. This guide will walk you through the essential steps and considerations for exporting your projects, from basic principles to advanced optimizations.
Navigating the Deliver Page in DaVinci Resolve
Once your editing and grading are complete within DaVinci Resolve, the next crucial phase is exporting your project. This is accomplished through the dedicated "Deliver" page. To access this workspace, simply click on the "Deliver" tab located at the bottom of the DaVinci Resolve interface. This action transitions you into the export environment, where all the necessary controls for rendering your video reside.
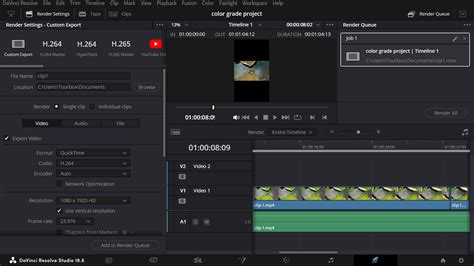
Upon entering the Deliver page, you'll be presented with a range of options on the left-hand side. DaVinci Resolve offers a series of pre-configured "Render Presets" designed for various popular platforms and workflows, including presets for YouTube, Vimeo, and even compatibility with non-linear editing software like Final Cut Pro. These presets serve as excellent starting points, offering a quick way to apply optimized settings. However, for more specific needs or to achieve a precise outcome, you also have the flexibility to create and save your own custom export settings, ensuring a tailored approach to every project.
Understanding Format and Codec Choices
The selection of the correct format and codec is fundamental to achieving the desired balance between quality, file size, and compatibility. For general video distribution across most online platforms and for broad compatibility, MP4 and MOV are the most commonly used container formats.
Within these formats, the choice of codec plays a vital role:
- H.264 (AVC): This is often considered the industry standard for online video distribution. It provides an excellent balance between video quality and manageable file sizes, making it ideal for platforms like YouTube, Vimeo, and social media.
- H.265 (HEVC): Offering more advanced compression than H.264, H.265 can achieve similar quality at a smaller file size. This is particularly beneficial for high-resolution content (like 4K and 8K) or when bandwidth is a concern. However, it may require more processing power for encoding and decoding and might not be universally supported by older devices or some older editing software.
- ProRes (Apple): A family of intermediate codecs developed by Apple, ProRes is renowned for its high quality and efficiency in post-production workflows. It's a visually lossless codec, meaning it retains a very high degree of image information. ProRes 422 HQ is a popular choice for professional use, offering excellent quality with moderate file sizes, making it suitable for master files or for further editing.
- DNxHR/DNxHD (Avid): Similar to ProRes, Avid's DNxHR and DNxHD codecs are professional-grade intermediate codecs designed for high-quality video editing and mastering. They offer excellent image fidelity and are widely used in broadcast and professional film production. DNxHR HQX is the high-quality variant.
For professional use, archival purposes, or when the exported file is intended for further editing or mastering, codecs like ProRes 422 HQ or DNxHR HQX are generally preferred. These formats preserve maximum image quality and are ideal for future editing or broadcast television, acting as robust master files.
Optimizing Resolution and Frame Rate
A core principle when exporting is to match the resolution and frame rate of your timeline unless your specific delivery requirements dictate otherwise. Your timeline resolution is the fundamental canvas size of your project, and its frame rate dictates the smoothness of motion. Exporting at these native settings ensures that you are not upscaling (which can lead to a loss of detail) or downscaling unnecessarily, and that the temporal information (motion) is preserved as intended.
For instance, if you've edited a project in 4K (3840 x 2160) at 29.97 frames per second, your export settings should ideally mirror these values. Deviations should only occur if, for example, you are specifically preparing a lower-resolution version for web streaming or a different frame rate for slow-motion effects that were intentionally created.
Fine-Tuning Quality Settings: Bitrate and Encoding
The quality settings, particularly the bitrate, are paramount in determining the visual fidelity and file size of your exported video.
- Bitrate: This refers to the amount of data used per second of video. A higher bitrate generally translates to better quality but also a larger file size. For most online platforms, it's recommended to "Restrict to" a specific bitrate rather than using variable or constant quality settings that might result in unpredictable file sizes.
- For 1080p (Full HD) projects destined for online viewing, a bitrate between 10,000 kb/s and 20,000 kb/s is often a good starting point, with 15,000 kb/s being a common recommendation for consistent quality.
- For 4K (UHD) projects, a higher bitrate is necessary to maintain detail. 40,000 kb/s (40 Mbps) is frequently cited as an optimal setting for 4K content on platforms like YouTube.
- Encoding Profile: Setting the encoding profile to "High" (often referred to as "High Profile" in H.264/H.265 settings) ensures that the encoder utilizes the most advanced compression techniques available, leading to the best possible quality for the chosen bitrate.
Audio Settings for Clarity and Compatibility
High-quality audio is just as important as excellent video. When exporting, ensure your audio settings are configured for clarity and compatibility.
- Format: AAC (Advanced Audio Coding) is the standard audio codec for most online video distribution. It offers good compression efficiency while maintaining excellent audio quality.
- Bitrate: For stereo audio, a bitrate of 320 kb/s is generally considered high-quality and is sufficient for most applications, providing a rich and detailed listening experience without unnecessarily inflating the file size. For mono audio, 128 kb/s or 192 kb/s might suffice.
Setting the Destination for Your Render
Before you initiate the export process, you must specify where the final video file will be saved. Click on the “Browse” button in the export settings. This will open a file browser window, allowing you to navigate to your desired storage location on your computer or external drives. It’s good practice to create a dedicated folder for your exported files to keep your projects organized.
Adapting for Different Aspect Ratios
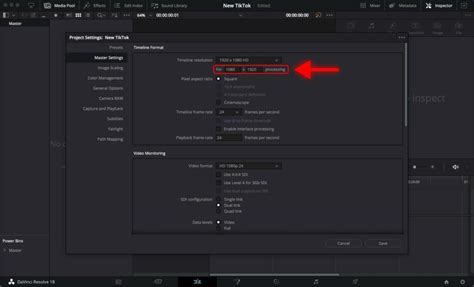
In today's multi-platform content landscape, videos are often required in various aspect ratios beyond the traditional widescreen. If your final delivery requires a different format, such as a vertical video for Instagram Reels or TikTok, a square video for Instagram feeds, or an ultrawide format, you can adjust your project settings accordingly. DaVinci Resolve allows you to change the timeline resolution and aspect ratio to accommodate these specific needs. This ensures your content is optimized for viewing on different devices and platforms, from mobile phones to large screens.
How To Change Aspect Ratio in DaVinci Resolve (YouTube, TikTok, Film)
Pro Tips for Seamless Exporting
To streamline your workflow and minimize potential issues, consider these professional tips for exporting in DaVinci Resolve:
- Utilize Render Presets: As mentioned earlier, DaVinci Resolve’s built-in render presets are invaluable for saving time and reducing the likelihood of errors. They provide a solid foundation for common delivery platforms.
- Verify Color Management: It is crucial to ensure that your export color space settings align with your project settings and the intended display environment. For most web content and general distribution, the Rec.709 color space is the standard. Mismatches in color management can lead to exported videos appearing washed out, oversaturated, or with incorrect contrast compared to your timeline view. Check your project settings and the Deliver page's color space options to confirm they are consistent.
- Export a Test Clip: Before committing to rendering an entire, potentially lengthy video, it is highly recommended to export a short section or a "test clip." This allows you to quickly verify that your chosen settings are producing the desired quality, that there are no unexpected artifacts or glitches, and that the audio is synchronized correctly. This small step can save significant time and frustration by catching issues early.
- Understand Delivery Requirements: Different platforms and broadcasters have specific technical specifications and compression algorithms. Always consult the guidelines provided by the platform (e.g., YouTube's upload recommendations, Instagram's technical requirements) or your client. Optimizing your export settings for the specific platform your audience will use will ensure your video plays smoothly and looks its best.
Addressing Common Export Challenges
Several common issues can arise during the export process, and understanding their causes can help you resolve them efficiently.
Avoiding Quality Loss During Export
To export a video in DaVinci Resolve without significant quality loss, the primary strategy involves using codecs and settings that minimize or eliminate compression artifacts. For archival or professional master files, employing visually lossless codecs like ProRes 422 HQ or DNxHR HQX is the best approach. These codecs are designed to retain a very high degree of image detail. Crucially, you must match your project's resolution and frame rate during export. Furthermore, disabling unnecessary compression or using very high bitrates is essential.
For online delivery platforms like YouTube, which inherently use compression, the goal is to minimize this compression's impact. This means using H.264 with a high bitrate. For example, a bitrate of 40 Mbps (Megabits per second) is often recommended for 4K content, and around 15 Mbps for 1080p content. Using the "Restrict to" bitrate option ensures consistency.
Optimal Settings for YouTube
When preparing a video for YouTube, specific settings are generally recommended to achieve the best balance of quality and upload efficiency:
- Format: MP4 is the most widely accepted container.
- Codec: H.264 is the preferred video codec.
- Resolution: Match your timeline's resolution. Common choices include 3840x2160 (4K) or 1920x1080 (1080p).
- Bitrate: For 4K, aim for around 40 Mbps. For 1080p, 15 Mbps is a good target. Always enable the "Restrict to" bitrate option to ensure consistent quality.
- Frame Rate: Ensure the export frame rate matches your source footage or timeline settings. Common frame rates include 23.976, 25, 29.97, 50, and 59.94 fps.
Exporting Vertical Video for Instagram Reels
To create a vertical video suitable for platforms like Instagram Reels or TikTok, you need to configure your project and export settings for a vertical aspect ratio:
- Timeline Resolution: Set your timeline resolution to 1080 pixels wide by 1920 pixels tall (1080x1920).
- Format: Use MP4.
- Codec: H.264 is recommended.
- Bitrate: A bitrate of around 10 Mbps is generally sufficient for vertical 1080p content.
- Frame Rate: 30 fps is a common and widely compatible frame rate for social media.
- Content Framing: Critically, ensure your main subject and key visual elements are centered within the frame. This is vital because different devices and apps may display content with slight variations in safe areas, and centering minimizes the risk of important parts being cropped out.
Master File Export Settings
For creating a master file that will be used for archival purposes or for further post-production, broadcast, or distribution to other platforms, the priority is maximum quality preservation. In DaVinci Resolve, this typically means exporting in a professional, intermediate codec. The universally recommended choices are:
- MOV Container with ProRes 422 HQ Codec: This is an excellent option, especially for users on macOS, offering a great balance of high quality and manageable file sizes for professional workflows.
- MOV or MXF Container with DNxHR HQX Codec: For users on Windows or in mixed environments, DNxHR HQX provides comparable quality and performance to ProRes 422 HQ.
These formats are considered "visually lossless," meaning they retain nearly all the image information from your timeline, making them ideal for long-term storage and future repurposing.
Understanding Why Exported Video Looks Different
A common and often frustrating issue is when the exported video does not look the same as it did on the editing timeline. This discrepancy is most frequently caused by color space mismatches or incorrect gamma transfer function settings. DaVinci Resolve handles color management meticulously, and if the color space or gamma settings used during export do not align with the settings used for your project and intended viewing environment (e.g., Rec.709 for web/broadcast, sRGB for some web displays), color shifts, contrast changes, or brightness alterations will occur. Always double-check your project's color management settings in DaVinci Resolve and ensure that the export settings, particularly the color space option on the Deliver page, are set to match. For most web content, exporting in Rec.709 is the standard practice.
By carefully considering these settings and understanding the underlying principles, you can confidently export your projects from DaVinci Resolve, ensuring your videos meet the highest standards of quality and compatibility for their intended audience and platform.