Photoshop offers a diverse array of methods to duplicate elements within your images, a fundamental skill that can significantly streamline your creative process. Whether you're aiming to create backups, experiment with edits without altering the original, prepare for complex compositing, or simply replicate objects for design purposes, understanding these duplication techniques is paramount. This tutorial delves into the various ways to duplicate layers, selections, and entire images in Photoshop, empowering you to work more efficiently and effectively.
The Foundation: Understanding Layers in Photoshop
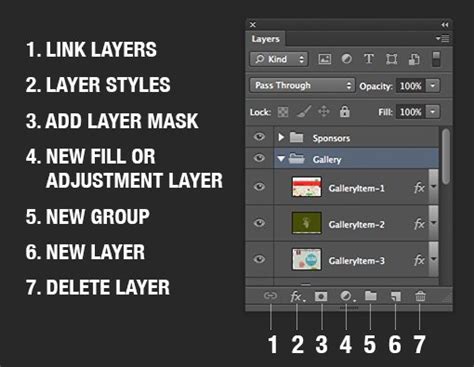
Before diving into duplication, it's crucial to grasp the concept of layers. Think of Photoshop layers as stacked, transparent panes of glass, each containing a different element of your image. This layered approach is central to Photoshop's flexibility, allowing for non-destructive editing and intricate manipulation. The Layers Panel, typically located on the right side of your workspace, is your command center for managing these layers. It's critical for organizing image layers, which is vital for any duplication efforts. Layers help keep different components of your image organized and editable at any time, ensuring that your original image remains intact while you experiment. Familiarize yourself with the Toolbar and the Layers Panel to effectively manage your image components.
Duplicating Entire Layers: Quick and Efficient Methods
Duplicating layers is one of the most common and essential tasks in Photoshop. This is particularly useful when you need to experiment with different edits on a copy of a layer without affecting the original.
The Classic Copy and Paste
One of the easiest and most straightforward methods to duplicate an object or an entire layer is the classic Copy and Paste technique. This familiar shortcut is universally applicable across many applications.
- For Mac users: Press Command + C to copy, then Command + V to paste.
- For PC users: Press Ctrl + C to copy, then Ctrl + V to paste.
When you paste, the duplicated layer will appear in your Layers Panel, often above the currently active layer. You may need to select this newly made duplicate, depending on what you duplicated and how. For example, if you duplicated by copying and pasting, you need to select the new image layer that has been created.
The Duplicate Layer Command
Photoshop provides a dedicated command for duplicating layers, offering a slightly more controlled approach.
- Select the Layer: In the Layers Panel, click on the layer you wish to duplicate.
- Access the Command: You can access this command in two primary ways:
- Navigate to Layer > Duplicate Layer in the top menu bar.
- Click on the Layers Panel's "More menu" (often represented by three horizontal lines or dots) and select Duplicate Layer.
- Dialog Box: A dialog box will appear, allowing you to give the duplicated layer a new name if desired. This is helpful for maintaining organization, especially when working with numerous layers.
The Keyboard Shortcut: Ctrl/Command + J
For even greater efficiency, Photoshop offers a powerful keyboard shortcut for duplicating the selected layer.
- For Mac users: Select the layer and press Command + J.
- For PC users: Select the layer and press Ctrl + J.
This shortcut is particularly useful when working with complex images, as it allows for precise control over specific areas without changing the original layer. It's a quick way to create an exact copy that appears as a new layer in the Layers Panel.
Duplicating Selections: Precision for Specific Areas
If you only need to duplicate a specific part of an image rather than an entire layer, Photoshop's selection tools are your best allies. This method is invaluable when you want to isolate and replicate a particular element.
Utilizing Selection Tools
Photoshop offers a range of selection tools to cater to different needs:
- Marquee Tools: These tools, such as the Rectangular Marquee Tool and the Elliptical Marquee Tool, allow you to create geometric selections. They are ideal for duplicating rectangular or oval areas of your image.
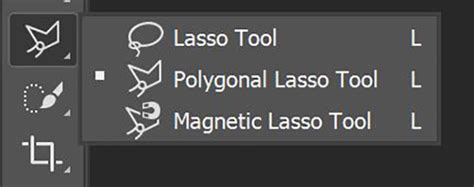
- Lasso Tools: The Lasso Tool, Polygonal Lasso Tool, and Magnetic Lasso Tool provide more flexibility when creating selections. You can draw freehand selections, create straight-edged selections, or have the tool snap to edges in your image, respectively.
Once you have made your selection using any of these tools:
- Copy: Press Command + C (Mac) or Ctrl + C (PC) to copy the selected area.
- Paste: Press Command + V (Mac) or Ctrl + V (PC) to paste the selection as a new layer.
This creates a new layer containing only the selected pixels, preserving the original image. You can then move, transform, or edit this new layer independently.
Duplicating Images: Creating Entirely New Files
Duplicating an entire image in Photoshop is a fundamental skill for various editing workflows. It allows you to have a separate, editable copy of your original image, essential for experimentation and safeguarding your work.
Using "Save As" for Duplication
The most straightforward way to duplicate an entire image is by using the "Save As" function.
- Open Your Image: First, open your real estate photo or any image within Photoshop. Make sure your image resolution is set appropriately for the task at hand; you can check and adjust this by selecting Image > Image Size.
- Navigate to Save As: Go to File > Save As.
- Choose a New Filename: In the "Save As" dialog box, choose a new filename for your duplicate. Ensure you are saving it to a different location or with a different name to avoid overwriting your original file.
- Select Format: Choose the desired file format (e.g., PSD for layered editing, JPEG for sharing).
This method creates a completely independent copy of your image.
Duplicating a Layer to a New Document
You can also duplicate a layer from your current document into a new, separate document.
- Open the Source Image: Ensure the image containing the layer you want to duplicate is open.
- Select the Layer(s): In the Layers Panel, select the layer or layers you wish to duplicate.
- Duplicate Layer: Use the Duplicate Layer command (Layer > Duplicate Layer or Ctrl/Command + J).
- Choose Destination Document: In the "Duplicate Layer" dialog box, under the "Document" pop-up menu, select New.
- Create New File: A new document will be created containing a copy of your selected layer. You can then save this new document as a separate file. The layer created by duplicating a layer has no background by default, unless the original layer had one.
Advanced Duplication Techniques and Considerations
Beyond the basic methods, Photoshop offers more nuanced ways to duplicate and manage your duplicated elements, enhancing your control and workflow.
Cloning Objects
Cloning is a powerful technique for copying specific parts of an image directly onto the original image or another layer. This is particularly useful for removing blemishes, replicating textures, or seamlessly extending areas.
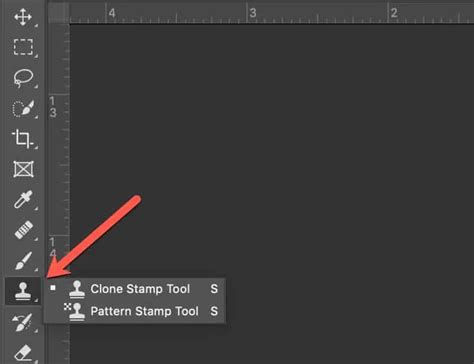
- Select the Clone Stamp Tool: Choose the Clone Stamp Tool from the Toolbar (shortcut: S).
- Define the Source: Hold down the Option key (Mac) or Alt key (PC) and click on the part of the image you wish to clone. This sets the source point.
- Paint the Clone: Release the Option/Alt key and click and drag over the area where you want to paint the cloned pixels. The tool will copy pixels from your defined source point to where you are painting.
Dragging Layers Between Documents
You can easily duplicate layers from one image and place them into another by simply dragging them.
- Open Both Documents: Have both the source image and the destination image open in Photoshop.
- Select Layer(s): In the Layers Panel of the source document, select the layer or layers you want to duplicate.
- Drag and Drop: Click and drag the selected layer(s) from the source document's Layers Panel directly into the image window of the destination document.
- Positioning: The copied layer will appear in the destination image, usually above the active layer in the Layers Panel. If the layer youâre dragging is larger than the destination image, only part of the layer may be visible initially. You can then reposition, resize, or transform it as needed.
Moving Layers in Increments
When positioning duplicated layers, you can move their contents together with precision.
- 10-Pixel Increments: Hold down the Shift key while using the arrow keys on your keyboard to move the selected layer in 10-pixel increments.
- Diagonal Movement: Combine the Shift key with arrow keys for precise diagonal movements.
Layer Management with Duplicates
Effective layer organization is vital when working with multiple duplicates.
- Descriptive Naming: Name your layers descriptively to easily identify their content or purpose.
- Layer Groups: Use layer groups to categorize related duplicates, minimizing clutter in the Layers panel.
- Stacking Order: Change the stacking order of layers by dragging them up or down in the Layers Panel. This directly affects how layers overlap and interact visually.
- Layer Alignment and Distribution: Use Photoshop's alignment and distribution tools to precisely position multiple duplicated layers relative to each other.
Merging and Flattening Duplicated Layers
Once you've completed your edits with duplicated layers, you may want to combine them to simplify your document and reduce file size.
Merging Layers
Merging layers combines selected layers into a single layer. This is a significant step in maintaining a clean and organized file.
- Select Layers: Select the layers you want to merge in the Layers panel. To select more than one layer, hold down Ctrl (Command in Mac OS) and click on each layer.
- Merge Command: You can merge selected layers using:
- Ctrl + E (PC) or Command + E (Mac): This is a quick keyboard shortcut for merging selected layers with the layer directly below them.
- Layer > Merge Selected: Access this option from the top menu.
- Layers Panel More Menu: Select Merge Selected from the Layers panel's More menu.
Caution: Merging is a permanent action. Be cautious, as it cannot be undone after saving and closing the document. Consider saving a copy of your work with layers intact for future edits before merging.
Flattening the Image
Flattening an image combines all visible layers into a single background layer. This drastically reduces file size but eliminates the ability to edit individual layers.
- Access Flatten Command: Go to Layer > Flatten Image.
- Effect: This process merges all layers, discards hidden layers, and fills transparent areas with white.
Note: Merging layers or flattening an image can greatly increase the file size of an image if the layers are complex or have many effects. Conversely, merging layers reduces file size by consolidating them.
Difference between Merge and Flatten in Photoshop
Saving and Exporting Your Duplicated Work
After duplicating and editing your images, the final steps involve saving and exporting your work for various purposes.
Saving Your Work
- Save As (PSD): If you intend to continue editing or need to preserve your layers, use File > Save As and choose the Photoshop (.PSD) format. This ensures all your layers, masks, and adjustments are saved.
- Save a Copy: For a quick backup with layers intact, use File > Save a Copy.
Exporting for Use
When your image is ready for web, print, or other platforms, you'll export it.
- Export As: Use File > Export > Export As for fine-grained control over resolution, quality, and file format.
- Quick Export: For faster exports with preset settings, use File > Export > Quick Export.
- Common Formats:
- JPEG: Ideal for photographs, offering good compression and quality.
- PNG: Excellent for graphics with transparency or sharp lines.
- GIF: Suitable for simple animations or images with limited colors.
Adjust resolution, quality, and other export settings to match the requirements of your project.
Best Practices for Duplicating in Photoshop
To maximize the benefits of duplication techniques and maintain a smooth workflow, consider these best practices:
- High Resolution: Always start with high-resolution images for better editing results and to ensure that duplicated elements retain quality.
- Organized Layers: Keep your layers organized by naming them appropriately as you duplicate and edit. Use layer groups for related elements.
- Non-Destructive Editing: Employ non-destructive editing techniques, such as adjustment layers and Smart Objects, whenever possible. This preserves the original image quality and allows for easier modifications later.
- Experimentation: Don't hesitate to experiment with different duplication methods. Find which ones work best for your specific workflow and project needs.
- Save Often: Regularly save your work, especially when dealing with complex projects involving numerous duplicated layers.
By mastering these various methods for duplicating elements in Photoshop, you can significantly boost your productivity and unlock new creative possibilities in your image editing and design projects. Happy duplicating!