Are you looking to speed up your color correction workflow so you can get projects done faster or take on more clients? Then it’s time to dive into the world of shortcuts for DaVinci Resolve. Whether you’re a seasoned professional or a color correction novice, this list of shortcuts will help make color correction faster, easier, and more efficient. Make sure you save this page for easy reference in your next editing session. DaVinci Resolve has transformed from a standalone color correction platform into an all-in-one editing suite, primed with all the tools necessary for full-on post-production. While it’s recognized as the industry standard for color correction and grading, more editors and post-production professionals are utilizing DaVinci start-to-finish for video projects than ever before. No matter your experience level in DaVinci Resolve, the following sections highlight the most helpful hotkeys and shortcuts to streamline your workflow. Read through this list, take detailed notes, and find the bits that work best for you. Once you implement these maneuvers in your day-to-day editing process, you’ll find yourself spending less time futzing around in the timeline and more energy on the creative process, getting the project into its final, polished form faster than ever.
Keyboard shortcuts are a fundamental staple of computer systems, first invented in the 1970s, and they have helped shape how technologies emerged. From Ctrl+C to Ctrl+V for copy and paste, or Alt+F4 to exit a crashed program, keyboard shortcuts are a pivotal function of an operating system. While some shortcuts are tied to the inner workings of your computer, individual software applications also often have specific keyboard shortcuts to aid efficiency and perform actions faster. For example, if you wanted to cut a media clip into two separate timeline files using your mouse, you would need to click the blade tool beneath the viewing window, then go back to your media clip on the timeline and click to slice the clip into two. However, if you use a keyboard shortcut, you can hit 'B' on the keyboard to switch to the blade tool instantly. Or, if the playhead is already over the spot where you want to split the clip, you could press Ctrl+B, which slices the clip for you while keeping you in your original edit state. With these shortcuts, there’s no need to move the mouse at all. It’s not like using your mouse is a lengthy task that eats up 10 minutes of your time; at most, you’re saving 3-4 seconds. But think of how many times you’ll be performing these actions over the course of your entire edit. Those few seconds add up to a considerable amount of time, and many times, your editing speed is what will separate you from the next editor.
The Essential DaVinci Resolve Keyboard Shortcuts for Beginners
Understanding the fundamentals comes first, no matter your post-production focus. These familiar keyboard shortcuts will assist your efforts in cutting and pasting segments of your video, managing your project files, and navigating your timeline with unparalleled speed.
Basic Operations
These are the foundational commands that every editor needs to have at their fingertips. They form the bedrock of efficient editing, allowing for quick manipulation of clips and project elements.
- Cut:
[Ctrl/Cmd + X]- Removes the selected clip or element and places it on the clipboard. - Copy:
[Ctrl /Cmd + C]- Duplicates the selected clip or element and places it on the clipboard without removing it from its original location. - Undo:
[Ctrl/Cmd + Z]- Reverts the last action performed, allowing you to correct mistakes or experiment with different approaches. - Redo:
[Ctrl/Cmd + Shift + Z]- Reapplies an action that was previously undone. - Paste:
[Ctrl/Cmd + V]- Inserts the content of the clipboard at the current playhead position or into a selected area. - Paste Attribute:
[Alt/Option + V]- Allows you to paste specific attributes (like color grades, effects, or transformations) from one clip to another, maintaining your project's visual consistency. - Select All:
[Ctrl/Cmd + A]- Selects all elements within the current view or timeline. - Deselect All:
[Ctrl/Cmd + Shift + A]- Removes all current selections, allowing you to start fresh.
File Handling and Project Management
Saving your work and managing your project files efficiently is crucial. These shortcuts make it effortless to begin from scratch, record the progress of your editing tasks, and organize your assets.
- Save:
[Ctrl/Cmd + S]- Saves your current project, ensuring your progress is not lost. - Save As:
[Ctrl /Cmd + Shift + S]- Saves the current project under a new name or in a different location, useful for creating backup versions or parallel edits. - New Bin:
[Ctrl/Cmd + Shift + N]- Creates a new bin in the Media Pool, helping you organize your imported footage and assets. - New Timeline:
[Ctrl/Cmd + N]- Creates a new timeline within your project, essential for multi-sequence projects or for organizing different stages of your edit. - Import Project:
[Ctrl/Cmd + I]- Opens a dialog box to import an existing DaVinci Resolve project file. - Export Project:
[Ctrl/Cmd + E]- Initiates the export process for your finished project. - Deselect All Tracks:
[Ctrl/Cmd + Shift + A]- Deselects all tracks, allowing for focused editing on specific elements.
Editing Shortcuts for Enhanced Productivity
This is where things get interesting. With this list of commands, you’ll find yourself completely immersed in the editing process. Whether splitting, splicing, or trimming, overwriting an edit, or adding a transition between frames, these keyboard shortcuts will become your most coveted tools to increase your productivity in DaVinci Resolve.
Timeline Manipulation
These shortcuts are designed to speed up the physical act of editing on the timeline, reducing the need for constant mouse interaction and allowing for a more fluid editing experience.
- Trim:
[T]- Activates the Trim Edit Mode, allowing you to adjust the in and out points of clips directly on the timeline. - Blade:
[B]- Selects the Blade tool, enabling you to cut clips at any point. - Razor:
[Ctrl/Cmd + B]- Cuts the selected clip directly at the playhead position. This is incredibly useful for quick edits without switching tools. - Pointer:
[A]- Selects the standard Selection tool, allowing you to move, trim, and select clips. - Insert Edit:
[F9]- Inserts the selected clip from the source viewer into the timeline at the playhead position, shifting subsequent clips to make room. - Overwrite Edit:
[F10]- Overwrites the portion of the timeline at the playhead with the selected clip from the source viewer. - Replace Edit:
[F11]- Replaces the selected clip on the timeline with the clip from the source viewer, maintaining the duration of the original clip. This is particularly useful after color grading to swap a frame while preserving the grade. - Place on Top Edit:
[F12]- Places the selected clip on an upper video track at the playhead position, useful for picture-in-picture effects or overlays. - Delete:
[Backspace]- Deletes the selected clip or element. By default, this performs a ripple delete, closing any gaps. - Dynamic Trim Mode:
[W]- Activates Dynamic Trim Mode, a powerful tool for ripple, slide, slip, and roll edits. In DaVinci Resolve, unlike some other NLEs, the trim tool is dynamic; by hovering over different pieces of the timeline, editors can choose their editing style. - Select Clips Forward:
[Y]- Selects all clips on the timeline from the playhead position to the end of the timeline. - Edit Point Type:
[U]- Allows you to easily scan through your timeline by selecting edit points. Simply press[U]and then use the up/down arrow keys to navigate from clip to clip, bringing you between shots faster than manually scrolling from one frame to the next. - Snapping On/Off:
[N]- Toggles snapping to edit points and frame boundaries on or off. This is crucial for precise alignment. - Split Clip:
[Ctrl/Cmd + (+)]- Splits the selected clip at the playhead. - Join Clip:
[Alt/Option + (+)]- Joins selected adjacent clips into a single compound clip. - Add Transition:
[Ctrl/Cmd + T]- Adds the default transition (usually a cross dissolve) between two selected clips or at the playhead position.
Playback and Navigation
Intuitively navigating the timeline ensures the smoothest possible editing experience. Maintaining this focus during playback keeps the creative process flowing, and with DaVinci Resolve’s easy-to-remember keystrokes, you’ll keep track of the last frame while imagining what needs to come next without the headache.
- Play (forward):
[L]- Starts or pauses playback in the forward direction. HoldingLmultiple times can increase playback speed. - Play (reverse):
[J]- Starts or pauses playback in the reverse direction. HoldingJmultiple times can increase reverse playback speed. - Stop:
[K]- Stops playback. - Go to First Frame:
[;]- Moves the playhead to the very beginning of the timeline. - Go to Last Frame:
[‘]- Moves the playhead to the very end of the timeline. - Go to Previous Keyframe:
[Go to previous keyframe]- Moves the playhead to the preceding keyframe. (Note: The specific key for this may vary or require customization). - Go to Next Keyframe:
[Go to next keyframe]- Moves the playhead to the subsequent keyframe. (Note: The specific key for this may vary or require customization). - Next Clip:
[Down arrow]- Moves the playhead to the beginning of the next clip in the timeline. - Previous Clip:
[Up arrow]- Moves the playhead to the beginning of the previous clip in the timeline. - Move One Frame Forward:
[Right arrow]- Advances the playhead by one frame. - Move One Frame Backward:
[Left arrow]- Moves the playhead back by one frame. - Move One Second Forward:
[Shift + Right arrow]- Advances the playhead by one second. - Move One Second Backward:
[Shift + Left arrow]- Moves the playhead back by one second. - Toggle Full-Screen Viewer:
[Cmd + F / Ctrl + F]- Switches the viewer to full-screen mode. - Toggle Loop Playback:
[Cmd + / / Ctrl + /]- Enables or disables loop playback for a selected section of the timeline.
Marking and Annotation
Avoid scrolling back and forth between one end of your video timeline to the other. Setting markers in your timeline is the easiest way to navigate between key moments of your story, and DaVinci Resolve makes it as simple as tapping your keyboard to establish these interest points.
- Set Mark In:
[I]- Sets the "In" point for a selected range or clip. - Set Mark Out:
[O]- Sets the "Out" point for a selected range or clip. - Mark Clip:
[X]- Marks the selected clip or range between the In and Out points. - Add Marker:
[M]- Adds a marker at the current playhead position. When a clip is selected, it adds a marker to the media clip itself. PressingCtrl+MorCmd+Mbrings up an info box to add details to the marker instantly. - Delete Marker:
[Alt/Option + M]- Deletes the selected marker. - Add Flag:
[G]- Adds a flag to the selected clip or timeline marker, useful for categorizing or noting specific aspects. - Edit Marker:
[Ctrl/Cmd + M]- Opens the marker details window for the selected marker, allowing you to edit its name, comments, and color.
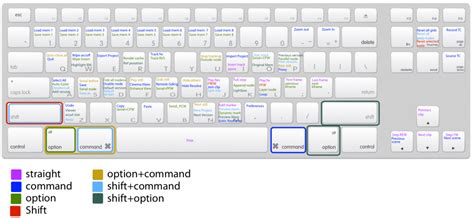
Davinci Resolve 18 Keyboard shortcuts - Playback/Navigation
Advanced Editing and Clip Actions
As you become more comfortable with the basic shortcuts, these advanced commands can further refine your editing process, offering more control and efficiency for complex tasks.
Clip Modifications
These shortcuts allow for precise control over individual clips and their properties.
- Replace Edit (Maintaining Grade):
[F11]- Use this function to swap a frame after the color grading process has been completed. Utilizing this shortcut will maintain the color grade from the original frame and apply it to the new clip, preserving your project’s visual aesthetic. - Delete (Ripple Delete):
[Backspace]- Deletes the selected clip and automatically closes the gap, rippling subsequent clips forward. - Ripple Delete:
[Ctrl/Cmd + Shift + Backspace]- Explicitly performs a ripple delete, closing any gaps. - Trim Start to Playhead:
[Shift + []- Trims the start of the selected clip to the current playhead position. - Trim End to Playhead:
[Shift + []- Trims the end of the selected clip to the current playhead position. - Disable Clip:
[D]- Toggles the visibility of the selected clip on or off. This is useful for A/B testing different takes or temporarily removing elements. - Join Clip:
[Ctrl + \ / Cmd + \]- Joins selected adjacent clips into a single unit. - Change Clip Speed:
[Ctrl/Cmd + R]- Opens the clip speed dialog, allowing you to create slow-motion, fast-motion, or freeze frames. - Add Transition:
[Ctrl/Cmd + T]- Adds the default transition between selected clips. - Add Video-Only Transition:
[Alt + T / Option + T]- Adds only a video transition between clips, leaving the audio unaffected. - Add Audio-Only Transition:
[Shift + T]- Adds only an audio transition between clips. - Select Audio of Linked Clip:
[Alt/Option + Click]- When audio and video are linked, holdingAltorOptionwhile clicking allows you to select only the audio component. - Select Video of Linked Clip:
[Alt/Option + Click]- Similarly, holdingAltorOptionwhile clicking on the video component allows you to select only the video.
Advanced Trim Modes
DaVinci Resolve's trim modes offer sophisticated ways to adjust edits without leaving gaps or creating unwanted overlaps.
- Trim Edit Mode:
[T]- As mentioned earlier, this mode allows for direct manipulation of edit points. - Dynamic Trim Mode:
[W]- This mode is a powerhouse for adjustments. When activated, you can use the 'Slip' and 'Slide' tools by hovering your mouse over different parts of a clip to adjust its start and end points relative to the surrounding clips, or to shift the media within its existing duration.
Pasting Attributes
The Paste Attributes function is invaluable for maintaining a consistent look and feel across your project.
- Paste Attributes:
[Alt/Option + V]- Opens a window where you can select specific attributes (like color grades, transformations, audio levels, effects, etc.) to paste from a copied clip to selected clips on the timeline. This allows for granular control over what information is transferred.
Customizing Your DaVinci Resolve Keyboard Shortcuts
The beauty of DaVinci Resolve lies in its adaptability. Many editors find some of the default shortcut combinations confusing or awkward and want to alter them to make them more adaptive to their work style. Thankfully, DaVinci Resolve makes it easy to do that.
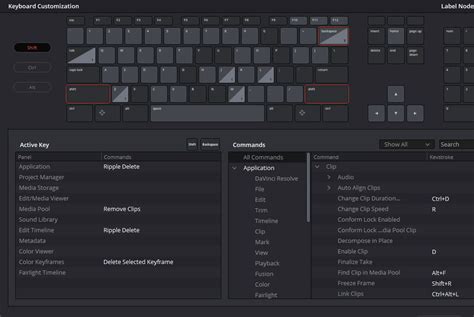
Accessing Keyboard Customization
To add or change your shortcuts and hotkeys in DaVinci Resolve:
- Navigate to the “DaVinci Resolve” menu in your menu bar and select “Keyboard Customization.” This can also be accessed via the shortcut
[Ctrl + Alt + K]or[Cmd + Alt + K].
Replicating Existing Layouts
DaVinci Resolve offers the option of replicating shortcut keyboard layouts from other popular editing software, making the transition smoother for users migrating from different platforms.
- In the Keyboard Customization window, select the dropdown menu at the top right-hand side. By default, it should say “DaVinci Resolve.”
- The dropdown should then reveal different options for programs such as Adobe Premiere Pro or Avid Media Composer.
- Select the program whose layout you wish to replicate and then hit “Save” at the bottom of the window to lock in your preferences. This is a fantastic way for editors used to a certain hotkey layout to replicate it directly in Resolve without having to manually enter each hotkey.
Adding Custom Hotkeys and Shortcuts
For those who prefer to build their own personalized setup:
- Locate the command or tool you want to assign a shortcut to by scrolling through the extensive list of commands or using the search bar to find a specific command.
- To assign a new shortcut, click on the command. In the “Keystroke” box, press the desired key or key combination. If the key is already assigned, Resolve will warn you.
- You can delete the linked key or shortcut associated with a command and replace it with your own, or add an additional shortcut on top of the original using the “+” sign next to the assigned key or key combination. Since DaVinci Resolve 15.2, you can assign multiple keys or key combinations to the same command, offering immense flexibility.
- Once you have created all your assigned shortcuts, you can choose to save them to your default keyboard or create a new keyboard layout using the dropdown menu at the top right corner. Select “Save As New Preset” to save your new layout as its own distinct preset.
By following these steps, you can create perfectly personalized keyboard shortcuts that will help you blaze through your DaVinci Resolve editing sessions at lightning-fast speeds.
Beyond the Edit Page: Shortcuts for Color, Fairlight, and Fusion
While the Edit page is where most of the timeline manipulation occurs, DaVinci Resolve's power extends to its dedicated pages for color grading, audio post-production, and visual effects. Mastering shortcuts within these pages can dramatically enhance your workflow.
Color Page Shortcuts
DaVinci Resolve is renowned for its color grading capabilities, and shortcuts here are essential for a smooth workflow.
- Switch to Color Page:
[Shift + 6]- Quickly navigates to the Color page. - Add New Node:
[Alt + S / Option + S]- Adds a new serial node, allowing for complex color grading layers. You can add as many as you want. - Enable/Disable All Nodes:
[Alt + D / Option + D]- Toggles the active state of all nodes in the node graph. - Zoom to Fit Viewer:
[Z]- Resets the viewer to display the entire image, useful after zooming in for detailed work.
Fusion Page Shortcuts (Visual Effects)
The Fusion page is where visual effects and motion graphics are created. These shortcuts streamline the node-based workflow.
- Add Tool:
[Shift + Space]- Opens the tool selection window, streamlining the addition of Fusion nodes to your project. - Connect Nodes:
[F]- Instantly connects two selected nodes, a fundamental action for structuring visual effects and composite workflows. - Disconnect Nodes:
[Shift + F]- Breaks the connection between selected nodes, offering flexibility in reorganizing or modifying your node tree. - Add Merge Node:
[Shift + M]- Adds a Merge node, essential for compositing multiple images or effect layers. - Delete Node:
[Backspace/Delete]- Removes selected nodes, simplifying the process of cleaning up or adjusting your node structure.
Fairlight Page Shortcuts (Audio Post-Production)
For audio engineers and editors, the Fairlight page offers powerful tools for sound design and mixing.
- Navigate to Fairlight Page:
[Shift + 5]- Quickly switches to the Fairlight audio post-production page. - Add Track:
[Ctrl/Cmd + Shift + T]- Adds a new audio track. - Mute Track:
[M]- Toggles mute for the selected track. - Solo Track:
[S]- Toggles solo for the selected track, isolating it for monitoring.
By ingraining these commands into muscle memory, editors can work fluidly, focusing on creative decisions rather than navigating menus. Whether you are cutting, copying, pasting, trimming, navigating, or grading, mastering these DaVinci Resolve hotkeys will undoubtedly revolutionize the way you work, transforming your editing process into a more efficient and enjoyable experience.