Zooming is a fundamental technique in video editing, allowing creators to emphasize specific details, create dynamic movement, and guide the viewer's attention. DaVinci Resolve, a powerful professional video editing software, offers a versatile array of tools to achieve both simple and complex zoom effects. Whether you are a beginner looking to make basic framing adjustments or an advanced editor aiming for cinematic motion, understanding how to zoom in and out effectively is crucial for enhancing your video content. This guide will delve into the various methods available within DaVinci Resolve, from the straightforward Transform controls to the more sophisticated Dynamic Zoom and keyframe animations, ensuring you can master every aspect of zooming.
The Transform Controls: Your First Step to Zooming
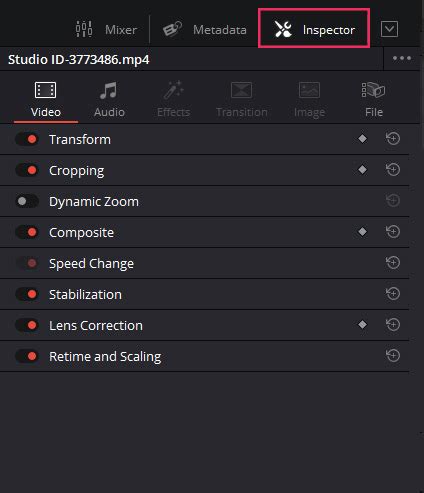
The most accessible way to zoom in and out in DaVinci Resolve is through the Inspector Panel, specifically using the Transform controls. This method is ideal for making quick adjustments to the framing of a clip without the need for complex animation.
To begin, select the clip you wish to modify on your timeline. Next, open the Inspector Panel, which is typically located in the top-right corner of your DaVinci Resolve interface. Within the Inspector, you will find a section labeled "Transform." Here, you will see parameters for "Zoom X" and "Zoom Y." Increasing the values for these parameters will zoom the clip in, effectively magnifying the image. Conversely, decreasing these values will zoom the clip out. If your zoom adjustment causes the desired subject to move out of frame, you can use the "Position X" and "Position Y" parameters within the same Transform section to reframe the shot precisely.
For those who prefer a more visual approach, DaVinci Resolve also offers on-screen controls for the Transform tool. Underneath the viewer window, you can activate the Transform tool. Once enabled, you will see an outline around your video in the viewer. You can then click and drag this outline to change the size of the video, which directly corresponds to the zoom level. Similarly, you can click and drag anywhere within the video frame to reposition it. When the on-screen transform tool is active and you are animating the zoom using keyframes, you can even see the path of the animation directly in the viewer.
Resetting any of these Transform settings is straightforward. You can either double-click on the name of the setting (e.g., "Zoom") or click the small circle to the right of the input field. This ensures you can easily revert to the default values if needed.
Best for:
- Simple zoom adjustments without animation.
- Quick reframing of clips.
- Beginners learning basic manipulation.
Dynamic Zoom: Effortless Smooth Zooms
For a quick and smooth zoom-in or zoom-out effect that spans the entire duration of a clip, DaVinci Resolve provides an automated feature called "Dynamic Zoom." This tool is incredibly useful for adding a subtle sense of movement or emphasis without the need for manual keyframe adjustments.
To utilize Dynamic Zoom, select your clip in the timeline and open the Inspector Panel. You will find the Dynamic Zoom option within the Transform section. Simply enable this option, and your video will automatically begin to zoom. You can then hit play to preview the effect.
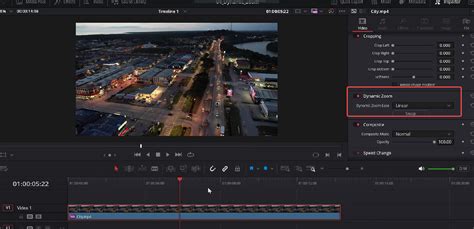
The visual representation of the Dynamic Zoom effect is displayed directly in the viewer. You will see a red and a green box. The green box typically represents the starting location and framing of the zoom, while the red box indicates the ending location and framing. By adjusting the size and position of these boxes, you dictate how the zoom will progress. You can also swap the start and end points by clicking a "Swap" icon, allowing you to easily switch between a zoom-in and a zoom-out effect.
Within the Inspector Panel, under the Dynamic Zoom settings, you can further refine how the zoom appears. DaVinci Resolve also allows you to change how the video will "ease" at the ends of the clip, which smooths out the transition into and out of the zoom effect, making it appear more natural. It's important to note that as long as the viewer control for Dynamic Zoom is active, your video will appear fully zoomed out, with only the overlay of the red and green boxes visible, indicating the zoom parameters.
Best for:
- Creating fast and smooth zooms without manual keyframing.
- Adding a consistent zoom effect to an entire clip.
- Quickly emphasizing or de-emphasizing a subject.
Keyframed Zoom Animations: Precision Control
When you require precise control over the speed, timing, and direction of your zoom, keyframes are the way to go. This method allows for complex and nuanced zoom animations, making it a staple for professional video editing.
To create a keyframed zoom animation, first select your clip and open the Inspector Panel. Navigate to the Zoom X and Zoom Y parameters within the Transform section. To set your starting point, click on the small diamond icon located just after the input fields. This action creates your first keyframe at the current playhead position.
Next, move the playhead to the point in the timeline where you want your zoom animation to end. Now, change the Zoom X and Zoom Y values to your desired ending size. DaVinci Resolve will automatically create a second keyframe at this new position, animating the zoom between the two keyframes.
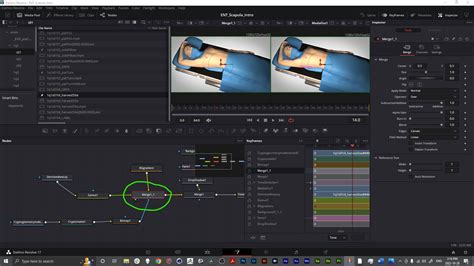
At the bottom of the clip in the timeline, you will see a representation of your keyframes. You can access the Keyframe Editor by clicking the icon that looks like a keyframe. This editor provides a visual representation of your animation. You can click on the keyframes within this window to select and move them, thereby altering the timing of your zoom. You can also delete selected keyframes if needed.
To further refine the smoothness of your zoom animation, you can right-click on the keyframes to access a pop-out window that allows you to add "Ease In" and "Ease Out" effects. These options create a gradual acceleration or deceleration of the zoom, making the motion feel more organic and less robotic. Alternatively, you can directly manipulate the curves of your zoom animation within the Keyframe Editor for even finer control over the speed and acceleration.
Best for:
- Advanced zoom control with smooth speed adjustments.
- Creating dynamic zoom sequences with specific timing.
- Following subjects or creating dramatic reveals.
Zooming with the Edit Page Crop Tool: Revealing Specific Areas
The Crop tool, accessible within the Inspector Panel on the Edit page, can also be used in conjunction with zoom to achieve specific framing effects. This method is particularly useful when you want to focus on a particular area of a clip by first cropping out the surrounding elements and then zooming into the remaining frame.
To use this technique, select your clip and open the Inspector Panel. Expand the "Cropping" section. Here, you will find parameters to crop from the left, right, top, and bottom edges of the video frame. Adjust these values to remove unwanted parts of the video.
Once you have cropped the image to your desired extent, you can then use the "Zoom" values within the "Transform" section of the Inspector to enlarge the cropped area. Adjusting the "Position X" and "Position Y" will allow you to perfectly frame your subject within the newly cropped and zoomed view. This method effectively allows you to "zoom in" on a specific section by first isolating it through cropping and then scaling it up.
Best for:
- Close-up framing without scaling the entire image.
- Creating a focused shot by removing distractions.
- Achieving a specific aspect ratio or composition.
Zooming with the Fusion Page: Advanced Cinematic Effects
For highly sophisticated and cinematic zoom effects, including those that involve motion tracking, the Fusion Page in DaVinci Resolve offers unparalleled control. This node-based compositing environment allows for complex layering and manipulation of video elements.
To create an advanced zoom in Fusion, select your clip and switch to the Fusion Page. In the node editor, you'll typically start with a MediaIn node. To apply zoom, you'll need to add a Transform node. You can do this by clicking on the MediaIn node, pressing Shift + Spacebar, typing "Transform," and selecting the Transform node. Connect the output of the MediaIn node to the input of the Transform node.
With the Transform node selected, you can adjust the "Size" parameter in the Inspector to achieve your zoom effect. The "Center X/Y" values allow you to reposition the zoomed frame, similar to the Position controls on the Edit page. To animate the zoom, you can add keyframes to the "Size" parameter by clicking the diamond icon next to it. As with the Edit page, you would then move the playhead and change the "Size" value to create the animation. Fusion's node-based workflow allows for intricate control over every aspect of the zoom, including blending modes, masks, and effects, enabling truly professional results.
Best for:
- Complex zoom effects with smooth motion.
- Integrating zooms with motion tracking.
- Achieving highly stylized or cinematic zoom transitions.
Troubleshooting Common Zoom Issues
Even with the powerful tools available in DaVinci Resolve, you might encounter issues when zooming. Here are some common problems and their solutions:
Zoom Is Blurry or Pixelated
One of the most common complaints is that zooming into a clip makes it look blurry or pixelated. This is often due to the resolution of your source footage.
- Use High-Resolution Footage: The best way to combat zoom-induced blurriness is to start with high-resolution source material. Footage shot in 4K or higher will retain much more detail, allowing for significant zooming without a noticeable loss in quality.
- Project Settings: In DaVinci Resolve, go to
File > Project Settings > General Options. Under the "Scaling" section, ensure that "Video field processing" is set appropriately, and importantly, under "Scaling Quality," you can set the "Resize filter" to "Smoother." This setting can help improve the perceived quality when scaling footage up or down. - Color Page Adjustments: If you're working with lower-resolution footage and need to zoom, you can sometimes mitigate blurriness by applying sharpness adjustments on the Color Page. However, this is a workaround and won't magically create detail that isn't there.
Zoom Not Working Correctly in Fusion
If you're using the Fusion Page and your zoom effects aren't behaving as expected:
- Correct Node: Ensure you are applying the zoom to a Transform node, not directly to the MediaIn node. The Transform node is specifically designed for these kinds of spatial manipulations.
- Reset Settings: If you're getting unexpected results, try resetting the Zoom and Position settings within the Inspector Panel of the Transform node.
Laggy Playback After Applying Zoom Effects
Complex zoom animations, especially those with many keyframes or involving Fusion, can sometimes lead to choppy playback.
- Render Cache: Enable the Render Cache. Go to
Playback > Render Cache > Smart. This will allow DaVinci Resolve to pre-render sections of your timeline that have been modified, leading to smoother playback. - Playback Resolution: Lower the playback resolution in the timeline viewer. You can do this by clicking on the playback resolution dropdown menu (usually near the viewer) and selecting "Half" or "Quarter." This reduces the processing load during playback.
- Optimized Media: For very demanding projects, consider generating Optimized Media for your clips. This transcodes your footage into a more playback-friendly format.
Keyframing Made Easy: A Davinci Resolve Tutorial for Noobs
FAQ: Frequently Asked Questions About Zooming in DaVinci Resolve
How do I zoom in and out in DaVinci Resolve?
To zoom in and out in DaVinci Resolve, select your clip on the timeline, open the Inspector Panel (top right), and adjust the "Zoom X" and "Zoom Y" values under the "Transform" section. Increase the values to zoom in and decrease them to zoom out.
How to zoom in on a specific part of a video in DaVinci Resolve?
Select the clip, open the Inspector Panel, and increase the "Zoom" values. Then, adjust the "Position X" and "Position Y" to reframe the subject precisely on the specific part you want to highlight. For a smooth animation, use keyframes.
How to create a smooth zoom effect in DaVinci Resolve?
For a smooth, automated zoom, use the "Dynamic Zoom" feature in the Inspector Panel. Enable it, and adjust the green (start) and red (end) rectangles in the Viewer to define the zoom area. For manually animated zooms, refine the motion by using "Ease In" and "Ease Out" options in the Keyframe Editor.
How do you animate a zoom-in in DaVinci Resolve?
To animate a zoom, use keyframes in the Inspector Panel. Select your clip, click the diamond icon next to "Zoom" at your desired starting point to add a keyframe. Move the playhead forward in the timeline, change the "Zoom" values, and DaVinci Resolve will automatically create the animation between the keyframes.
How to zoom in without losing quality in DaVinci Resolve?
To minimize quality loss when zooming, use high-resolution source footage (4K or higher). In your Project Settings (File > Project Settings > General Options), under "Scaling Quality," consider setting the "Resize filter" to "Smoother."
How to zoom in and out using Fusion in DaVinci Resolve?
In the Fusion Page, add a "Transform" node to your clip. Adjust the "Size" parameter within the node's Inspector to zoom in or out. Use the "Center X/Y" values to reframe. Apply keyframes to the "Size" parameter for animated zooming.
Why is my zoom blurry in DaVinci Resolve?
Zooming into a low-resolution clip is the primary cause of blurriness. Using higher-resolution footage is the best solution. You can also try applying sharpness adjustments in the Color Page, but this cannot create detail that isn't present in the original footage.
How to zoom in on a cropped area in DaVinci Resolve?
Use the "Cropping" tool in the Inspector Panel to remove unwanted edges of your video. Then, increase the "Zoom" values under the "Transform" section to enlarge the cropped area. Adjust "Position X/Y" to frame your subject correctly.
How do I fix lag when zooming in DaVinci Resolve?
If playback becomes laggy after applying zoom effects, enable Render Cache (Playback > Render Cache > Smart). Lowering the playback resolution to "Half" or "Quarter" can also help. For significant performance gains, consider using Optimized Media.
Can I zoom in and out multiple times in DaVinci Resolve?
Yes, you can create multiple zoom-ins and zoom-outs within a single clip by adding multiple keyframes in the Inspector Panel at different points in the timeline. This allows for complex zoom sequences.
Mastering zooming in DaVinci Resolve is an iterative process. The Transform controls and Dynamic Zoom are excellent starting points for beginners, offering quick and intuitive ways to adjust framing. As your skills develop, delving into keyframe animations and the advanced capabilities of the Fusion Page will unlock a world of creative possibilities. Experimentation is key; don't hesitate to explore different values, combine techniques, and leverage the resources available to you to elevate your video editing to a professional level.