For over two decades, the intricate dance of editing has been performed on the familiar canvas of Adobe Premiere Pro. Having started with its earliest iterations, the muscle memory ingrained over twenty-five years is a formidable force. Yet, the evolving landscape of post-production demands adaptation, and the time has arrived to gradually transition to DaVinci Resolve. This journey, while challenging, is made significantly smoother by tailoring Resolve's interface and shortcuts to mimic the intuitive workflow of a seasoned Premiere Pro editor. This article delves into the process of remapping DaVinci Resolve's keyboard presets, focusing on bridging the gap for those accustomed to Premiere Pro's established command structure, and unlocking a more efficient editing experience.
The Power of Q and W: Streamlining Trims
One of the most impactful discoveries for an editor migrating from Premiere Pro to DaVinci Resolve is the elegant efficiency of the Q and W keys for trimming. In Premiere Pro, these keys are instrumental in quickly adjusting the start or end of a clip to align with the playhead, with the added benefit of automatically rippling the subsequent footage. This capability is invaluable for both rapid rough cuts and meticulous final refinements, essentially condensing five distinct operations into a single keystroke. Premiere Pro has long assigned these functions to Q and W.
DaVinci Resolve refers to these operations as "Start to Playhead" and "End to Playhead," found within the "Trim - Ripple" category. While Resolve's default shortcuts for these actions involve a more complex three-key combination (reportedly SHIFT+CTRL+<), remapping them to Q and W in Resolve replicates the familiar and highly efficient behavior of Premiere Pro. This simple yet profound adjustment significantly enhances the speed and fluidity of the editing process, making it feel much more like home for a long-time Premiere Pro user.
Precision Cutting and Blade Tool Adjustments
The act of splitting clips is another fundamental editing task that benefits from ergonomic shortcut design. In Premiere Pro, the cut tool is frequently employed for this purpose, often supplemented by CTRL+K for a quick split. While the user has remapped CTRL+K for easier left-hand access in Premiere, DaVinci Resolve offers its own approach. The "Blade Edit" function in Resolve can be left at its default setting, but for those seeking a more streamlined experience, remapping the "Razor" command (often defaulting to CTRL+B) to a single, easily accessible key like 'C' can dramatically improve workflow. This allows for a single, fluid motion to split a clip, much like the remapped CTRL+B in Premiere.
Navigating the Timeline: Smooth Scrolling vs. Paging
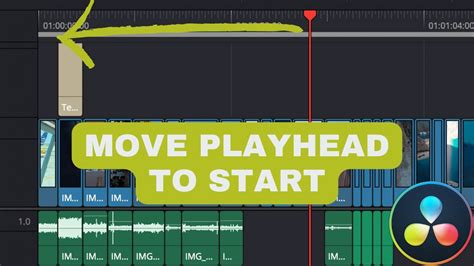
The visual experience of the timeline is a crucial aspect of editing efficiency. DaVinci Resolve's Edit page, by default, employs a paginated timeline similar to Premiere Pro, where the timeline advances in segments as the playhead moves. However, for many editors, a "smooth scrolling" timeline with a static playhead offers a more immersive and visually informative experience. This setting allows the editor to continuously monitor the footage as it scrolls by, maintaining a consistent visual anchor with the playhead. This preference is a significant departure from Premiere's default behavior and can be a key customization for those transitioning to Resolve.
Viewer Modes: Optimizing Preview Real Estate
The arrangement of the viewer windows significantly impacts how an editor interacts with their footage. On the Edit page, Resolve typically presents source and program views side-by-side. However, many editors, particularly when focusing on detailed cuts and refinements, prefer a larger preview of their footage without the distraction of another clip to its immediate left. DaVinci Resolve addresses this need through its "Viewer Mode" switch, allowing for a more expansive program view. This functionality is also present on the Cut Page, which by default displays footage full-screen. Here, the "Viewer Mode" can be toggled to "Multi Source" footage, offering a different, yet equally valuable, perspective.
Full-Screen View: Maximizing Visual Focus
Achieving a full-screen viewport is essential for critical review and immersive editing. Premiere Pro utilizes the CTRL+Tilde shortcut for this purpose, temporarily expanding the viewport. In DaVinci Resolve, the equivalent command is CTRL+F. While there might be alternative methods involving scopes (reportedly SHIFT+F and ALT+F), these may not align with every editor's workflow. The straightforward CTRL+F provides a quick and direct way to enter a full-screen editing environment, enhancing focus and reducing visual clutter.
The Art of Keyboard Customization in DaVinci Resolve
The ability to remap keyboard shortcuts in DaVinci Resolve is not merely a convenience; it's a powerful tool for personalizing the application to one's specific workflow. Accessing this customization is straightforward: navigate to "DaVinci Resolve" in the menu bar and select "Keyboard Customization," or use the shortcut CTRL+ALT+K. This opens a dedicated window displaying a visual representation of the keyboard and a list of pre-defined shortcut presets.
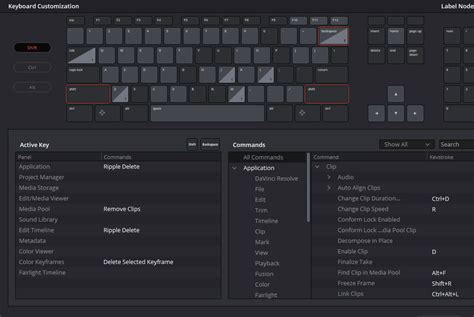
Users can begin by selecting any existing preset, such as the default "DaVinci Resolve" layout. Upon making the first modification, the software prompts the user to either save over the existing preset or create a new custom one. To remap a command, select a key on the virtual keyboard. The "Active Key" window will then display its current function, alongside its "menu perspective" name on the right.
To reassign a shortcut, the existing mapping must first be unassigned. This is achieved by locating the command in the "Commands" window and clicking the small 'X' icon next to its assigned keystroke, leaving a red, empty field. Subsequently, press the desired new shortcut on your physical keyboard. If the chosen shortcut is already in use, Resolve will alert you, offering the option to override the existing assignment or select a different key. For instance, remapping the "Razor" command (defaulting to CTRL+B) to the 'C' key involves selecting 'C' on the virtual keyboard, noting its current mapping (e.g., "Mouse pointer"), searching for "Razor" in the Commands window, unmapping its current shortcut, and then assigning 'C'. If 'C' was already assigned, Resolve will prompt for confirmation to override.
Once the remapping is complete, the custom layout can be saved. Clicking the three-dots icon next to the presets list allows for saving the current configuration. This function also enables exporting shortcuts for use on different systems, ensuring a consistent workflow across multiple workstations.
The Indispensable Role of Hotkeys in Professional Editing
Observing a professional editor at work reveals a remarkable speed and fluidity, often described as a "lightning pace." This efficiency is not magic; it is the direct result of mastering hotkeys-keyboard shortcuts that exponentially accelerate the editing process. For seasoned professionals, these shortcuts are second nature, an integral part of their toolkit. The importance of keyboard shortcuts extends beyond mere speed, encompassing several critical benefits:
- Reduced Mouse Dependency: Shortcuts minimize the need to constantly reach for and manipulate the mouse. Tasks like saving a project, which might otherwise involve navigating menus, become instantaneous with a single key press. This conserves valuable time, especially for frequently performed actions like cutting, playing, and saving.
- Minimizing Fatigue: The physical act of using a mouse involves more repetitive strain than pressing keys. By relying on keyboard shortcuts, editors can reduce physical fatigue, allowing them to maintain focus and stamina for longer editing sessions.
- Preventing Errors: Navigating through extensive menus with a mouse carries an inherent risk of misclicks, particularly when tired. Well-drilled keyboard shortcuts provide a direct and reliable route to desired commands, reducing the likelihood of errors and ensuring a more consistent process.
- Standardization and Efficiency: Once learned and ingrained, keyboard shortcuts enable editors to perform common tasks and access tools in a uniform, efficient manner. This standardization streamlines the entire editing process, minimizing repetitive movements and accelerating the completion of edits.
- Demonstrating Expertise: The proficient use of hotkeys signals a high level of familiarity and mastery with editing software. This not only impresses peers and clients but also demonstrates a professional dedication to efficiency and a deep understanding of the tools at hand, making an editor more sought-after.
The underlying principle is that any repetitive task that can be reduced to a single key press, or a simple combination of keys, will save time and effort over the long haul. While software developers strive to create intuitive interfaces, the human element of editing often benefits from direct, keyboard-driven commands.
DaVinci Resolve vs. Premiere Pro: A Deeper Dive
The debate between DaVinci Resolve and Adobe Premiere Pro is a recurring theme in the video editing community. Both are powerful non-linear editing systems (NLEs), each with its own strengths and design philosophies. Premiere Pro, with its origins dating back to 1991, has long been a dominant force, often considered the industry standard for many years. DaVinci Resolve, initially renowned for its unparalleled color grading capabilities, has evolved significantly, particularly after its acquisition by Blackmagic Design in 2009, transforming into a comprehensive NLE that rivals established players.
Design Mentality and Core Functionality
The fundamental difference lies in their foundational design. Premiere Pro was conceived as an NLE from its inception. In contrast, DaVinci Resolve began as a specialized color grading suite, with NLE and visual effects functionalities developed around that core. While both can perform a vast array of editing tasks, their areas of excellence often diverge.
On the surface, their user interfaces bear striking similarities, featuring timelines, editing tools, and media bins that are functionally comparable. However, Resolve's approach to visual effects, motion graphics, and coloring is distinct. It employs a node-based system for all effects, a methodology that, while possessing a steeper learning curve, offers immense control and precision once mastered. This node-based system is particularly favored by colorists, allowing for intricate connections between different effects in a web-like structure. Premiere Pro, like most NLEs, utilizes a layer-based system for effects, which is generally more accessible but offers less granular control.
How to switch from Premiere Pro to Davinci Resolve FAST!
The Adobe Creative Cloud Ecosystem
Premiere Pro's significant advantage lies in its seamless integration with the Adobe Creative Cloud. This ecosystem includes powerful applications such as Photoshop, Illustrator, After Effects, Audition, and Lightroom. The ability to dynamically link Premiere Pro timelines and clips directly to After Effects, for instance, is invaluable for complex motion graphics and advanced visual effects workflows, streamlining the transfer of assets and ensuring consistency across projects.
DaVinci Resolve's Integrated Workspaces
DaVinci Resolve, on the other hand, offers a highly integrated, all-in-one solution through its distinct workspaces. These seven specialized pages-Media, Cut, Edit, Fusion, Color, Fairlight, and Deliver-effectively function as a suite of professional tools within a single application. The Media, Cut, and Edit pages handle the core editing tasks. The Fusion page is a robust visual effects and motion graphics compositing program akin to After Effects. The Color page provides an extensive suite of color correction and grading tools, including color wheels, LUTs, power windows, and specialized color effects. Fairlight is a dedicated audio post-production environment, comparable to Adobe Audition. Finally, the Deliver page manages all export settings and processes.
Performance Benchmarks
Performance is an area where DaVinci Resolve frequently demonstrates a notable advantage. It is often praised for its exceptionally smooth playback and remarkably fast export times, often keeping pace with or even surpassing other high-performance NLEs. Premiere Pro's performance can sometimes be less consistent, with a history of bugs and crashes. While a powerful hardware setup can mitigate these issues, Resolve tends to be more forgiving and efficient in its resource utilization.
Empirical tests have highlighted these differences. For instance, on an M1 Max Macbook Pro, DaVinci Resolve consistently outperformed Premiere Pro in export times across various footage types, including 4K H.264, 4K ProRes 422, and 5K RED Raw. These tests, which included transitions and color grading, showed Resolve completing exports significantly faster, especially with higher-quality codecs like ProRes 422.
Supported Formats and Codec Handling
Both applications support a broad range of file formats. However, Resolve has a distinct advantage with Blackmagic RAW, a codec developed by Blackmagic Design. While Premiere Pro can handle Blackmagic RAW with the use of plugins, Resolve offers native, highly optimized support, as expected, given its development by the same company.
Pricing Models: A Stark Contrast
The pricing strategies of DaVinci Resolve and Premiere Pro represent a fundamental divergence. DaVinci Resolve offers a remarkably capable free version that provides most of the functionality needed by beginners and many intermediate users. For professional-grade features, advanced tools, and higher resolutions, DaVinci Resolve Studio is available for a one-time purchase of $295, which includes all future updates. This Studio version is often bundled with Blackmagic Design cameras, providing significant value to users of their hardware.
Adobe, conversely, operates on a subscription model for its Creative Cloud products. Premiere Pro is available for $20.99 per month or $239.98 annually. Over five years, this subscription cost can exceed $1,000, whereas the DaVinci Resolve Studio purchase remains a fixed $295 investment. While Adobe offers discounts for students and businesses, the perpetual license offered by Resolve for a single purchase makes it a more economically attractive option for many, particularly independent creators and smaller studios.
When to Choose Which Software
The optimal choice between DaVinci Resolve and Premiere Pro ultimately hinges on individual needs and workflow preferences.
DaVinci Resolve is an excellent choice for:
- Color Grading Enthusiasts: Naturally, its origins as a leading color grading suite make it the go-to for professionals who prioritize color correction and grading. Many editors use Resolve solely for its color tools, exporting projects via XML to their preferred NLE.
- Beginners Seeking a Powerful Free Option: The free version of DaVinci Resolve is incredibly robust, offering a full NLE experience without an initial financial commitment. This makes it an ideal platform for aspiring editors to gain experience and develop their skills.
- Users Requiring Linux Support: DaVinci Resolve runs exceptionally well on Linux, a platform where Premiere Pro has no support.
- Editors Prioritizing Performance and Stability: For those who experience performance issues with other NLEs, Resolve's often superior playback and export speeds can be a game-changer.
- Projects Requiring Integrated Audio and VFX: The comprehensive nature of Resolve's Fusion and Fairlight pages means that complex audio work and visual effects can be handled within the same application, streamlining workflows.
Premiere Pro is often preferred for:
- Large-Scale, Multi-Track Projects: Premiere Pro can handle a vast number of video and audio tracks, making it well-suited for complex documentaries, feature films, or projects with intricate Multicam setups.
- Teams Within the Adobe Creative Cloud Ecosystem: For larger teams and studios already invested in Adobe products, Premiere Pro's seamless integration and file-sharing capabilities within Creative Cloud are a significant advantage.
- Extensive Motion Graphics Workflows: The dynamic linking to After Effects provides unparalleled flexibility for editors who rely heavily on sophisticated motion graphics and visual effects.
- Familiarity and Established Workflows: For editors who have spent years with Premiere Pro, the transition to Resolve might involve a steeper learning curve than adapting existing Premiere Pro workflows.
The Nuances of Text and Keyframing
Beyond the core editing functions, specific features can also influence user preference. The handling of text, for instance, has been a point of contention for some Resolve users. While Resolve offers basic text generation and the more advanced Text+ nodes (integrated with Fusion), some find its text manipulation less intuitive than Premiere Pro's. The lack of font previews in Resolve's font selection menu, for example, necessitates scrolling through each font individually, a tedious process compared to Premiere's immediate visual feedback. Premiere Pro's text tool, often likened to Photoshop's, is praised for its simplicity, fluidity in manipulation (dragging text directly on the timeline viewer), and the ability to adjust properties like font size and color for multiple lines within a single text object. While Resolve has introduced 2D and 3D title presets with Fusion integration, its text generation capabilities are still considered by some to be less refined than Premiere's.
Keyframing on the Edit page in Resolve also presents a different approach. Whether for audio, video, or text, keyframes are typically adjusted within a dedicated panel on the clip itself, accessed via the track. Premiere Pro's system, while potentially less integrated in terms of visual representation on the clip itself, is often found to be more straightforward for many editors.
Conclusion: A Tool Tailored to the User
Ultimately, both DaVinci Resolve and Adobe Premiere Pro are exceptionally powerful video editing platforms. The choice between them is not about which software is objectively "better," but rather which best aligns with an individual editor's workflow, technical requirements, and budget. Premiere Pro offers a robust, integrated ecosystem for collaborative and complex projects, while DaVinci Resolve provides a potent, cost-effective, and highly performant solution, particularly excelling in color grading and offering a comprehensive suite of tools within a single application. For the long-time Premiere Pro editor, the path to mastering DaVinci Resolve is paved with strategic keyboard customization, transforming a potentially daunting transition into an opportunity to enhance efficiency and unlock new creative possibilities. By understanding and implementing these shortcut adjustments, editors can bridge the gap between familiar workflows and the advanced capabilities of DaVinci Resolve, ensuring that their creative vision is not hindered by technical limitations.