Editing high-resolution footage, particularly in 2K or 4K, can present significant challenges for even powerful workstations. The sheer volume of data within each frame can lead to sluggish performance, making the editing process a frustrating and time-consuming endeavor. Similarly, certain video codecs, regardless of their resolution, are not inherently optimized for the demands of non-linear editing. In this landscape, DaVinci Resolve emerges as a compelling solution, offering robust capabilities for handling high-resolution video and facilitating a smooth proxy workflow. This guide delves into the intricacies of working with proxies in DaVinci Resolve, from initial setup to final export, empowering editors to streamline their post-production process.
Understanding the Proxy Workflow
At its core, a proxy workflow, often referred to as offline editing, involves the creation of lower-resolution, more manageable versions of your original high-quality footage. These surrogate files, known as proxies, are used during the editing phase. By employing smaller file sizes and more efficient codecs, proxies significantly enhance playback performance, allowing for a fluid and responsive editing experience. This is particularly crucial when dealing with complex timelines, extensive visual effects, speed ramping, or the application of Look-Up Tables (LUTs). Even with a high-end machine, editing 6K raw footage or higher can result in dropped frames and impaired playback without proxies.
Beyond performance improvements, proxy workflows offer a key advantage in remote collaboration. Since proxy files are substantially smaller than their original counterparts, uploading and downloading them for collaborative projects becomes considerably faster. This facilitates seamless remote editing, enabling teams to work together effectively regardless of geographical location.
DaVinci Resolve's Native Proxy Generation
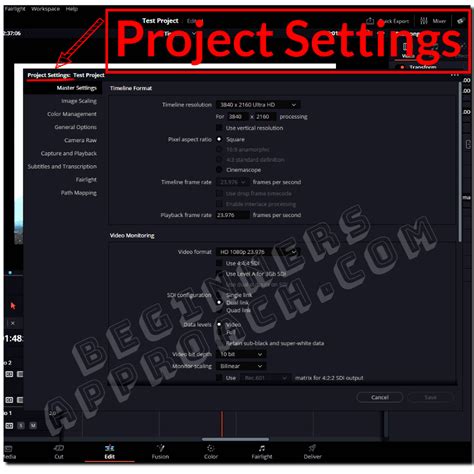
DaVinci Resolve offers a user-friendly interface for implementing proxy workflows. To enable this functionality, you first need to import your footage into the Media Pool. Navigate to your project's settings by accessing "Project Settings" via the File menu or by clicking the sprocket icon in the bottom right corner of the GUI. Within the "Master Settings" tab, scroll down to the "Optimized Media and Render Cache" section. Here, you can define the proxy media resolution and select the desired format.
Once these settings are saved, you can proceed to generate proxies. Select the clips you wish to work with in the Media Pool. You can select individual clips, a range of clips by holding Shift, or multiple specific clips by holding Ctrl (Windows/Linux) or ⌘ (Mac). After selecting your clips, right-click and choose "Generate Optimized Media" or "Generate Proxy Media" (depending on the Resolve version and specific terminology). A progress window will appear, tracking the proxy generation process. It's important to note that, unlike in some other editing applications, this process cannot run in the background within DaVinci Resolve itself. Therefore, it's advisable to allocate time for this step, perhaps during a coffee break.
Optimizing Proxy Settings
When configuring your proxy settings, several choices warrant careful consideration. The "Optimized Media Resolution" allows you to manually set the proxy resolution. For instance, if you have UHD (3840 x 2160) footage but prefer to edit in 1080p (1920 x 1080), you would select "Half." It's important to understand that "Half" resolution effectively provides a quarter of the total pixels because it refers to halving each dimension (height and width). The "Choose Automatically" option offers dynamic resizing based on your project's timeline resolution. If your project is set to 1080p, 8K clips will generate quarter-resolution proxies, and 4K clips will generate half-resolution proxies, all aiming to be around the 1080p mark. Clips that are already 1080p or smaller will generate proxies at their original resolution.
The "Optimized Media Format" presents a variety of codec options. For basic offline editing or audio mixing in the Fairlight page, codecs like DNxHR LB or ProRes 422 Proxy are suitable. However, if you intend to perform color grading on the Color page or visual effects work in the Fusion page using these proxies, it's recommended to choose a higher-quality mezzanine format.
Proxy File Location and Organization
A critical aspect of working with proxies is managing their storage location. Generating proxies effectively doubles the number of files you'll be managing. Therefore, it's paramount to establish a clear and organized system. DaVinci Resolve offers flexibility in choosing where to store your cache files, including network shares (NAS/SAN), directly attached external drives or RAID arrays, or a dedicated internal drive separate from your operating system. Regardless of the choice, ensuring good read and write speeds is essential.
Within DaVinci Resolve's preferences, under "System" > "Media Storage," you can configure "Proxy Generation Location." Choosing the "Proxy subfolders in media file locations" option is highly recommended. This ensures that proxies are automatically generated within a subfolder of their original media's location, maintaining a clear and logical connection between the high-resolution files and their proxy counterparts. This organization is vital to avoid file mess and potential conflicts during the conform process.
A well-structured folder and file system is crucial for avoiding a file mess and potential conflicts. The structure should be self-explanatory, and it's advisable to avoid special characters and spaces in file and folder names where possible. A common practice is to establish distinct top-level folders such as "OCF" (Original Camera Files) for your raw footage, "PROXIES" for the generated proxy files, "LUTs" for any specific LUTs from your Digital Image Technician (DIT), and "AUDIO" for all sound recordings from the set. Further organization can be achieved by creating subfolders for each shooting day, often incorporating the date, and within those, subdirectories for each camera card.
Save Hard Drive Space! - DaVinci Resolve 17 Media Management Tutorial
External Proxy Generation: The Blackmagic Proxy Generator
DaVinci Resolve also integrates with the Blackmagic Proxy Generator, a free application that works in the background. This utility automatically detects new files added to a designated "watchlist" and generates proxies for them. The generated proxies are then placed in a "Proxy" folder, typically located alongside the original media. This external generation offers a degree of automation and can be particularly useful for large ingest workflows.
To utilize the Proxy Generator, open the application, add your media folders to the watchlist, select your desired proxy format, and initiate the process. The available proxy formats are listed by the resulting proxy clip size, which is a significant consideration if you plan to share these files over the internet. It's crucial to be aware that not all proxy codecs are created equal. For editing purposes, it is strongly recommended to avoid H.264 and H.265 codecs. Their Long GOP (Group of Pictures) structure is inherently less efficient for the frame-by-frame access required in editing, leading to performance issues.
Applying LUTs and Burn-Ins to Proxies
DaVinci Resolve's proxy workflow allows for the addition of burned-in LUTs directly to the proxy files. This can be useful for previewing the intended look of the footage during the editing process. After selecting your clips and generating proxies, you can right-click on the thumbnail in the Nodes window (or access clip attributes) and select your desired LUT. This ensures that the color transformation is embedded within the proxy, providing a more accurate representation of the final grade.
For projects requiring specific burn-in information on the proxy files, such as source clip names or timecode, DaVinci Resolve offers customization. You can select clips, right-click, and choose "Clip Attributes" to access options for burn-ins. For instance, you might choose to burn in the "Source Clip Name" on the bottom left and "Source Timecode" on the bottom right. These custom burn-in settings can often be saved as presets for future use, streamlining the process for recurring project needs.
Using Proxies in the Edit and Export Stages
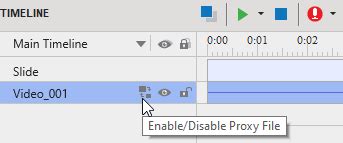
To begin actively using the generated proxies, navigate to the "Playback" menu in DaVinci Resolve, select "Proxy Handling," and choose "Prefer Proxies." DaVinci Resolve will then automatically link the proxies to their high-resolution originals, even if the proxies were created externally. When "Prefer Proxies" is enabled, the playback will utilize the lower-resolution proxy files, ensuring smooth performance.
When it comes to exporting your final project, DaVinci Resolve is designed to automatically switch back to the original, high-resolution media for rendering. This ensures that your final output maintains the maximum possible quality and resolution. However, for specific scenarios where exporting using proxy media is necessary or desired, DaVinci Resolve provides this option. To enable this, go to the "Advanced Settings" within the "Render" panel on the Deliver page and check the "Use Proxy Media" box.
Beyond Native Workflows: Media Asset Management
For more complex workflows and enhanced media management, platforms like the Media Library offer integration with both DaVinci Resolve and Adobe Premiere Pro. These Media Asset Management (MAM) systems can significantly enhance proxy workflows by allowing users to download proxies generated for preview and then reuse them directly within their non-linear editing (NLE) software. With a single click within an integrated panel, you can import proxy files for all footage in a project or sequence, eliminating the need to manually generate new proxies within Resolve. This level of integration streamlines collaboration and asset management, particularly in larger post-production environments.
Optimized Media vs. Proxy Media
DaVinci Resolve also features "Optimized Media," which, like proxies, aims to make footage easier for your computer to handle. However, there are key distinctions. Optimized media is typically stored in a less shareable format, often with cryptic file names and a proprietary codec like .dvcc. This makes it less versatile for external collaboration or use in other applications. In contrast, proxy media is designed to be more universal and recognizable, with more straightforward file naming conventions, making it a more practical choice for sharing and remote workflows.
Considering External NLEs
While DaVinci Resolve offers robust native proxy capabilities, it's worth noting that other professional editing software, such as Adobe Premiere Pro and Avid Media Composer, also provide their own proxy generation tools. In some cases, particularly for established workflows or specific team preferences, creating proxies directly within Premiere or Avid might offer a more streamlined experience. For those interested in exploring these alternatives, resources dedicated to proxy workflows in Adobe Premiere Pro are readily available.
The Evolving Landscape of Post-Production
Blackmagic Design continually enhances DaVinci Resolve with advanced functionality in each new release, solidifying its position as a premier post-production application. The software's evolution, from its origins as a high-end color grading system to an all-encompassing post-production suite incorporating editing, audio mixing (Fairlight), visual effects (Fusion), and more, underscores its ambition to be a singular, integrated tool for diverse post-production specialties.
Historically, DaVinci Resolve was a turnkey solution, demanding specialized and powerful hardware. The transition to Mac and Windows platforms, allowing users to install the software on their own hardware, democratized professional color correction. However, the computational demands of high-resolution, RAW footage remain a significant consideration. Offline editors and audio mixers, for example, do not require the immense processing power needed to natively debayer 8K 60-fps footage. Creating proxies addresses this by ensuring that every collaborator can edit efficiently without necessitating prohibitively expensive hardware for original camera files.
The decision of whether a "perfect" proxy workflow exists is subjective and depends heavily on the specific production's needs, camera formats, and team preferences. However, by understanding and implementing the proxy generation and management features within DaVinci Resolve, editors can significantly improve their editing efficiency, reduce playback issues, and facilitate smoother collaboration, ultimately leading to a more productive and enjoyable post-production experience.