When working with Adobe InDesign, encountering missing fonts can be a common, yet frustrating, problem. This often occurs when you open a document created by someone else, or when a project involves fonts that are not currently installed on your system. Fortunately, InDesign provides several tools and methods to resolve these "font missing" alerts, ensuring your documents display as intended.
Understanding the "Missing Fonts" Alert
Upon opening an InDesign file that utilizes fonts not present on your computer, you will typically be greeted with an alert. This notification will state that "The document [filename] uses fonts that are either currently unavailable on your computer or no longer supported in InDesign." It will then prompt you to "Install the missing fonts in InDesign or InCopy."
This alert is crucial because fonts are fundamental to the visual design and readability of any publication. If a font is missing, InDesign will substitute it with a default font, often resulting in a drastic and undesirable change to the layout, typography, and overall aesthetic of the document. This substitution can also lead to text reflow, altering spacing and line breaks, which can significantly impact the intended design.
The Role of Adobe Typekit and Creative Cloud
In many modern InDesign workflows, missing fonts are often linked to Adobe's font library, formerly known as Typekit, now integrated into Creative Cloud. If a font used in a document is available through your Creative Cloud subscription, InDesign can often detect this. The application may then present an option to "Sync Fonts." By clicking this, InDesign will attempt to download and install the necessary font from Adobe's servers directly onto your system. This is a seamless process that usually resolves the issue quickly, allowing you to continue working with the original typography.
However, the situation becomes more complex when the missing font is not available through Creative Cloud, or if the syncing option does not appear. In such cases, you will need to take further steps to locate and install the font manually.
Utilizing the "Find Fonts" Dialog Box
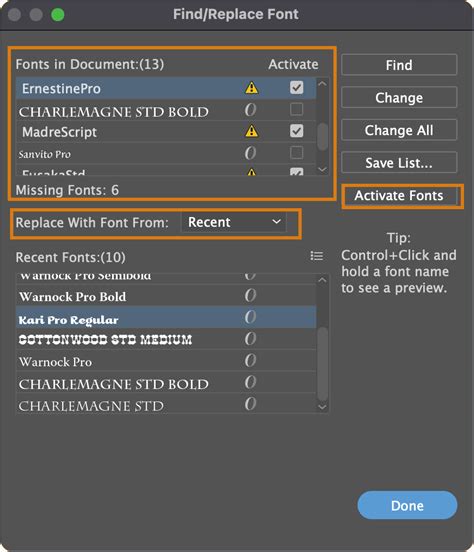
The "Find Fonts" dialog box is InDesign's primary tool for managing missing or substituted fonts within a document. When you encounter the missing font alert, you can access this dialog box by clicking the "Find Fonts" button.
This dialog box will list all the fonts used in your document that InDesign cannot locate. For each missing font, it will display the name of the font and indicate that it is missing.
Options within "Find Fonts"
Within the "Find Fonts" dialog box, you have several options for addressing a missing font:
- Sync Fonts (if available): As mentioned earlier, if the font is part of the Creative Cloud library, you might see a "Sync Fonts" button. This is the easiest solution.
- Replace with a Similar Font: If the missing font is not available through Creative Cloud, or if you prefer not to use it, you can choose to replace it with a font that is already installed on your system. The dialog box provides a dropdown list of available fonts on your computer. You can scroll through this list and select a suitable replacement. It is advisable to choose a font with similar characteristics (e.g., weight, style, x-height) to maintain the integrity of the design as much as possible. After selecting a replacement, you can click "Change All" to apply this substitution to every instance of the missing font throughout the document.
- Manual Font Replacement (Cross-Platform Considerations): Sometimes, font discrepancies arise due to naming conventions between different operating systems, such as Mac and Windows. For example, a font named "Times New Roman" on a PC might be recognized as simply "Times" on a Mac, even though it's the same font. In such scenarios, you might need to manually locate the correct font name in your system's font list within the "Find Fonts" dialog box. You might find a "Pro" version or a slightly different variant of the font you are looking for. The goal is to find a font that matches the original attributes as closely as possible.
- Ignoring Missing Fonts (Temporary Solution): In certain situations, you might choose to temporarily ignore missing fonts. This is particularly useful if you are only performing a text check or if the document is being sent back to the original creator who has the necessary fonts. By clicking "Done" without making any replacements, the missing fonts will remain substituted, and the document will display with the default fonts. However, this is not a permanent solution, and the document will only display correctly once the actual fonts are installed.
How to install new font in Adobe CC (InDesign | Illustrator | Photoshop)
Installing Fonts Manually
If the "Find Fonts" dialog box doesn't offer a solution, or if the font is not available through Creative Cloud, you will need to install the font onto your system manually.
Locating Font Files
Often, when a designer sends you a project, they will also provide a "packaged" version of the InDesign file. This package typically includes all the necessary assets, such as images, linked files, and importantly, the fonts used in the document.
If you receive a packaged InDesign file (often a .zip archive), look for a folder named "Document Fonts" within the extracted contents. This folder should contain the font files that were used in the project.
Installing Fonts on Your System
Once you have located the font files (e.g., .otf, .ttf), you can install them on your operating system:
- On Mac: You can usually double-click a font file to open it in the Font Book application. From there, click the "Install Font" button.
- On Windows: You can right-click on the font file and select "Install."
If you have a font management utility, ensure that the fonts are activated within that program. InDesign and InCopy only support installed font styles. If a particular font doesn't include bold or italic styles (e.g., some decorative fonts), you may need to select the plain version of the font in InDesign.
Verifying Font Installation
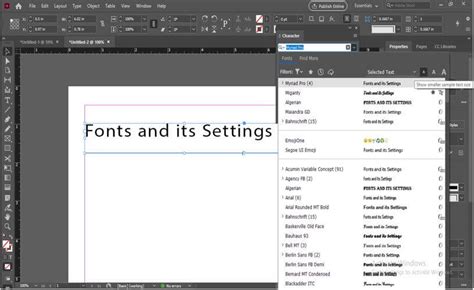
After installing a font, it's good practice to verify that it has been installed correctly. Open another application, such as Adobe Illustrator or Microsoft Word, and check if the newly installed font appears in the font menu. If it doesn't appear in another application, try reinstalling the font.
When Fonts Need to Be Purchased
Not all fonts are free. Many professional-quality fonts are created by skilled typographers who invest significant time and effort into their design. Consequently, these fonts often come with a cost. If you receive a document with a missing font that is not available through Creative Cloud and was not provided in a package, you may need to purchase it from a reputable font foundry or marketplace.
Font prices can vary widely. Factors influencing the cost include the complexity of the font family (e.g., the number of weights and styles), the character set (e.g., support for multiple languages, special characters), and the licensing terms. Some fonts might cost around €27, while others with extensive character sets and extensive stylistic options can be significantly more expensive.
When purchasing fonts, ensure you are acquiring the correct styles and weights that were used in the original document. Always buy from trusted sources to ensure you receive legitimate and properly licensed font files.
Important Considerations for Font Management
- Font Styles: InDesign and InCopy support only installed font styles. If a font, like "Critter," does not include bold or italic styles, you must use the plain version. Attempting to apply bold or italic formatting to such a font will not work as expected.
- Imported Graphics: The "Find/Replace Font" dialog box does not replace fonts contained within imported graphics, such as placed EPS or PDF files. If a missing font is embedded within such a file, you must install the missing font on your system. InDesign will then be able to render the graphic correctly.
- Font Management Utilities: If you use font management software (e.g., Suitcase Fusion, FontExplorer X), ensure that the fonts are activated within that utility before opening your InDesign document. These utilities help organize and activate fonts on your system, preventing font conflicts and ensuring that InDesign can access them.
- Reinstalling Fonts: If a font appears to be installed but is still not recognized by InDesign, a reinstall might resolve the issue. This can sometimes clear up corrupted font data or incorrect system registrations.
By understanding these troubleshooting steps and employing the tools available within InDesign, you can effectively manage and resolve missing font issues, ensuring the integrity and professional appearance of your design projects.