Gradients are a fundamental design element in Photoshop, offering a versatile way to add depth, visual interest, and subtle transitions to your images. Whether you aim to mimic natural phenomena like an evening sky, create futuristic effects, or simply blend colors seamlessly, understanding how to craft and apply gradients is an invaluable skill. This guide will walk you through the process of creating and manipulating gradients in Photoshop, from basic application to advanced customization, ensuring you can achieve a wide array of visual outcomes.
Accessing and Understanding the Gradient Tool
The journey to creating compelling gradients begins with locating and understanding the Gradient Tool in Photoshop. This tool is your primary gateway to generating smooth color blends.
Locating the Gradient Tool
The Gradient Tool shares its space with the Paint Bucket Tool on the Photoshop toolbar. If you don't see the Gradient Tool immediately, click and hold the Paint Bucket icon. A fly-out menu will appear, allowing you to select the "Gradient Tool." The keyboard shortcut for activating the Gradient Tool is 'G'. However, remember that pressing 'G' will only select the Gradient Tool if it was the last tool chosen from that particular set.
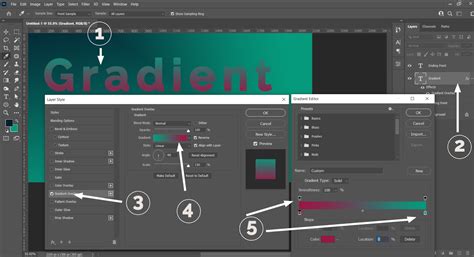
The Gradient Editor: Your Customization Hub
Once the Gradient Tool is active, you'll notice a "Gradient" drop-down menu at the top of your screen, typically located in the Options Bar. Clicking this drop-down opens the Gradient Editor, which is the central hub for creating and modifying your gradients. Here, you'll find a preview of the selected gradient, along with various controls for its color, opacity, and distribution.
Exploring Gradient Styles and Presets
Photoshop offers a variety of pre-defined gradient styles, each providing a distinct visual effect. Understanding these styles is crucial for quickly achieving specific looks.
Standard Gradient Styles
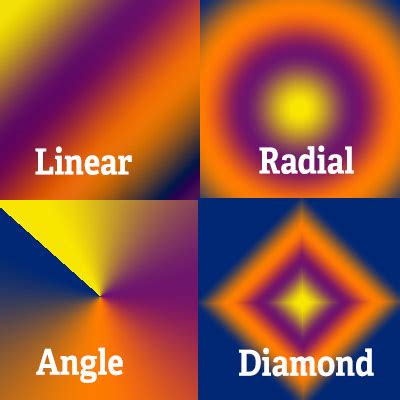
Next to the selected gradient in the toolbar, you will find five squares, each representing a different gradient style:
- Linear: This is the most classic gradient type, characterized by a straight, uniform blend between colors. It’s akin to the gradual transition of colors seen in an evening sky.
- Radial: This style begins with a single color at the center and expands outwards in a spherical pattern, gradually changing into the next color. It can evoke the feeling of looking directly into a light source, like the sun.
- Angular: More specifically, this style sweeps colors in a counterclockwise arc around your starting point. It creates a sweeping, directional effect.
- Reflected: This style generates a mirror image of a normal linear gradient on both sides of the starting point, creating a symmetrical, mirrored effect.
You are encouraged to experiment with these styles to discover which best suits your creative vision.
Utilizing Presets
The Gradient Editor presents a range of "Presets" that serve as excellent starting points for your designs. Selecting a preset will load its configuration into the gradient bar at the bottom of the editor, allowing you to preview it before applying it to your image. Clicking "OK" after selecting a preset will close the editor, and you can then click and drag across your image to apply the chosen gradient.
Crafting Custom Gradients: The Gradient Editor in Detail
While presets are useful, the true power of gradients lies in your ability to create custom blends tailored to your specific needs. The Gradient Editor provides granular control over every aspect of your gradient.
Understanding the Gradient Bar
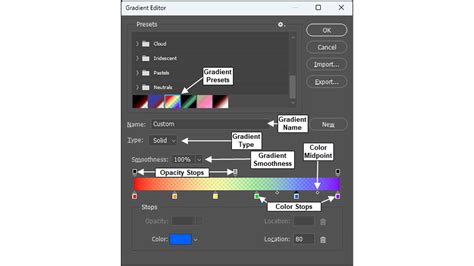
The gradient bar in the Gradient Editor is where the magic happens. It visually represents the blend of colors and opacity. Below this bar, you'll find several key components:
- Color Stops: These are the colored squares located at the bottom of the gradient bar. Each color stop represents a specific color that will be present in your gradient.
- Midpoint: This diamond-shaped marker, located between two color stops, dictates where the blend between those two colors will be most intense or evenly distributed.
- Opacity Stops: These are the squares located at the top of the gradient bar. They control the transparency of the gradient at different locations.
Adjusting Colors
To modify a color within your gradient, simply double-click the corresponding colored square (Color Stop) at the bottom of the gradient bar. This action will open the Color Picker, allowing you to select a new hue. You can add additional colors to your gradient by clicking anywhere between two existing color stops on the gradient bar. A new color stop will appear, which you can then customize.
Controlling Color Location and Midpoints
The "Location" value, associated with each color stop, determines its position along the gradient bar, measured in percentages from the left. You can adjust this by dragging the color stop itself or by entering a numerical value. The midpoint diamond between two color stops also has a "Location" value that can be adjusted, controlling the point at which the two colors blend most evenly.
Manipulating Opacity
The opacity stops at the top of the gradient bar function similarly to color stops but control transparency. Clicking an opacity stop allows you to adjust its opacity level using the "Opacity" slider. You can set it from 0% (fully transparent) to 100% (fully opaque). This is crucial for creating gradients that fade to transparency, allowing pixels underneath to show through. You can also add new opacity stops by clicking on the top of the gradient bar, enabling you to define areas of varying transparency within your gradient.
Smoothness and Noise
The "Smoothness" setting in the Gradient Editor influences how smoothly the colors transition. A higher smoothness value results in a more seamless blend. Additionally, Photoshop offers a "Noise" option for gradients. This feature introduces random colors into the gradient, creating a textured or "fuzzier" effect. You can choose the intensity of this noise, with options like 10% or 50% noise, allowing you to include a subtle or more pronounced random element within your gradient.
Saving Custom Gradients
Once you've created a gradient to your satisfaction, you can save it for future use. In the Gradient Editor, enter a new name in the "Name" text box and then click the "New" button. Your custom gradient will be added to your library of presets, ready to be recalled and applied whenever needed. Gradients are stored in libraries, making them easily accessible across projects.
Applying Gradients to Your Image
With your gradient created or selected, the next step is to apply it to your image. The method of application depends slightly on whether you're using a Gradient Fill Layer or a direct application of the Gradient Tool.
Using the Gradient Tool Directly
After customizing your gradient in the editor and clicking "OK," the Gradient Tool is ready for use. Click and drag across the area of your image where you want the gradient to appear. The length and direction of your drag will determine the gradient's spread and orientation. Releasing the mouse button applies the gradient. This method is considered "destructive" as it directly alters the pixels of your current layer.
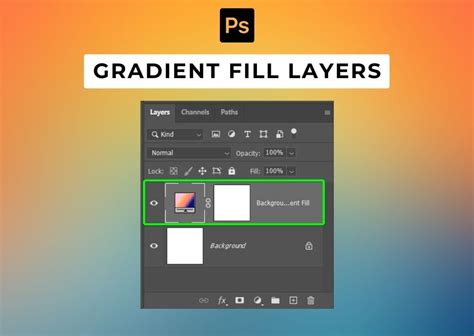
Employing Gradient Fill Layers
For more flexibility and non-destructive editing, it's highly recommended to use Gradient Fill Layers. To create one, go to Layer > New Fill Layer > Gradient. This action adds a new layer above your current layer, and the Gradient Fill dialog box will appear, allowing you to select or edit your gradient. The advantage of a fill layer is that you can double-click the layer thumbnail at any time to re-edit the gradient's color, position, and opacity without affecting the underlying image data.
Advanced Gradient Techniques and Applications
Gradients are far more than just simple color fades; they are powerful tools for creating complex visual effects.
Transparency and Blending Modes
Gradients can incorporate transparency, allowing for subtle overlays and sophisticated blending effects. When a gradient has transparent areas, the pixels of the layer beneath it will show through. This is particularly useful for fading images or text into a background. By combining gradients with Photoshop's various blending modes (found in the Layers panel), you can achieve a vast range of effects, from soft glows to dramatic color shifts.
Gradients with Text
Gradients can be applied directly to text layers, transforming plain text into eye-catching elements. This can be achieved by applying a gradient fill to the text layer itself or by creating a gradient on a separate layer and then clipping it to the text layer. This technique is excellent for adding depth and style to headlines and titles. While vector text can be converted to a bitmap image, applying a gradient directly to the text object often preserves its scalability.
How To Use The Gradient Tool In Photoshop (UPDATED)
Layering and Effects
The ability to layer multiple gradients, each with its own settings and blending modes, opens up a world of creative possibilities. You can use subtle gradients to simulate lighting and shadows, add atmospheric effects, or build up complex textures. For instance, a soft radial gradient can create a vignette effect, darkening the edges of an image, while a series of linear gradients with different opacities can simulate the layered colors of a sunset.
Troubleshooting Common Gradient Issues
Even with straightforward tools, occasional hiccups can occur. Here are solutions to common problems:
The Gradient Tool is Missing
If you cannot find the Gradient Tool on your toolbar, first ensure you are not in a mode that hides it. Click the Paint Bucket icon and hold to reveal the fly-out menu; the Gradient Tool should be there. If it’s still absent, check your workspace. Go to Window > Workspace > Essentials to reset to the default layout.
Gradients Not Appearing as Expected
Ensure that you have a pixel layer selected or that you are working with a shape layer that can accept a gradient fill. If you are working with a selection, the gradient will only be applied within that selected area. Also, check the opacity settings of your gradient stops; a fully transparent gradient will not be visible.
Beyond the Basics: Expanding Your Gradient Palette
Photoshop's gradient capabilities extend beyond what's immediately visible.
Gradient Libraries and Online Resources
Gradients you create and save are stored in your Photoshop libraries. Furthermore, the internet is a treasure trove of "Gradient Preset Packs" that you can download and import into Photoshop. These packs offer thousands of pre-made gradients, providing endless inspiration and accelerating your workflow.
Subtle Color Changes and Atmospheric Effects
Gradients are invaluable for adding subtle color changes that mimic natural phenomena. They can simulate the gradual shift in color caused by shadow, atmospheric perspective, or the diffusion of light. By carefully selecting colors and adjusting their placement and opacity, you can imbue your images with a sense of realism or create fantastical color palettes. Gradients can be used to add subtle color changes to an image, such as those caused by shadow, and they can be layered and blended to create interesting effects.
The power of gradients in Photoshop lies in their adaptability. From simple fills to intricate textural overlays, they are a cornerstone of digital design. By mastering the Gradient Tool and the Gradient Editor, you unlock the ability to create visually compelling and dynamic imagery that can elevate any project.