GIFs, those endlessly looping, often humorous, and sometimes informative animated snippets, have become an integral part of our digital landscape. From social media feeds to blog posts and digital marketing campaigns, they offer a dynamic way to convey messages, evoke emotions, and add a touch of personality. While numerous free online tools exist for GIF creation, such as Giphy, for those seeking complete customization and a professional, on-brand result, Adobe Photoshop remains the ultimate answer. This tutorial will guide you through the process of creating your own animated GIF in Photoshop, demystifying the animation panel and empowering you to bring your visual ideas to life.
Understanding the GIF Format
Before diving into the creation process, it's beneficial to understand what a GIF truly is. GIF, an acronym for Graphics Interchange Format, is a bitmap image format that supports lossless data compression. Originally designed in 1987 by CompuServe to facilitate faster image transmission over the internet, its key innovation was the ability to store multiple images within a single file, enabling simple animations. This feature, coupled with its relatively small file size and support for transparency, made it ideal for early web graphics like logos, line art, and charts.
It's important to distinguish GIFs from other common image formats. Unlike JPEGs, which are excellent for photographic images due to their support for millions of colors and lossy compression, GIFs are limited to an 8-bit palette, meaning they can only display a maximum of 256 colors. This limitation can result in a grainy appearance for photographic content. PNGs, on the other hand, offer lossless compression and support a wider color spectrum, making them a strong successor to GIF for many applications, particularly those requiring transparency. For high-resolution print work, TIFFs are the standard, offering excellent quality without compression.
While GIFs can be static images, their true power lies in their animation capabilities. A GIF is, at its core, an animation that plays on a loop, often referred to as "forever." This looping nature, combined with the absence of audio, sets them apart from video files. Their popularity has surged dramatically, driven by the rise of social media, the expansion of broadband internet, and the inherent ease with which they communicate jokes, ideas, and emotions, much like memes.
Planning Your Animated GIF
As with any creative endeavor, a well-defined plan is crucial for a successful GIF. Before even opening Photoshop, consider what you want your animation to achieve. What message are you trying to convey? What aesthetic are you aiming for? Resistance to going overboard with GIFs is also advised; excessive use or large file sizes can significantly slow down website loading times.
For this tutorial, we'll follow a practical example: creating a simple frame animation that highlights a series of favorite things. This approach helps illustrate the fundamental principles of GIF creation in Photoshop. The process involves preparing your visual elements, arranging them, and then animating specific aspects.
A critical aspect of planning involves considering your document size. This will directly influence the final dimensions of your GIF and, consequently, its file size. For instance, if you're creating a GIF for a blog post, you'll want to balance visual impact with load times.
Setting Up Your Photoshop Document
- Create a New Document: Launch Adobe Photoshop. Navigate to "File" > "New…" to create a new document. The dimensions you choose here are crucial and will depend on where you intend to use your GIF. For a blog post, a common size might be around 800 pixels wide.
- Add Your Base Content:
- Background: Begin with your background layer. For our example, we'll leave the background layer as white.
- Title: Type out your title at the top of the canvas. In our case, "My Favorite Things." Format the text to your liking.
- Importing Images: Copy and paste images of the items you want to feature into your Photoshop document. If the images have backgrounds that you don't want, you'll need to remove them. Photoshop offers various tools for background removal, such as the Magic Wand tool, Quick Selection tool, or the Pen tool for more precise selections.
- Arrangement: Rearrange the items on the canvas until you are satisfied with the layout.
- Numbering: Add text elements to number your items from 1 to 9. Format these numbers to be easily visible and aesthetically pleasing.
- Highlighting Elements: For the animation, we'll use stars to highlight each item sequentially. Use the brush tool to draw stars around each item. For our example, we'll draw stars around each of the nine items.
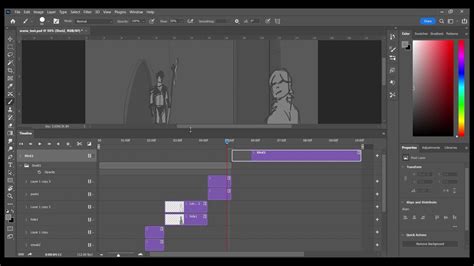
Organizing Layers for Animation
Efficient layer management is key to a smooth animation workflow, especially when dealing with multiple elements.
- Grouping Layers: To prevent the layers panel from becoming cluttered, group related layers together. For our example, each group will contain one item photo and its corresponding number. To group layers:
- Hold down the "Shift" key on your keyboard.
- Select the layers you want to group by clicking on them.
- Right-click on the selected layers and choose "Group Layers" (or use the shortcut Ctrl+G on Windows, Cmd+G on Mac).
- Saving Your Work: This is a crucial "Pro Tip"! Now is an excellent time to save your Photoshop Document (PSD file). This ensures that you don't lose your hard work and can easily make future edits. Navigate to "File" > "Save As…" and choose the PSD format.
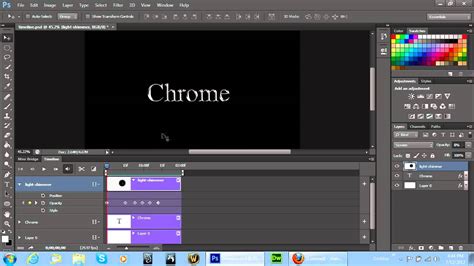
Bringing Your Animation to Life: The Timeline Panel
With your layers organized, it's time to animate. Photoshop's Timeline panel is where the magic happens.
- Accessing the Timeline: If you're using Photoshop Creative Cloud, navigate to "Window" > "Timeline." A timeline panel will appear at the bottom of your Photoshop interface.
- Choosing Animation Type: In the Timeline panel, you'll see two options: "Video Animation" and "Frame Animation." For creating a looping GIF, "Frame Animation" is the appropriate choice. Upon selecting "Create Frame Animation," a single frame will appear, labeled "1."
- Understanding Layer Visibility: Notice the small "eye" icon next to each layer in the Layers panel. This icon controls layer visibility. Clicking the eye will hide the layer's content, and clicking it again will make it visible. This is fundamental to creating frame-by-frame animation.
- Setting Up the First Frame: For our example, ensure that all your "groups" (containing item photos and numbers) and your background layer are turned ON (visible). Now, turn OFF the visibility of all the "stars" layers except for the stars that are behind your first item (e.g., the Lindt chocolate). This sets up the initial state of your animation.
- Creating Subsequent Frames:
- Click the "New Frame" button at the bottom of the Timeline panel. This duplicates the current frame.
- In the duplicated frame, turn OFF the visibility of the stars that were visible in the previous frame.
- Then, turn ON the visibility of the stars for the next item you want to highlight. For instance, if your first frame showed stars behind Item #5, your second frame would have those stars turned OFF and the stars for Item #9 (dry shampoo) turned ON.
- Previewing: Use the "Play" button on the Timeline to preview your animation so far. You should see the stars moving from one item to another.
- Repeating the Process: Continue this process for each set of stars. For every new frame you create, you'll turn off the visibility of the previous set of stars and turn on the visibility of the next set. Remember that your item, number, and background layers should remain visible in every frame.
- Setting Frame Delays: Each frame has a delay time, which determines how long it remains visible before transitioning to the next. Click on the dropdown menu to the right of "0 sec" (or the current delay time) below each frame in the Timeline. You can set custom delays for each frame, or select a group of frames and apply a delay to all of them. For smooth transitions, half-second intervals (0.5 sec) often work well.
- Looping: At the bottom of the Timeline panel, you'll find a dropdown menu that typically says "Once" or "No Overlap." Change this to "Forever" to ensure your GIF plays on an infinite loop.
Exporting Your Animated GIF
Once you're satisfied with your animation and have previewed it to ensure smooth transitions and correct timing, it's time to export it as a GIF file.
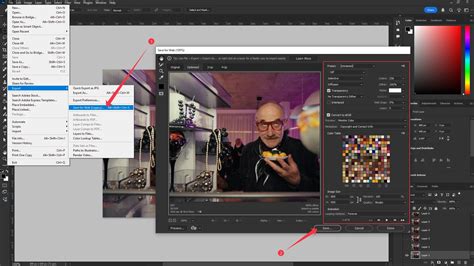
- Save for Web (Legacy): Navigate to "File" > "Export" > "Save for Web (Legacy)…" This dialog box provides crucial options for optimizing your GIF for web use, focusing on minimizing file size for faster loading times.
- GIF Settings:
- File Format: In the top right corner of the "Save for Web" dialog, ensure that "GIF" is selected from the dropdown menu.
- Color Reduction: You'll see an option for "Colors." For most animations, reducing the number of colors can significantly decrease file size without a noticeable loss in quality. A setting of "64 colors" is often a good starting point, but you can experiment with lower values like "32" or "16" if file size is a major concern. Be mindful that further reduction can lead to banding or a loss of detail.
- Dithering: Dithering can help simulate more colors than are actually available, but it can also increase file size. Experiment with different dithering patterns (e.g., "Diffusion," "Pattern," "Noise") to find a balance between visual quality and file size.
- Looping Options: Verify that the "Looping Options" is set to "Forever."
- Previewing Load Times: The "Save for Web" dialog often provides an estimated file size and, sometimes, an estimated load time based on different internet connection speeds. This is invaluable for ensuring your GIF won't be a bottleneck for your audience. For context, a 56Kbps dial-up connection is significantly slower than modern high-speed internet, so aiming for a file size that loads quickly on average connections is ideal.
- Saving the GIF: Once you've adjusted the settings to your satisfaction, click "Save…" and choose a location on your computer to save your animated GIF file.
Beyond the Basics: Enhancing Your GIF Creation
While this tutorial covers the fundamentals of creating a frame animation in Photoshop, the possibilities are vast.
- Video to GIF: You can also import video clips into Photoshop and use the Timeline to select segments and convert them into GIFs. This is an excellent way to capture short, dynamic moments.
- Advanced Animation Techniques: Explore more advanced features within the Timeline panel, such as adjusting the timing of individual frames more precisely, adding transitions, or even utilizing motion tweening for smoother, more complex movements.
- External Tools: If Photoshop is not readily available, consider free online tools like Giphy. While they offer convenience, they may have limitations in terms of customization and output quality compared to professional software.
- Workflow Enhancement: For those who frequently use Photoshop for complex tasks, consider tools like TourBox. These programmable controllers can streamline repetitive actions, allowing you to focus more on the creative aspects of your design process.
How to Convert Video in GIF in Photoshop
By mastering the techniques outlined in this tutorial, you'll be well-equipped to create engaging and customized animated GIFs that will enhance your online presence and captivate your audience. The ability to control every aspect of your animation, from the frame-by-frame movement to the final file optimization, makes Photoshop an indispensable tool for any serious GIF creator. Remember to experiment, have fun, and always keep your audience's experience in mind when balancing visual flair with performance.