The allure of the "dreamy look" in photography is undeniable, a popular aesthetic that imbues images with a soft, ethereal, and often romantic quality. Frequently sought after in wedding and portrait photography, this style is characterized by its gentle contrast, muted color palettes, and a subtle, almost painterly softness. While many photographers initially turn to "dreamy Lightroom presets" as a shortcut to achieving this look, the reality is far more nuanced. As professional photographers know, a truly consistent and high-quality dreamy aesthetic often eludes the one-click solution of traditional presets, revealing the need for a deeper understanding of post-production techniques and, increasingly, the power of AI-driven editing.
Deconstructing the "Dreamy" Aesthetic: Key Visual Elements
Before delving into the "how," it's crucial to define what constitutes the "dreamy" look. It's not a singular attribute but a harmonious blend of several key visual components that work in concert to create an atmospheric and emotive image.
Light and Contrast: The Foundation of Softness
The very essence of the dreamy aesthetic is its relationship with light. This translates into a deliberate manipulation of contrast to create a gentle, diffused feel.
- Low Contrast: Images embracing the dreamy look eschew the starkness of deep blacks and blown-out whites. Instead, they feature a more compressed tonal range, avoiding extreme values.
- Lifted Blacks: This is perhaps the most defining characteristic. The darkest areas of the photograph are not rendered as pure black but are instead "lifted" to a soft, neutral gray. This technique, often referred to as a "faded" or "matte" look, immediately softens the image and contributes to its ethereal quality.
- Muted Highlights: Mirroring the treatment of the shadows, the brightest parts of the image are also softened. Instead of being pure white, they are "rolled off" or gently muted, preventing the sky or other bright elements from becoming distracting or harsh.
Color Palette: Muted, Warm, and Earthy Tones
Color plays a pivotal role in establishing the dreamy mood, moving away from vibrant, saturated hues towards a more subdued and harmonious palette.
- Muted, Earthy Tones: The overall color saturation is reduced, favoring colors that feel grounded and natural, often leaning towards earthy or desaturated shades.
- Warm Skin Tones: For portraiture, skin tones are almost invariably pushed towards warmth, adopting peachy or golden hues. This enhances the inviting and gentle feel of the image.
- Desaturated Greens: A significant aspect of achieving the dreamy look involves taming vibrant greens. Bright, distracting greens in foliage are typically desaturated and often shifted towards more natural, earthy tones like olive or even a brownish-green.
- Pastel Hues: Colors are frequently shifted to evoke a softer, more delicate feel, often leaning towards pastel shades.
Texture and Detail: The Subtle Additions
Beyond light and color, subtle additions to texture and detail further refine the dreamy aesthetic.
- Filmic Grain: A fine layer of film grain is often introduced. This digital artifact helps to break up the sterile, overly clean look of digital photography, adding a tactile and organic quality that harks back to traditional film.
- Softness: While the primary subject remains in focus, the overall image might possess a gentle softness. This is not to be confused with blurriness, but rather a subtle reduction in micro-contrast that prevents the image from feeling overly sharp or clinical.
In essence, the "dreamy" look is an intentional orchestration of softness, warmth, and gentleness, characterized by low contrast, lifted blacks, and a harmonious, earthy color palette.
Building the Dreamy Look from Scratch in Adobe Lightroom
Achieving this aesthetic manually within Adobe Lightroom is a multi-step process that requires a solid understanding of the software's core editing tools. This foundational knowledge is essential before even considering presets or AI solutions.
The Core Adjustments: Setting the Stage
The journey begins with fundamental adjustments that lay the groundwork for the dreamy look.
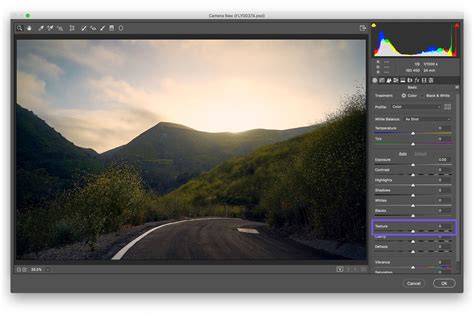
- White Balance (WB): To infuse warmth, the Temp slider is almost always nudged towards the yellow, introducing a subtle warmth to the entire image.
- Exposure: Ensuring correct exposure is paramount, as it provides a stable base for all subsequent adjustments.
- Contrast: The Contrast slider is pulled down significantly to reduce the overall tonal separation and begin the process of softening the image.
- Highlights: The Highlights slider is brought down considerably to mute the brightest areas and prevent clipping.
- Shadows: Conversely, the Shadows slider is pushed upwards to lift the darker areas, initiating the "lifted blacks" effect.
- Whites: To precisely control the brightest points, holding the Alt (or Option) key while adjusting the Whites slider and dragging it left until almost no white spots appear is crucial. This prevents any pure white areas from distracting the viewer.
- Blacks: Similarly, holding Alt (or Option) and clicking the Blacks slider, then dragging it right, is used to define the new black point, ensuring it's not pure black but a soft gray.
Presence and Tone: Refining the Feel
Further adjustments to the "Presence" and tone sliders refine the image's tactile qualities.
- Clarity: The Clarity slider is often lowered slightly to introduce a gentle softness across the image, avoiding an overly sharp or crunchy look.
- Dehaze: The Dehaze slider may also be lowered to further reduce contrast and add to the diffused, atmospheric quality.
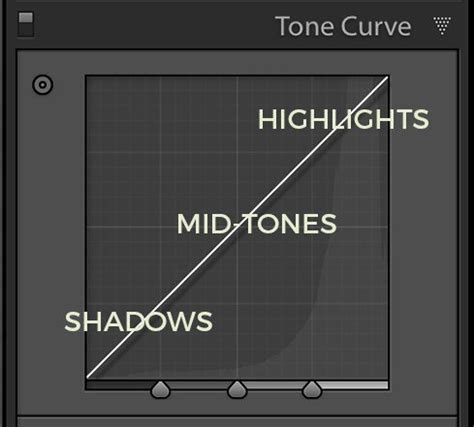
The Tone Curve: The Heart of the Dreamy Look
The Tone Curve is where much of the magic for the dreamy look truly happens, offering precise control over tonal relationships.
- Lift the Blacks: By clicking on the bottom-left point of the Tone Curve and dragging it upwards along the left axis, the darkest parts of the photo are transformed into a soft gray, instantly imparting the signature "faded" look.
- Drop the Whites: The top-right point of the curve is clicked and dragged downwards along the right axis to gently roll off the highlights, preventing them from becoming too harsh.
- Add a Gentle "S-Curve": A subtle "S-curve" is created by clicking in the middle of the line (midtones) and pulling it up slightly, and then clicking in the lower-middle (shadows) and pulling it down slightly. This refines the tonal transition and adds depth without introducing harsh contrast.
HSL/Color Panel: Sculpting the Palette
The HSL (Hue, Saturation, Luminance) panel is where the characteristic color palette of the dreamy aesthetic is meticulously crafted.
- Hue Adjustments: In the Hue tab, greens are often shifted slightly towards yellow or aqua to achieve a more natural, earthy tone.
- Saturation Adjustments: This is a critical step. The Green slider is pulled down significantly to desaturate foliage. The Blue slider may also be reduced to mute sky tones or other blue elements.
- Luminance Adjustments: Luminance, which controls brightness, is used to fine-tune colors. The Orange slider is almost always boosted to enhance the warmth of skin tones.
Color Grading: Adding Nuance and Depth
Lightroom's Color Grading panel (formerly Split Toning) offers an advanced method for adding subtle color casts that further enhance the dreamy mood.
- Shadows: A low-saturation Yellow or Orange is often added to the shadows to maintain warmth even in the darkest areas.
- Highlights: A very subtle Teal or Blue might be introduced to the highlights, providing a gentle contrast to the warm tones and adding a touch of sophistication.
Effects Panel: The Finishing Touches
The Effects panel is where the final textural elements are applied.
- Grain: A fine layer of film grain is added to replicate the aesthetic of traditional film photography and break up the digital crispness.
Camera Calibration: Unleashing Hidden Potential
The Camera Calibration panel, often overlooked, is a powerful tool for creating unique color shifts that are difficult to achieve elsewhere. The Red Primary and Blue Primary sliders can be adjusted to create very specific and nuanced color renditions, further contributing to a distinctive dreamy look.
The Limitations of Traditional Presets
While the manual process in Lightroom yields professional results, it is undeniably time-consuming, especially when dealing with large volumes of images, such as a full wedding. This is where the appeal of presets arises, promising a faster route to the desired aesthetic. However, the inherent nature of traditional presets often creates more problems than it solves.
A preset is, at its core, a saved list of slider positions. This "one-size-fits-all" approach fails to account for the most critical variable in photography: light. Applying a preset designed for a bright, sunny day to a photo taken in deep shade, or vice-versa, will invariably lead to undesirable results. The preset, lacking any understanding of the image's context, will apply its static settings regardless of the exposure, white balance, or lighting conditions.
This necessitates a lengthy "fixing" process. Instead of saving time, photographers often find themselves spending considerable effort correcting the preset's misapplied settings â adjusting exposure, white balance, and individual color sliders for each image. This negates the intended benefit of presets and transforms them from a shortcut into a frustrating starting point. The core issue is that traditional presets fail to adapt to the unique characteristics of each individual photograph, a fundamental requirement for a truly consistent and professional look.
The AI Revolution: Imagen as a Workflow Solution
The limitations of traditional presets have long been a source of frustration for photographers. However, the advent of AI-powered editing tools has begun to revolutionize the post-production workflow. Imagen emerges as a modern solution, addressing the inherent shortcomings of static presets with intelligent, adaptive editing.
Unlike a preset, which applies fixed settings, Imagen is a sophisticated desktop application that integrates directly with Adobe Lightroom Classic catalogs. It analyzes the photograph's histogram, understanding its exposure, white balance, and lighting conditions. This allows Imagen to make dynamic, intelligent edits that are tailored to each specific image, delivering true consistency and significantly reducing the manual effort required to achieve a desired aesthetic.
Creating Your Signature "Dreamy" Look with AI
The power of Imagen lies in its ability to learn and replicate a photographer's unique style. This is achieved through AI Profiles.
- Talent AI Profiles: For those seeking immediate access to a professional aesthetic, Imagen offers "Talent AI Profiles." These are developed in partnership with world-renowned photographers and allow users to apply a signature style that still adapts intelligently to individual photos. It's akin to having a top professional editor working on your images, but with the AI's adaptive capabilities.
- Personal AI Profiles: The ultimate customization comes with creating a Personal AI Profile. This involves providing Imagen with at least 3,000 of your own consistently edited photos. Imagen then meticulously studies these images, learning your specific editing tastes, how you handle highlights and shadows, and your unique color palette. Once trained, Imagen can edit new, unedited photos in your exact style, effectively automating your creative workflow and preserving your brand identity.
The Imagen Workflow: Simplicity and Efficiency
The Imagen workflow is designed for speed and ease of use.
- Download the App: Begin by downloading the Imagen desktop application, which operates locally on your computer for optimal performance.
- Choose Your AI Profile:
- The Pro Move (Personal AI Profile): Navigate to the AI Profiles tab and select "Create your own profile." Follow the guided process, pointing Imagen to your Lightroom Classic catalogs containing your edited images.
- The Fast Track (Talent AI Profile): Visit the Profile Showcase, select a "dreamy" Talent AI Profile that resonates with your vision, and add it to your account.
- Import and Edit: Import your RAW photos into Lightroom Classic as usual. Then, open the Imagen app. Imagen will recognize your Lightroom catalogs. Select your desired AI Profile and any specific AI Tools (e.g., Subject Mask for precise person-based edits).
- Process and Review: Click "Edit." Imagen processes images at an astonishing speed, often around half a second per photo. Once complete, open Lightroom Classic, and your photos will be automatically edited with all sliders adjusted.
- Continuous Learning: Imagen's AI is designed to learn and improve. After you manually tweak any of Imagen's edits, you can "Fine-Tune" your Personal AI Profile by uploading these refined edits. This ensures the AI continuously adapts to your evolving style.
Beyond Editing: An All-in-One Platform
Imagen's capabilities extend far beyond just editing. It aims to streamline the entire post-production workflow.
- Culling Studio: For large batches of images, such as an entire memory card dump, Imagen's Culling Studio can automate the initial culling process, identifying duplicates, blurry shots, and blinked images, saving significant time.
- Cloud Storage: Secure and optimized cloud storage is integrated, providing peace of mind and efficient space management.
- Client Galleries: Imagen can even assist in delivering final, edited client galleries, taking the process from raw files to final delivery.
Imagen is not merely a replacement for "dreamy Lightroom presets"; it represents a paradigm shift in photographic workflow, offering an intelligent, consistent, and efficient solution for achieving even the most nuanced aesthetic.
Frequently Asked Questions About Dreamy Edits and AI
The transition to AI-powered editing can bring about many questions. Here are answers to some common inquiries regarding achieving the dreamy look and utilizing tools like Imagen.
Presets vs. AI: Understanding the Differences
- Are "dreamy" Lightroom presets completely useless?Not entirely. They can serve as a valuable learning tool. By applying a preset and then dissecting the slider positions, photographers can gain insight into how certain looks are constructed. However, for consistent, professional results, they are often insufficient.
- What's the difference between a Talent AI Profile and buying a preset pack from the same photographer?A preset pack is a static file that applies the same settings universally. A Talent AI Profile, on the other hand, is an AI model trained on thousands of that photographer's edits. The AI Profile intelligently adapts its edits to your photo's specific lighting, exposure, and other characteristics, offering a far more dynamic and personalized result.
Personal AI Profiles: Training and Consistency
- How many photos do I need for a Personal AI Profile?Imagen recommends a minimum of 3,000 consistently edited photos for optimal results. The more high-quality, consistent images you provide, the more accurate and refined your Personal AI Profile will become.
- What if my editing style isn't consistent across all my work?It's crucial to maintain consistency. If you have distinct styles (e.g., "dreamy/airy" versus "dark/moody"), create separate Personal AI Profiles for each. Organize your photos into folders or collections in Lightroom to facilitate this. Feeding inconsistent styles into a single profile will confuse the AI and lead to suboptimal results.
- Will Imagen's AI editing replace my creativity?No. Imagen automates the execution of your established style. You remain the creative director. The AI applies the aesthetic you've defined through your Personal AI Profile to the more tedious aspects of editing, freeing you to focus on creative decision-making and client interaction.
- Can Imagen help me achieve a "dark and moody" look instead of "dreamy"?Absolutely. Imagen's AI is style-agnostic. By training a Personal AI Profile with 3,000 of your best "dark and moody" edits, Imagen can learn and replicate that aesthetic with the same intelligence and adaptability.
Technicalities and Workflow Integration
- Can Imagen edit JPEGs, or just RAW files?Imagen can edit both RAW and JPEG formats. However, it's best practice to create separate AI Profiles for each format, as their characteristics can differ.
- Does Imagen work with Lightroom CC (cloud) or just Lightroom Classic?Imagen's primary integration is with Lightroom Classic, which is favored by many high-volume professionals. However, it can also work with Lightroom (cloud), Photoshop, and Bridge.
- How long does Imagen take to edit a full wedding?Imagen is remarkably fast, processing images at approximately 0.5 seconds per photo. This means a full wedding's worth of photos can be edited in a matter of minutes.
- What happens if I donât like an edit Imagen makes?You are always in control. Imagen's edits are simply slider adjustments within your Lightroom catalog. You can easily tweak them manually, just as you would with any other edit. The "Fine-Tuning" process allows you to upload your manual adjustments back to Imagen to improve its future edits.
- Is Imagen's culling better than using Lightroom's flags?Yes, because it's automated. Imagen's AI performs an initial pass, identifying duplicates, blurry shots, and blinked frames, significantly reducing the manual effort required for culling large quantities of images.
Pricing and Subscription Models
- Is Imagen a subscription, and how does pricing work?Imagen operates on a "pay-as-you-go" model, where you pay a small fee per photo edited. Subscription plans are also available, often including features like culling and storage for a monthly fee, which can be more cost-effective for high-volume professionals.
The pursuit of a "dreamy" aesthetic in photography is an artistic endeavor that transcends simple slider adjustments. While traditional presets offer a starting point, they often fall short of delivering the consistent, professional quality that discerning photographers demand. The integration of AI, particularly through platforms like Imagen, represents a significant leap forward, enabling photographers to not only achieve their desired looks with unparalleled efficiency but also to develop and automate their unique artistic vision. By understanding the core elements of the dreamy aesthetic and leveraging intelligent editing tools, photographers can transform their workflow and consistently produce images that are as breathtaking as they are technically proficient.