Procreate has emerged as a powerhouse for digital art creation, offering an intuitive and accessible platform for artists of all levels. Whether you're a complete novice looking to dip your toes into the world of digital illustration or an experienced artist seeking a streamlined workflow, Procreate provides a robust set of tools to bring your visions to life. This tutorial, designed with simplicity and ease of learning in mind, will guide you through the fundamental aspects of Procreate, empowering you to start creating digital art right away. We'll break down the essential brushes, tools, and gestures, ensuring a smooth learning curve and fostering your unique creative potential.
Getting Started with the Fundamentals: Your First Steps in Procreate
For those new to digital art or Procreate specifically, the "Beginners Series" is an invaluable resource. This series is meticulously crafted to introduce you to the core functionalities of the app, making it an ideal starting point for anyone looking to learn. It’s designed to be both easy and practical, ensuring that you can grasp the fundamentals without feeling overwhelmed.
Mastering the Essential Tools: Brush, Color, and Gestures
The journey into digital art begins with understanding the basic building blocks. In Procreate, this means getting acquainted with the brush tool, the color palette, and the intuitive gesture controls.
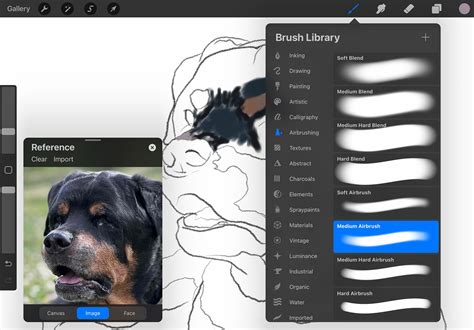
The Brush Tool is your primary instrument for creating marks on the digital canvas. Procreate boasts an extensive library of brushes, each with unique textures, shapes, and behaviors. For beginners, it's wise to start with the default brushes, such as the "Studio Pen" for clean lines, the "Technical Pen" for precise linework, or a basic "Round Brush" for general painting. Experimenting with brush size, opacity, and flow will allow you to achieve a wide range of effects. Don't be afraid to tap around and see how different settings alter the brush's output.
Color is the soul of any artwork, and Procreate offers a sophisticated yet user-friendly color system. The color picker allows you to select from a vast spectrum, offering various modes like the classic color wheel, disc, classic, and harmony. For beginners, focusing on the color wheel and disc modes is a good starting point. Understanding concepts like hue, saturation, and brightness will be crucial as you progress. You can also save your favorite color palettes for quick access, ensuring consistency in your work.
Gestures are what make Procreate feel so fluid and responsive. These simple finger movements allow you to perform common actions rapidly, without needing to navigate through menus. Key gestures to master include:
- Two-finger tap: Undo. This is your best friend when you make a mistake.
- Three-finger tap: Redo. To bring back what you just undid.
- Pinch to zoom: Magnify or shrink your canvas. Essential for detailed work.
- Two-finger scrub: Erase. Useful for quickly removing areas.
- Tap and hold with ColorDrop: Fill an area with color. A quick way to color large sections.
- Drag and drop with two fingers: Move selections or layers.
Familiarizing yourself with these gestures will significantly speed up your workflow and make the creative process more enjoyable.
The Power of Layers: Building Depth and Complexity
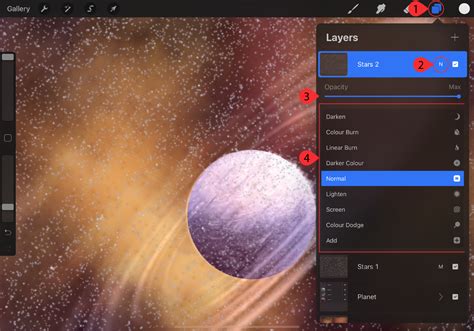
Layers are a fundamental concept in digital art, and Procreate handles them with exceptional ease. Think of layers as transparent sheets stacked on top of each other. You can draw, paint, and edit on each layer independently without affecting the others. This non-destructive workflow is incredibly powerful.
When you create a new canvas in Procreate, you start with a single layer. The Layers panel, usually found in the top-right corner of the interface, allows you to manage these layers. You can:
- Add new layers: Tap the "+" icon to create a fresh layer.
- Duplicate layers: Swipe left on a layer and tap "Duplicate."
- Delete layers: Swipe left on a layer and tap "Delete."
- Rearrange layers: Tap and hold a layer, then drag it up or down to change its stacking order.
- Adjust layer opacity: Use the slider at the top of the Layers panel to make a layer more or less transparent.
- Change layer blend modes: These modes alter how a layer interacts with the layers below it, creating effects like darkening, lightening, or color blending. Experimenting with modes like "Multiply," "Screen," and "Overlay" can add depth and richness to your artwork.
For beginners, it's highly recommended to use separate layers for different elements of your artwork. For instance, use one layer for your sketch, another for line art, a third for base colors, and additional layers for shading and highlights. This approach makes it easy to correct mistakes, experiment with colors, and refine details without starting over.
Diving Deeper: Procreate's Painting and Editing Tools
Once you've grasped the basics of brushes, colors, gestures, and layers, it's time to explore Procreate's more advanced features. The "Painting Tools" section of the Beginners Series is where you’ll delve into the nuances of Procreate's color, brush, layer, and effects capabilities.
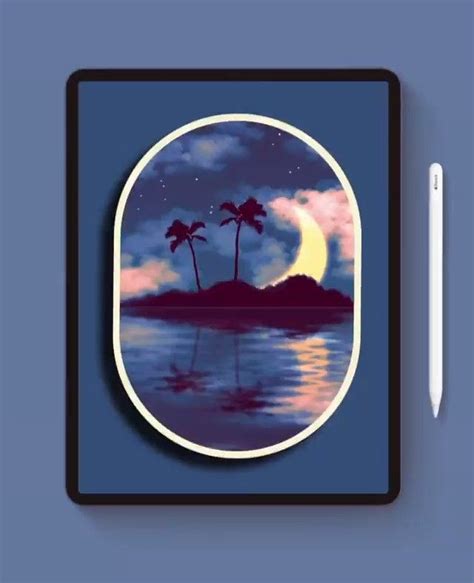
Exploring Colors, Brushes, and Effects: Creating a Night Scene
This stage of learning is about applying your foundational knowledge to create a more complex piece. A beautiful night scene is an excellent subject for practicing these skills.
Advanced Color Techniques: Beyond basic color selection, Procreate offers tools to refine your color choices. The Color Balance and Curves adjustments, accessible through the Adjustments menu (magic wand icon), allow for sophisticated color grading. You can shift the overall color tone of your artwork, enhance specific color ranges, or create dramatic lighting effects. For a night scene, you might use these tools to deepen blues and purples, add subtle glows to light sources, or desaturate certain areas to enhance the mood.
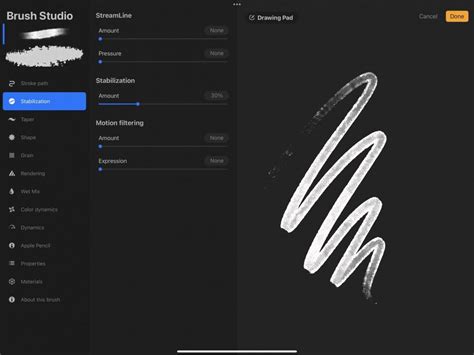
Brush Customization and Creation: While Procreate's pre-installed brushes are extensive, you can also customize existing brushes or create entirely new ones. By tapping on a brush and selecting "Edit," you unlock a deep level of control over its shape, grain, stroke properties, and rendering. You can adjust jitter, spacing, streamline, and stabilization to achieve precise line weights or unique textures. Creating your own brushes can be a rewarding experience, allowing you to develop a signature style. For a night scene, you might create a custom brush that mimics the soft glow of distant stars or the textured splatter of moonlight on water.
Leveraging Layers for Depth: In a night scene, layers become crucial for establishing depth and atmosphere. You might use a dark, textured background layer, followed by layers for distant elements like mountains or cityscapes, then mid-ground elements like trees or buildings, and finally foreground details. Using blend modes like "Add" or "Glow" on layers for stars or light sources can create a luminous effect. Soft brushes with low opacity are excellent for creating atmospheric haze or subtle gradients in the sky.
Applying Effects: Procreate's Adjustments menu offers a range of powerful effects that can transform your artwork. Tools like Gaussian Blur are perfect for creating soft backgrounds or out-of-focus elements, essential for conveying depth in a night scene. Noise can add texture and grit, while Hue/Saturation can subtly alter the mood. Experiment with these effects to see how they can enhance your night scene, from softening the edges of distant objects to adding a subtle shimmer to water.
LANDSCAPE ART for Beginners [Procreate Process]
Refining Your Art: Procreate's Editing Tools and Advanced Techniques
The third part of the Beginners Series focuses on Procreate's editing tools. This is where you learn to refine your artwork, correct mistakes, and add those finishing touches that elevate your piece from a simple drawing to a polished digital painting.
Mastering Selection and Transformation: Precision and Control
The Selection Tool is indispensable for isolating specific parts of your artwork for editing. Procreate offers several selection types:
- Freehand: Draw a freeform selection outline.
- Rectangle: Select a rectangular area.
- Ellipse: Select an elliptical area.
- Automatic: Tap on a color to select all contiguous pixels of that color. This is incredibly useful for selecting areas that have been filled with a single color.
Once you have a selection, you can perform a variety of actions:
- Move, Scale, Rotate: The Transform Tool (arrow icon) allows you to manipulate your selection. You can move it, resize it, rotate it, and even distort it using different snapping and magnetic options for precise placement.
- Copy and Paste: You can copy your selection to a new layer or paste it elsewhere on your canvas.
- Feathering: Soften the edges of your selection, creating a gradual transition rather than a harsh cut-off. This is excellent for blending elements or creating subtle lighting effects.
- Invert Selection: Select everything except what you initially selected.
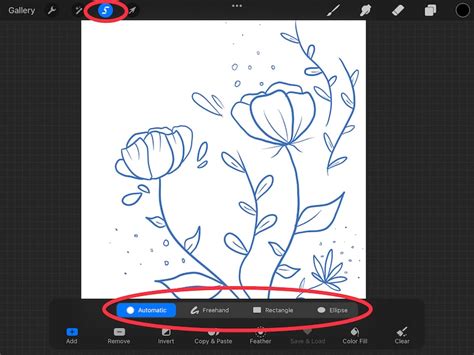
These tools provide a high degree of control, allowing you to make precise edits without affecting other parts of your artwork. For instance, if you want to adjust the color of just one object in your scene, you can use the selection tool to isolate it, then apply color adjustments only to that selected area.
Adjustments and Filters: Enhancing Your Artwork
The Adjustments Menu (magic wand icon) is a treasure trove of tools for altering the appearance of your entire canvas or specific selections. We've touched on some of these for color, but they extend to much more:
- Hue, Saturation, Brightness: Fine-tune the colors and overall lightness of your artwork.
- Color Balance: Adjust the color mix for shadows, midtones, and highlights independently, allowing for sophisticated color grading.
- Curves and Levels: Powerful tools for adjusting contrast and tonal range, offering more control than simple brightness/contrast sliders.
- Gaussian Blur: Soften areas, create depth of field, or blend elements.
- Motion Blur: Simulate movement by applying a directional blur.
- Noise: Add or reduce digital noise for texture or to clean up an image.
- Sharpen: Enhance edges and details.
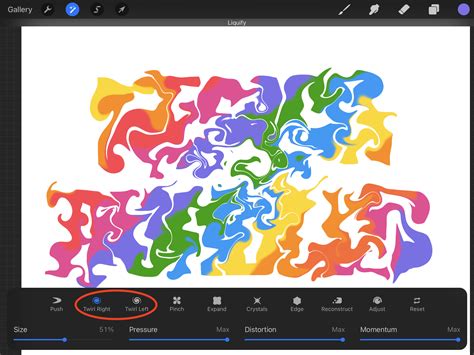
- Liquify: This is a particularly powerful tool that allows you to push, pull, twirl, and expand areas of your artwork, much like using a liquid. It's excellent for subtle reshaping of elements, creating organic forms, or adding dynamic flow.
Experimenting with these adjustments is key to developing your artistic eye. You can use them to unify the color palette of your piece, enhance dramatic lighting, or add subtle stylistic effects. For example, a slight sharpening on a focal point can draw the viewer's eye, while a touch of Gaussian blur on the background can push it back and make your subject stand out.
Importing and Exporting: Sharing Your Creations
Finally, understanding how to get your artwork into Procreate and how to share it is essential.
- Importing: Procreate allows you to import various file types, including JPEGs, PNGs, and even PSDs (Photoshop documents), preserving layers. You can import photos from your camera roll, files from cloud storage, or even scan physical artwork.
- Exporting: When you're ready to share your masterpiece, Procreate offers flexible export options. You can save your artwork as a JPEG or PNG for general use, a TIFF for high-quality printing, or a layered PSD to continue editing in other software. You can also export your artwork as a time-lapse video, showcasing the entire creation process, which is a popular feature for social media sharing.
Mastering these fundamental tools and techniques within Procreate will lay a solid foundation for your digital art journey. The "Beginners Series" provides a structured path to learn these essentials, empowering you to explore your creativity and produce stunning digital artwork. Remember, practice and experimentation are key, so don't hesitate to play around with the tools and discover what you can create.