Adobe InDesign offers a robust set of tools for creating and managing tables, transforming raw data into visually appealing and easily digestible information within your documents. Whether you're working with imported content from Microsoft Word or Excel, or building tables from scratch, InDesign provides the flexibility to achieve professional results. This comprehensive guide explores the fundamental aspects of table creation, manipulation, and advanced styling, empowering you to work efficiently and effectively with tabular data.
The Foundation of Tables: Rows, Columns, and Cells
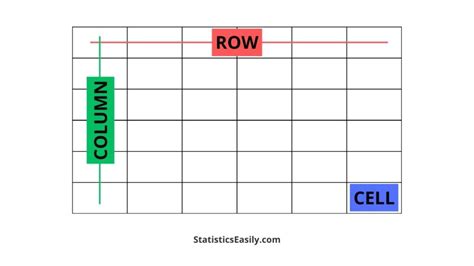
At its core, a table in InDesign is a structured grid composed of rows and columns, intersecting to form individual cells. Each cell acts as a miniature text frame, capable of containing text, inline graphics, or even other nested tables. You can construct tables directly within your document or convert existing tab-delimited text into a table format.
When you create a table, it initially occupies the full width of its containing text frame. Importantly, tables flow with the surrounding text, behaving much like inline graphics. This means a table will move through threaded frames as text above it changes in size or is added or deleted, ensuring content remains contiguous.
Creating Tables from Scratch
You have two primary methods for creating a table from scratch:
- Within an Existing Text Frame: Use the "Insert Table" option found under the Table menu. This method requires you to first draw a text frame where you want the table to reside.
- Without a Pre-existing Text Frame: Utilize the "Create Table" option. This approach generates a table without the need to manually create a text frame beforehand.
When you create a table, you'll be prompted to specify the number of rows and columns. You can also designate header and footer rows at this stage, which are crucial for organizing and repeating information across pages.
Converting Text to Tables
InDesign offers a streamlined process for converting existing text into tables. You can achieve this by:
- Tab-delimited Text: If your text is separated by tab characters, InDesign can interpret this structure directly into a table.
- Comma-separated or Paragraph-separated Text: For text formatted with commas or distinct paragraphs, InDesign's import options provide control over how this data is parsed into table cells.
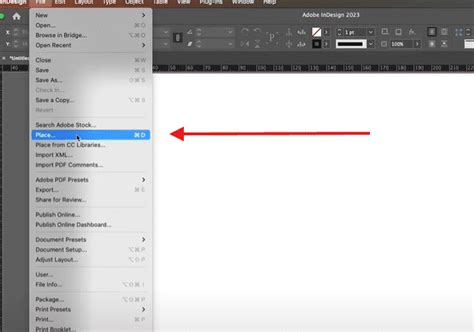
To initiate this conversion, you can either use the "Place" command (File > Place) for external text files or select text within your document and then choose "Convert Text to Table" from the Table menu. The "Import Options" dialog box will appear, allowing you to define how the text should be structured into rows and columns.
Navigating and Manipulating Table Content
Once your table is in place, efficient navigation and manipulation are key.
Moving Within a Table
The Tab key is your primary tool for moving through a table. Pressing Tab advances the cursor to the next cell. If you press Tab while in the last cell of the table, a new row is automatically created, simplifying the process of adding more data. To move backward through cells, use Shift+Tab. The arrow keys provide finer control for navigating within and between cells. Pressing the Right Arrow key at the end of a row will move the insertion point to the beginning of the first cell in that same row, facilitating seamless traversal.
Selecting Table Elements
Selecting the correct elements is crucial for applying formatting or making changes.
- Selecting Text within a Cell: Use the Type tool to position your cursor inside the cell and select the text as you normally would. Pressing
Command + A(orCtrl + Aon Windows) will select all text within the active cell. - Selecting a Cell: With the Type tool active, place your cursor inside the desired cell and press the Esc key. This action selects the cell, enabling you to modify its properties like color.
- Selecting a Row or Column: To select an entire row or column, you can use the Table menu. Place your insertion point within the desired row or column, then navigate to
Table > Select > ColumnorTable > Select > Row. Alternatively, you can hover your cursor above a column or to the left of a row until the cursor changes, then click to select. Multiple columns can be selected by clicking and dragging across them. - Selecting the Entire Table: To select the whole table, hover your cursor in the very top-left corner of the table. A small arrow icon will appear. Click this icon to select the entire table.
Resizing Tables, Rows, and Columns
Adjusting the dimensions of your table and its components is straightforward.
- Resizing the Entire Table: To resize the table while maintaining the relative proportions of its columns, select the table and then drag the right edge of the last column stroke. Holding the Shift key while dragging can help preserve column proportions.
- Resizing Rows: Row height can be adjusted by dragging the bottom edge of a row. The Table panel (
Window > Type & Tables > Table) also allows you to set row heights. You can specify an "At Least" height, which allows rows to expand if their content requires more space, or an "Exactly" height for uniform row dimensions. - Resizing Columns: Column widths can be adjusted by dragging the vertical lines between columns. The Table panel also provides controls for column widths.
Deleting Rows and Columns
To remove unwanted rows or columns:
- Using the Table Menu: Place your insertion point within the row or column you wish to delete. Navigate to
Table > Delete, then chooseRoworColumn. - Using the Table Options Dialog Box: Access the "Table Options" dialog box (
Table > Table Options > Table Setup). Here, you can specify a different number of rows and columns to effectively delete them.
Deleting Cell Contents
To clear the text or graphics from cells without removing the cells themselves, select the cells and press the Delete key. Alternatively, use the Type tool to select the specific text within the cells you want to remove.
Advanced Table Formatting and Styling
InDesign's power truly shines when it comes to formatting tables. Beyond basic adjustments, you can apply sophisticated styles to ensure consistency and visual appeal.
Cell Options: Padding, Alignment, and More
Each cell has its own set of options that control how content is displayed within its boundaries. Access these by selecting the cell(s) and going to Table > Cell Options > Text.
- Cell Insets: This feature controls the spacing between the cell content and its borders, allowing you to define top, bottom, left, and right margins.
- First Baseline: This setting influences how text aligns within the cell, particularly when dealing with multiple lines or different font sizes.
- Clipping for Graphics: When graphics are placed within a cell, you can choose to "Clip Contents to Cell," ensuring the graphic fits within the cell's boundaries.
- Text Rotation: InDesign allows you to rotate text within cells, useful for specific design layouts.
Strokes and Fills: Defining Borders and Backgrounds
Strokes and fills are fundamental to defining the visual appearance of your table.
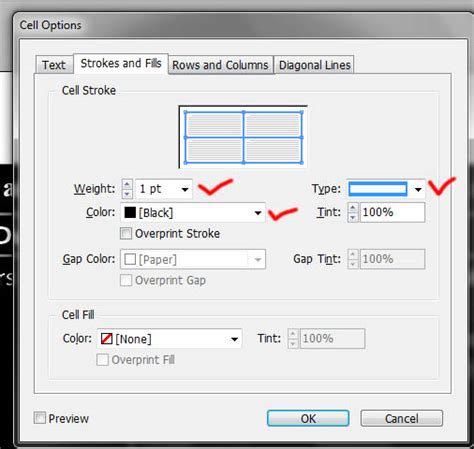
- Applying Strokes and Fills: Select the cells you wish to format, then navigate to
Table > Cell Options > Strokes and Fills. Here you can adjust stroke weight, type, color, and tint. You can also apply fills to cells. - Stroke Drawing Order: You have control over whether row strokes appear over column strokes or vice versa. Access this by selecting cells and going to
Table > Table Options > Table Setup, then adjusting the "Stroke Drawing Order" settings. - Overprinting: The "Overprint Stroke" and "Overprint Fill" options ensure that strokes and fills interact predictably with underlying elements, especially important in print workflows.
- Gap Color: When using dashed or dotted strokes, you can specify a "Gap Color" to control the appearance of the spaces between the stroke segments.
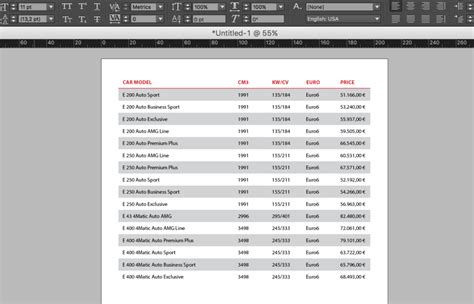
Alternating Row and Column Fills/Strokes
To create visually distinct rows or columns, InDesign offers alternating patterns.
- Alternating Row/Column Strokes: Use
Table > Table Options > Alternating Row StrokesorAlternating Column Strokesto apply predefined patterns or create your own. - Alternating Fills: Similarly,
Table > Table Options > Alternating Fillsallows you to apply different background colors or tints to rows or columns, enhancing readability and visual appeal.
Learn InDesign Table Styles in 9 Minutes
Leveraging Table and Cell Styles for Efficiency
For documents with numerous tables or complex formatting requirements, Table Styles and Cell Styles are indispensable. They allow you to define and reuse formatting attributes, ensuring consistency and saving significant time.
Creating Table Styles
A Table Style encapsulates a wide range of formatting for an entire table, including:
- Cell Styles: Linking specific cell styles to header rows, footer rows, left/right columns, and body cells.
- Strokes and Fills: Defining the borders and background colors for the entire table.
- Alternating Patterns: Setting up alternating row or column fills and strokes.
- Table Borders: Applying a border to the entire table.
- Row/Column Strokes: Defining the appearance of internal row and column lines.
To create a Table Style:
- Format a table exactly as you want it to appear.
- Select the entire table.
- Open the Table Styles panel (
Window > Styles > Table Styles). - Click the "Create New Style" icon at the bottom of the panel.
- Double-click the new style to edit its properties and give it a descriptive name.
Creating Cell Styles
Cell Styles focus on the formatting of individual cells and are often nested within Table Styles. They can define:
- Paragraph Styles: Applying specific paragraph styles to the text within cells.
- Strokes and Fills: Setting borders and background colors for individual cells.
- Cell Insets: Defining internal padding.
- Text Alignment: Controlling how text is aligned within the cell.
To create a Cell Style:
- Format a cell or group of cells as desired.
- Open the Cell Styles panel (
Window > Styles > Cell Styles). - Click the "Create New Style" icon.
- Double-click the new style to edit its properties, name it, and link it to a Paragraph Style if needed.
Applying and Managing Styles
Once created, Table and Cell Styles can be applied to any table or cell within your document.
- Applying Styles: Simply select the table or cell(s) and click on the desired style in the respective panel.
- Importing Styles: You can import styles from other InDesign documents to maintain consistency across projects. Use the "Load Table Styles" or "Load Cell Styles" option from the panel menu.
- Overriding Styles: When you manually format a cell or table after applying a style, these manual changes are considered overrides. InDesign provides clear indicators for these overrides, allowing you to easily revert to the defined style or update the style based on your modifications.
Importing and Linking Tables
For workflows involving data originating from other applications, InDesign offers robust import capabilities.
Importing Tables from Word and Excel
When importing documents containing tables from Microsoft Word or Excel, use the File > Place command. Crucially, check the "Show Import Options" box. This will present a dialog box where you can fine-tune how the table's structure and formatting are translated into InDesign. You can control which elements are imported, how text flows, and even specify whether to retain formatting from the source document.
Linking to Excel Spreadsheets
A powerful feature for dynamic data is the ability to link to Excel spreadsheets. This means that if the Excel file is updated, you can refresh the table in InDesign to reflect those changes. This is particularly useful for documents that require frequent data updates. When placing an Excel file with the intention of linking, ensure you select the appropriate options in the import dialog.
Preflighting and Packaging for Output
Before sending your document to print or for digital distribution, it's essential to ensure there are no errors. InDesign's Preflight feature is invaluable for this.
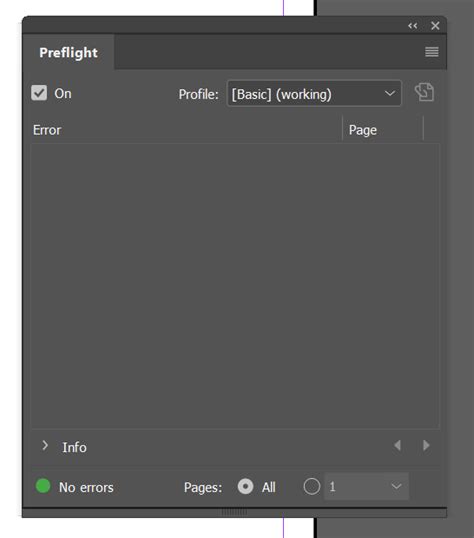
Using Preflight
The Preflight panel (Window > Output > Preflight) scans your document for potential issues, such as:
- Missing links (images or text files).
- Low-resolution images.
- Overset text (text that doesn't fit within its frame).
- Missing fonts.
You can create custom Preflight profiles to tailor the checks to your specific needs. By enabling Live Preflight, you can receive real-time alerts as errors occur.
Packaging Files
The "Package" command (File > Package) gathers all the necessary components of your InDesign document into a single folder. This includes:
- The InDesign document itself.
- Linked graphics.
- Used fonts.
- A customized report detailing document information and potential issues.
This package is then ready to be sent to a printer or collaborator, ensuring they have everything they need to reproduce your work accurately.
By mastering these tools and techniques, you can efficiently create, format, and manage tables in Adobe InDesign, elevating the clarity and professionalism of your documents.