Adobe Photoshop, a titan in the graphic design realm, offers a vast repertoire of tools and functionalities. A recurring query among its users pertains to the capability of exporting Scalable Vector Graphics (SVG) files directly from the software. The good news is that exporting SVGs from Photoshop is not only possible but also facilitated through several user-friendly options, positioning Photoshop as a remarkably adaptable instrument for graphic designers.
Understanding the Foundation: Vector vs. Raster Graphics
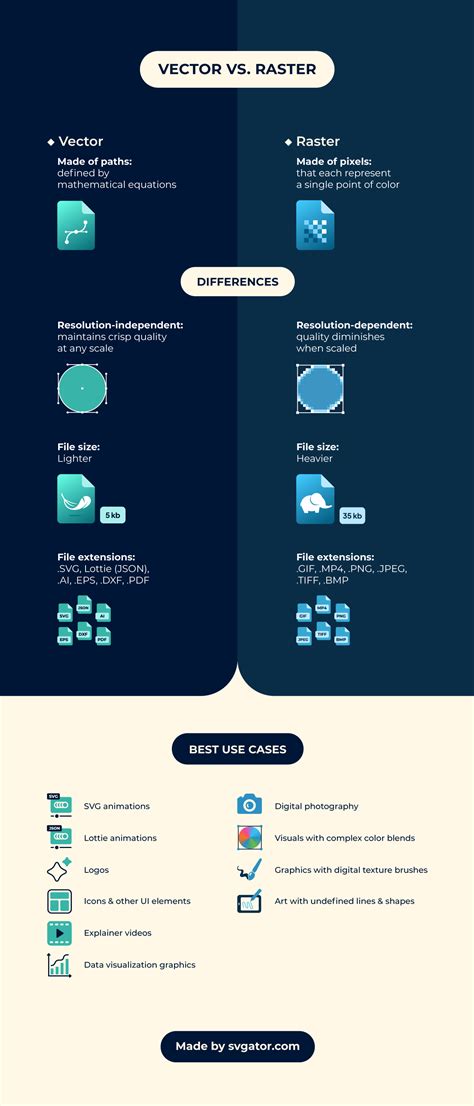
Before delving into the export process, it’s crucial to grasp the fundamental distinction between vector and raster graphics. Raster graphics, such as PNG, GIF, JPG, and BMP, are composed of a fixed grid of pixels. When these images are resized, the software essentially interpolates the existing pixel data, which can lead to a noticeable loss of quality and sharpness, often appearing pixelated or blurred.
In contrast, SVG, or Scalable Vector Graphics, is a vector format. Vector graphics are built upon mathematical equations that define paths, lines, and curves. This mathematical foundation is the key to their scalability. When an SVG file is resized, the software recalculates these paths according to the target dimensions, ensuring that the image remains crisp and clear at any size, without any degradation in quality. This inherent scalability makes SVGs exceptionally well-suited for essential design elements that are frequently resized, such as logos, icons, and other web graphics.
Preparing Your Design for SVG Export
The cornerstone of a successful SVG export from Photoshop lies in the nature of your design. To ensure your artwork translates effectively into a vector format, it must be created using Photoshop's vector-based tools. This primarily includes utilizing shape layers or working with paths generated by the Pen tool. Designs that are primarily pixel-based, such as photographs or detailed raster images, cannot be directly converted into true SVGs without significant manipulation.
It's also important to acknowledge that not all Photoshop features and effects are inherently compatible with the SVG format. To guarantee a smooth transition and optimal results, it is advisable to simplify your artwork. This involves scrutinizing your design for any unnecessary elements or complex effects that might not render correctly in a vector format. Streamlining your design ensures that the resulting SVG file is clean, efficient, and accurately represents your intended visual.
The SVG Export Process in Photoshop
Photoshop offers a straightforward process for exporting SVG files, making it an accessible feature for designers of all levels. The export dialog box presents a range of options that allow for fine-tuning the SVG output. These settings can include parameters for font embedding, image compression, and other critical aspects of the SVG file.
Option 1: Exporting the Entire Document as SVG
For a complete export of your vector artwork as an SVG file, Photoshop provides a direct export function.
- Ensure Vector Elements: Confirm that your design is composed of shape layers or paths.
- Navigate to Export: Go to
File > Export > Export As.... - Select SVG Format: In the dialog box that appears, locate the "Format" dropdown menu and select "SVG."
- Configure SVG Options: The SVG Options dialog box will then present various settings. Here, you can select the desired SVG profile. For more granular control, click on the "More Options" button to adjust advanced settings such as font embedding (choosing between embedding fonts or converting them to outlines) and image compression if any raster elements are included.
- Preview and Export: Review the preview image to ensure everything appears as expected. Once satisfied, click "Export All."
This method is ideal for exporting entire artboards or documents that have been meticulously crafted with vector tools.
Option 2: Exporting Individual Layers as SVG
Photoshop also empowers users to export individual layers as separate SVG files. This is particularly useful when you need to isolate specific vector elements from a larger design.
- Select the Layer: In the Layers panel, select the specific vector layer you wish to export.
- Navigate to Export: Go to
File > Export > Export As.... - Choose SVG Format: From the "Format" dropdown menu, select "SVG."
- Customize and Export: Similar to exporting the entire document, you can then adjust the SVG options as needed within the SVG Options dialog box. Click "Export Selected" or "Export All" (depending on the Photoshop version and context) to save your individual layer as an SVG.
This capability allows for greater flexibility in managing and utilizing individual vector assets from your Photoshop projects.
Transforming Raster Images into SVG: A Creative Approach
While Photoshop excels at exporting native vector artwork as SVG, there's also a creative approach to converting simple raster images (like PNG or JPG) into SVG files. This method is best suited for images with limited color complexity and distinct shapes, such as cartoons, icons, or flat design elements like smileys. Photographic or highly detailed images are generally not suitable for this conversion.
The process involves tracing and converting pixel data into vector paths:
- Open the Image: Load your raster image into Photoshop.
- Select and Make Work Path: Use selection tools (e.g., Quick Selection Tool, Magic Wand) to isolate areas of color. Once a selection is made, right-click within the selection and choose "Make Work Path…". This converts the selected pixels into a vector path.
- Create a New Fill Layer: Navigate to the Layer menu, click "New Fill Layer," and then select "Solid Color."
- Apply Color: Choose the color that corresponds to the area you just created a work path for. This will create a new shape layer, which is a vector element, filled with the selected color.
- Repeat for Each Color: Systematically repeat steps 2-4 for every distinct color and shape within your image. Each color will require its own selection, work path, and subsequent fill layer.
- Consolidate and Export: Once you have created shape layers for all the colors in your image, you can then proceed with the standard SVG export process outlined previously (
File > Export > Export As..., select SVG). Ensure you check the preview to confirm that all elements have been converted and rendered correctly.
This method requires patience and meticulous work, especially for images with multiple colors, but it allows you to leverage Photoshop's vector capabilities for simpler raster graphics.
How To Convert PNG To Vector In Photoshop - Full Guide
Advantages of Using SVG Export in Your Workflow
Incorporating SVG export into your graphic design workflow offers several significant advantages:
- Enhanced Scalability and Quality: The primary benefit is the ability to create graphics that can be scaled to any size without any loss of quality. This is invaluable for responsive web design, print materials, and any application where the final output size may vary.
- Streamlined Workflow and Compatibility: SVG files are universally supported by web browsers and many design applications. Exporting as SVG allows for seamless transfer of your designs between different platforms and software, eliminating compatibility concerns and reducing the need for multiple file formats.
- Smaller File Sizes (for vector data): While complex SVGs can become large, for many graphics like logos and icons, SVGs can be more efficient in terms of file size compared to high-resolution raster images, leading to faster loading times on web pages.
- Editability and Interactivity: SVGs can be edited directly in code (e.g., HTML, CSS, JavaScript) or in vector editing software like Adobe Illustrator. This opens up possibilities for dynamic styling, animations, and interactive elements on websites.
- Transparency and Gradients: SVG supports transparency, gradients, and filters, allowing for rich visual effects that remain scalable and crisp.
- Creative Freedom: The ability to create scalable graphics empowers designers to experiment with different sizes and resolutions without compromising the integrity of their work, fostering greater creative exploration.
Considerations and Best Practices
While Photoshop's SVG export is a powerful feature, it's important to be aware of certain nuances:
- Illustrator's Role: Historically, Adobe Illustrator has been the primary tool for creating and exporting SVGs due to its inherent vector-based nature. Photoshop's SVG export capabilities have evolved, but for highly complex vector illustrations or intricate path manipulations, Illustrator often remains the preferred choice. Some workflows might involve creating vector elements in Photoshop and then refining or exporting them from Illustrator for optimal results.
- Vector Smart Objects: Vectors placed or pasted into Photoshop as Vector Smart Objects cannot be properly exported as SVG directly from Photoshop. This is because they retain their original pixel-based properties within the Photoshop environment.
- Font Embedding: When exporting SVGs, consider how fonts are handled. You can often choose to embed fonts, which ensures the text appears as intended but can increase file size. Alternatively, converting fonts to outlines transforms them into vector shapes, guaranteeing consistent rendering but making the text uneditable as text.
- Performance Optimization: For web use, it's good practice to optimize your SVGs. This can involve simplifying paths, removing unnecessary metadata, and ensuring the initial dimensions are set appropriately for the intended use case. While SVGs are scalable, setting a reasonable initial size can help web developers integrate them more easily.
- Staying Updated: The landscape of graphic design tools and formats is constantly evolving. Keeping your Photoshop software updated ensures you have access to the latest features and improvements in SVG export functionality.
By understanding these considerations and employing the right techniques, designers can effectively leverage Photoshop to create and export SVG files, thereby enhancing the quality, scalability, and versatility of their graphic design projects. The ability to export SVG from Photoshop significantly contributes to a more flexible and efficient design workflow, empowering designers to meet the diverse demands of modern digital and print media.