Photoshop, a titan in the realm of digital image editing, offers a vast array of tools and features that can seem daunting to newcomers. Even seasoned users might find themselves encountering functionalities that remain somewhat enigmatic. This article aims to demystify one such area: Photoshop's channels, and to shed light on the "new numbers popup" phenomenon often encountered during various editing processes, particularly when dealing with text and numerical elements.
The Foundation: What are Channels in Photoshop?
For those embarking on their digital image editing journey, perhaps starting with a version like Photoshop Elements 3, it's common to find that even early iterations possess a wealth of functionality, much of which might go unused initially. A prime example of a powerful, yet often overlooked feature, is the concept of channels. For a considerable period, Photoshop's channels can remain a vague concept, their relevance to image editing unclear. However, as one delves deeper into the software, understanding and utilizing channels becomes second nature, unlocking advanced editing capabilities.
When you open Photoshop and navigate to Window > Channels, you'll observe that this panel remains empty until an image file is opened. This highlights a fundamental characteristic: channels, much like layers, are intrinsically linked to an image.
Color Channels: Deconstructing Image Color
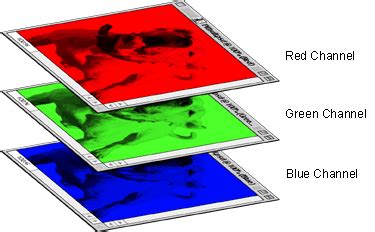
In a standard RGB (Red, Green, Blue) coded image, each pixel is defined by a specific combination of red, green, and blue values. Photoshop typically presents four channels for an RGB image: "RGB" itself, and then individual channels for "Red," "Green," and "Blue."
The individual color channels offer a monochromatic view of the image, essentially isolating the intensity of a single color component. Imagine discarding the green and blue values for every pixel and only observing the red intensity. This results in the Red channel. Areas that are bright red, pink, or yellow in the original image will appear lighter in the Red channel because these colors have a high red component. Conversely, green and blue areas will appear dark. Neutral tones will retain their luminosity.

The Green and Blue channels are constructed in a similar fashion, offering distinct grayscale representations based on their respective color intensities. For instance, a red area in the original image will appear very dark in the Green channel.
Properties and Peculiarities of Color Channels
Photoshop offers a unique way to visualize these color channels. By navigating to Edit > Preferences > Interface and enabling the "Show Channels in Color" option, the appearance of the Red, Green, and Blue channels changes. This "color" view is not a direct representation of the channel's data but rather a visual interpretation where the green and blue components of the channel's display are rendered black. This allows for a more intuitive understanding of what information is being retained when a particular color channel is isolated. To revert to the standard grayscale representation, simply switch off this preference and reload the image.
It's crucial to understand that color channels are automatically reconfigured when you convert an image to a different color mode. For instance, converting to CMYK Color mode introduces four channels: Cyan, Magenta, Yellow, and Black. Similarly, converting to LAB Color mode results in L (Lightness), A (Green-Red), and B (Blue-Yellow) channels.
Converting an image to Grayscale mode simplifies it to a single channel, effectively discarding all color information. Once an image is converted to grayscale, it remains so even if you convert it back to a color mode, as the original color data has been permanently removed.
Alpha Channels: Selections and Transparency
Beyond color channels, Photoshop also utilizes alpha channels. These are free-format channels that can be created by clicking the "Create new channel" icon at the bottom of the Channels panel. By default, a new alpha channel is black, but it can be modified by painting on it, applying gradients, or filters. Unlike color channels, alpha channels are grayscale and do not inherently contain color information.
The true power of alpha channels lies in their ability to store selections. When you make a selection using any of Photoshop's selection tools (Lasso, Marquee, Magic Wand, etc.) and then go to Select > Save Selection, you are essentially creating an alpha channel. This channel acts as a mask, defining which areas of the image are selected and to what degree.

The representation of a selection within an alpha channel is not always a stark black and white division. When a selection is feathered or has soft edges, the alpha channel will display a gradient of gray pixels. A white pixel in an alpha channel signifies a fully selected area, while black signifies an unselected area. Grays represent partial selections, with lighter grays indicating a higher degree of selection. This grayscale nature of alpha channels precisely mirrors the concept of selections, where pixels can be partially selected.
The Interplay of Channels, Masks, and Selections
There's a profound connection between channels, layer masks, and selections in Photoshop; they are, in essence, three manifestations of the same underlying concept.
Layer Masks and Channels: When you create an adjustment layer or add a mask to any layer, Photoshop automatically generates a corresponding channel in the Channels panel, often named after the layer and labeled as "Mask." This channel visually represents the layer mask. To preserve this mask for future use, you can duplicate it and give it a descriptive name.
Saving Channels: Channels can be saved along with an image file, provided you use formats like PSD or TIFF. This allows you to retain your channels and continue working with them in future editing sessions without needing to keep Photoshop open. Saving as JPG will result in the loss of all channels.
"Apply Image" Command: The "Apply Image" command in Photoshop is an incredibly versatile tool that facilitates the conversion and manipulation between masks and channels, further solidifying their interconnectedness.
Deleting Channels: While deleting an alpha channel is straightforward, attempting to delete color channels can lead to unexpected results. For example, deleting the Red channel from an RGB image might result in Magenta and Yellow channels, suggesting an internal conversion and removal process that isn't always intuitive. Deleting channels in other color modes like LAB can also yield unusual outcomes, often resulting in generic "Alpha" channels.
Duplicating Channels Across Color Modes: To obtain a channel from a different color mode (e.g., the Black channel from CMYK to use as an alpha channel in an RGB image), you typically need to duplicate the image, convert the duplicate to the desired color mode, and then duplicate the specific channel from that converted image, designating the original file as the target document.
Viewing Channels with Adjustment Layers: A peculiar behavior arises when an adjustment layer is present. Clicking on a color channel directly might not display its content. The workaround is to first click on the composite (RGB) channel to re-establish the view before selecting individual color channels.
Channel Limitations: The "Delete" button on the keyboard, when a channel is selected, might remove the current layer instead of the channel, a behavior that can vary based on operating system, Photoshop version, and keyboard shortcut configurations. Photoshop images are limited to a maximum of 56 channels, which is ample for most editing tasks. Importantly, every channel functions as an 8-bit grayscale, regardless of whether the underlying image is 16-bit coded.
The "New Numbers Popup" Phenomenon: Text and Numerical Editing
The "new numbers popup" or similar numerical input fields often encountered in Photoshop typically relate to text manipulation, transformations, or specific numerical adjustments. When you use the Type Tool to add text to an image, you enter a text mode. To adjust the size, position, or apply transformations to this text, you often use keyboard shortcuts like Ctrl+T (or Cmd+T on Mac) to enter Free Transform mode.

Within the Free Transform interface, or in the Options bar associated with the Type Tool, you'll find numerical input fields for precise control. These fields allow you to specify:
- Font Size: The height of the characters in points or pixels.
- Kerning and Tracking: Adjustments to the spacing between individual letters (kerning) or groups of letters (tracking).
- Leading: The vertical spacing between lines of text.
- Transformations: Precise values for scaling (width and height percentages), rotation (in degrees), skewing, and other transformations.
- Position: X and Y coordinates for precise placement of text elements.
Working with Text in Photoshop
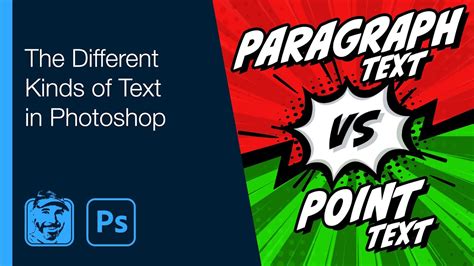
Photoshop offers two primary methods for adding text:
Point Text: When you click the Type Tool on your canvas and start typing, you are using Point Text. Each line of text exists independently, and you must press Enter to create a new line. This is ideal for short phrases or single words.
Paragraph Text: By clicking and dragging the Type Tool to create a rectangle, you define an area for Paragraph Text. Text will automatically wrap within this defined box, making it suitable for larger blocks of copy. The dimensions of this text box can be adjusted using its handles.
Enhancing Text with Effects and Styles
The "new numbers popup" can also appear when applying layer styles or effects to text. These effects can transform plain text into visually engaging elements:
- Bevel and Emboss: Creates a 3D-like appearance by simulating highlights and shadows on the edges of the text.
- Stroke: Adds an outline to the text.
- Inner Shadow/Glow: Creates shadows or glows from within the text, giving it depth or an illuminated effect.
- Color Overlay/Gradient Overlay: Applies a solid color or a gradient across the text.
- Pattern Overlay: Fills the text with a repeating pattern.
- Outer Glow/Drop Shadow: Adds glows or shadows to the outside of the text, helping it stand out from the background.
When applying these effects, numerical values are often used to control their intensity, size, spread, angle, and color. For instance, the "Distance" and "Size" of a drop shadow, or the "Color" and "Opacity" of a color overlay, are all controlled through numerical inputs or sliders that correspond to numerical values.
Quick Actions and Their Numerical Controls
Photoshop also features "Quick Actions," which are pre-programmed sequences of tasks that can be applied with a single click. While not always involving explicit numerical popups, many Quick Actions, such as Black and White adjustments or blur effects, have underlying numerical parameters that are adjusted automatically or can be further refined through sliders and input fields when the associated adjustment panel appears.
Saving Numerical Data and Image Formats
When saving your work, especially when dealing with text and specific numerical adjustments, the file format is critical. Saving as a Photoshop document (.PSD) preserves all layers, text editability, and applied effects, including any numerical data associated with them. For web use, formats like JPEG, GIF, or PNG are common, but these are "flattened" formats, meaning text layers are rasterized (converted to pixels), and the original numerical editability is lost.
Text Effects (Part 1/2) - Photoshop CS4 Advanced Tutorial HD
Understanding Photoshop's channels is fundamental for advanced image manipulation, offering control over color, selections, and transparency. Concurrently, recognizing the role of numerical inputs in text editing and effect application empowers users to achieve precise and visually compelling results. The "new numbers popup" is not an anomaly but rather an integral part of Photoshop's sophisticated toolkit for fine-tuning every aspect of an image.