In the realm of digital art and photo manipulation, achieving seamless blends and natural-looking transitions is paramount. Photoshop's feathering technique is an indispensable tool for any artist looking to soften the edges of selections, brushes, or layers. This guide delves into the intricacies of feathering, exploring various methods available within Photoshop to create subtle graduations and achieve professional-grade results. Whether you're a beginner aiming to understand the fundamental concepts or an advanced user seeking to refine your workflow, this tutorial will illuminate the path to mastering this essential skill.
Understanding the Essence of Feathering
Feathering in Photoshop is a process that softens the hard edges of a selection. It involves creating a gradual transition, or a soft, hazy effect, between the selected area and the surrounding pixels. This is achieved by gradually making the edges more transparent, giving them a blurred or "feathered" appearance. The core idea behind feathering is to blend elements naturally, making them appear as if they intrinsically belong to the image rather than being artificially placed. This is particularly crucial when compositing objects onto new backgrounds or when creating masks that require subtle integration.
The effect of feathering can be visualized as a gradient that fades from the fully selected area to complete transparency at the edges. The extent of this fade is controlled by a "feather radius," which determines the degree of softness. A larger radius results in a more pronounced and gradual transition, while a smaller radius maintains more of the original sharpness. Essentially, feathering makes edges semi-transparent, which can contribute to a more organic and less jarring visual outcome.
Why Feathering is Essential in Photo Editing
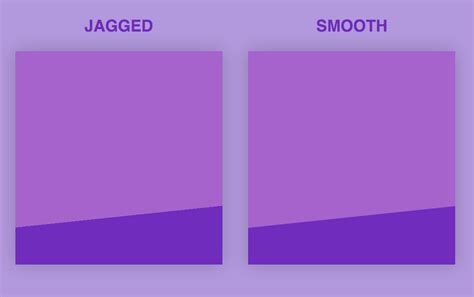
The necessity of feathering arises from the inherent nature of digital selections. When you select a part of an image, especially in complex scenes, the edges can often appear jagged or "aliased." These unsightly patterns indicate a sharp, abrupt transition between the selected pixels and those that are not. Feathering smooths these transitions, creating a more pleasing and realistic aesthetic.
Consider scenarios like isolating a subject from its background for a portrait or creating a vignette effect. In such cases, a hard-edged selection would look artificial and detract from the overall image quality. Feathering allows for a seamless integration, making the selected element blend harmoniously with its new environment. It's about creating a smooth transition between different elements of an image, crucial for visual coherence.
Traditional Feathering: The "Feather" Command
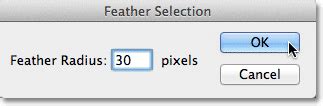
Photoshop offers a direct method for applying feathering through the "Feather" command, accessible via the Menu Bar under Select > Modify > Feather. This command opens the "Feather Selection" dialog box where you can input a numerical value for the "Feather Radius" in pixels.
While straightforward, this method has a significant drawback: it lacks a preview function. When you input a value, you have no immediate visual feedback to gauge the effect. This often leads to guesswork, where you might have to apply the feathering, then deselect and re-select to visually assess the result, and then adjust if necessary. This iterative process can be time-consuming and less efficient. The standard "marching ants" selection outline, which only appears around pixels that are at least 50% selected, offers no indication of the feathered edge.
The "Feather Selection" dialog box is where you specify the amount of feathering. For most practical purposes, a feather value of 10 is often sufficient. However, if the feathering effect is not very noticeable due to minimal color contrast between the image and the background, you might need to increase the "Feather Radius" a bit. When working with larger selections or objects, using larger feather amounts is generally recommended to achieve a noticeable effect.
It's important to note that the "Modify" option in the "Select" menu might be greyed out. This typically occurs if no selection is active or if the active layer is locked. To resolve this, ensure you have made a selection using any of the available selection tools and that you are working on an unlocked layer.
Quick Mask Mode: A Superior Approach to Feathering
A more intuitive and visually guided method for feathering selection edges is by utilizing Photoshop's Quick Mask mode. This mode offers a live preview, allowing you to see the effect of your feathering in real-time.
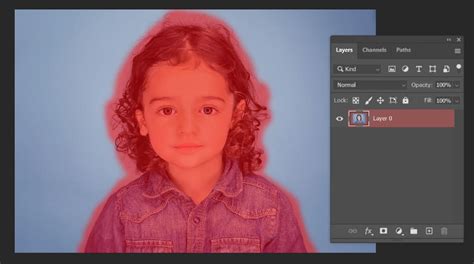
To enter Quick Mask mode, you can either click the Quick Mask icon at the bottom of the Tools panel or press the Q key on your keyboard. Upon entering Quick Mask mode, the standard "marching ants" selection outline is replaced by a translucent red overlay. This overlay visually represents the areas that are currently protected and not part of the selection. Conversely, areas that are fully visible, not covered by the overlay, are considered selected.
The beauty of Quick Mask mode lies in its ability to allow editing of selections using standard Photoshop tools, such as filters. The transition between the overlaid and non-overlaid areas in Quick Mask mode is initially sharp, mirroring a hard-edged selection. To soften these edges, you can apply filters directly to the Quick Mask overlay. The Gaussian Blur filter is particularly effective for this purpose.
When the Gaussian Blur dialog box is open, you can adjust the "Radius" slider while observing the changes in your document window. As you drag the slider to the right, the edges of the Quick Mask overlay will soften, providing a clear visual indication of the feathering effect. The further you increase the radius, the softer the edges will become. This live preview capability makes it far easier to achieve the desired level of feathering precisely. Once satisfied, click "OK" to apply the blur. Exiting Quick Mask mode (by pressing Q again or clicking the Quick Mask icon) will reveal the feathered selection outline, which, while still represented by "marching ants," now accurately reflects the softened edges.
Feathering with Layers and Layer Masks
Beyond direct selection modifications, feathering is powerfully integrated with Photoshop's layer and layer mask system. This approach offers non-destructive editing, meaning your original image data remains untouched and adjustments can be modified or removed at any time.
To feather using layers and masks:
- Create a New Layer: Start by creating a new layer in the Layers panel. This will be where your masked content resides.
- Make a Selection: Use any selection tool (e.g., Elliptical Marquee Tool, Lasso Tool) to define the area you wish to feather.
- Apply Feathering: Navigate to
Select > Modify > Featheror use the shortcutShift + F6to open the Feather Selection dialog. Enter your desired feather radius and click "OK." - Create a Layer Mask: With the feathered selection active, click the "Add layer mask" icon at the bottom of the Layers panel. This will create a mask based on your selection.
- Refine the Mask: You can further refine the mask. If you want to hide the area within the selection, select the layer mask thumbnail, then go to
Edit > Filland choose black. If you want to reveal the area, choose white.
Alternatively, the Gradient Tool can be used to feather a layer mask. Select the Gradient Tool and choose a gradient that transitions from black to transparent in the Options Bar. With the layer mask selected, drag the Gradient Tool across the mask. This creates a smooth transition between the visible and hidden parts of the layer, effectively feathering the mask.

Utilizing layers, layer masks, and feathering in conjunction provides a robust workflow for creating seamless blends and complex compositions.
Advanced Feathering Techniques
Photoshop offers several advanced techniques to achieve sophisticated feathering effects:
Gaussian Blur on Layer Masks
As mentioned with Quick Mask mode, applying Gaussian Blur directly to a layer mask offers granular control over feathering. This method is highly effective for creating varied degrees of softness and allows for easy experimentation with different blur levels.
Creating Vignettes
A common application of feathering is creating vignette effects, where the image gradually darkens or lightens towards its edges. This draws the viewer's attention to the center of the image. You can achieve this by:
- Creating a new layer.
- Making a large elliptical selection in the center of the image.
- Feathering this selection significantly (e.g., 100-300 pixels, depending on image size).
- Inverting the selection (
Select > Inverse). - Filling the inverted selection with black or a dark color on the new layer.
- Adjusting the layer's opacity for the desired effect.
Alternatively, you can use a layer mask with a radial gradient applied to a solid color fill layer, adjusting the gradient's softness and opacity.
Feathering Text and Shapes
When working with text or vector shapes, feathering can be applied to create softer outlines or integrated effects. You can:
- Make a selection around the text or shape.
- Apply feathering to this selection.
- On a new layer, apply a stroke or fill based on the feathered selection.
Feathering vs. Blurring: Differentiating the Effects
It's important to distinguish feathering from general blurring. While both involve softening, their applications differ:
- Feathering: Specifically softens the edges of a selection, creating a smooth gradient transition between the selected area and its surroundings. It's about blending boundaries.
- Blurring: Reduces the overall sharpness and detail of an entire image, a selection, or a layer. It makes an area appear less focused.
While feathering makes edges semi-transparent, blurring affects the clarity of the entire targeted area.
Feathering in Other Adobe Applications
The concept of feathering isn't exclusive to Photoshop. Adobe Illustrator, a vector graphics editor, also provides feathering capabilities:
- Adobe Illustrator: Select an object with the Selection tool, then go to
Effect > Stylize > Feather. Enter a feather radius value to soften the object's edges.
For web-based image editing, Photopea offers a similar functionality:
- Photopea: After making a selection, navigate to
Select > Modify > Border. While not named "feathering," adjusting the border width and applying smoothing can achieve a similar softening effect.
Practical Considerations and Tips
- Feather Radius Values: Start with small radius values (e.g., 0.5-2 pixels) for subtle effects. For wider, more pronounced feathering, increase the radius to 5-20 pixels or more, especially for larger selections or objects.
- File Size: Feathering, by introducing semi-transparent pixels, can slightly increase file size. Use it judiciously, particularly on low-resolution web images.
- Anti-aliasing: Anti-aliasing smooths jagged edges but does not create the gradual fade characteristic of feathering. It's a form of edge smoothing, not the same as a feathered transition.
- Keyboard Shortcuts: The primary keyboard shortcut for feathering is
Shift + F6. For artists who find memorizing shortcuts challenging, external controllers like TourBox can be programmed to map this function to a dedicated button for quicker access. - Practice: Mastering feathering, like any Photoshop technique, requires regular practice. Experiment with different methods and settings to understand their impact on your images.
Inverse Selection Techniques + Feathering Technique in Photoshop CC
By understanding and applying these feathering techniques, you can significantly enhance the professionalism and visual appeal of your digital creations, ensuring that your edits blend seamlessly and naturally into your compositions.