Adobe InDesign's Find/Change feature is an indispensable tool for any designer or publisher working with text. It empowers users to efficiently locate and modify specific text strings, characters, or patterns across single or multiple documents. This powerful utility can save countless hours of manual editing, ensuring consistency and accuracy in your layouts. Whether you're correcting minor typographical errors, standardizing formatting, or implementing complex text transformations, understanding the nuances of Find/Change is crucial.
The Fundamentals of Find/Change
At its most basic, the Find/Change feature allows you to search for one word and replace it with another. This is the entry point for many users, providing a straightforward solution for simple text edits. To access this functionality, navigate to Edit > Find/Change or use the keyboard shortcut Command + F (macOS) or Control + F (Windows). This action opens the Find/Change dialog box, which is divided into two primary sections: "Find what" and "Change to."
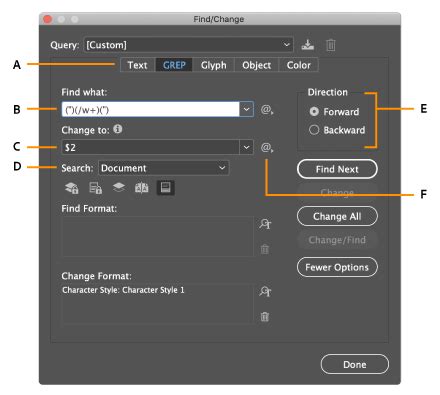
The "Find what" field is where you enter the text or pattern you wish to locate. The "Change to" field is where you specify the replacement text. Once these are defined, you can execute the search and replace operation. InDesign offers flexibility in limiting the scope of your search. You can choose to search within the current "story" (a continuous block of text), from your cursor's position to the end of the story, the entire document, or even all open documents if you are working with multiple files. Furthermore, if you have an active selection of text, you can confine the search and replace operation solely to that selected area.
Advanced Text Manipulation with GREP
While basic text replacement is useful, the true power of InDesign's Find/Change lies in its GREP (General Regular Expression Print) capabilities. GREP expressions allow you to search for and replace complex alphanumeric strings and patterns, making it ideal for handling intricate formatting issues in long documents or across numerous files.
One common scenario involves correcting instances where words are followed by a comma with no space, such as "Hello,Joe." The desired outcome is to insert a space after the comma, resulting in "Hello, Joe." Initially, one might try a simple approach in the Find dialog by entering ^$,^$ in the "Find what" field. This method can indeed find words with a comma and no subsequent space.
However, for more precise control and to leverage the full potential of pattern matching, GREP is the preferred method. Using the GREP option, you can enter (,)([\l\u]) in the "Find what" field. Let's break this down:
(,): This part captures a literal comma. The parentheses create a capturing group, allowing us to reference this part later.([\l\u]): This part captures a single lowercase letter (\l) or a single uppercase letter (\u). The square brackets indicate a character set, and the parentheses again create a capturing group.
In the "Change to" field, you would then enter , $2.
,: This inserts a literal comma.: This inserts a space.$2: This is a placeholder that refers to the content captured by the second capturing group in the "Find what" field, which is the letter immediately following the comma.
By using this GREP expression, InDesign finds a comma followed by a letter and replaces it with a comma, a space, and that same letter, effectively fixing the spacing issue.

Understanding GREP Metacharacters and Constructs
The effectiveness of GREP lies in its extensive library of metacharacters and constructs that define search patterns. Here are some fundamental elements to understand:
\l: Matches any lowercase letter.\u: Matches any uppercase letter.\d: Matches any digit (0-9).\s: Matches any whitespace character (space, tab, newline, etc.)..: Matches any character except a newline.*: Matches the preceding element zero or more times.+: Matches the preceding element one or more times.?: Matches the preceding element zero or one time.(): Creates a capturing group.[]: Defines a character set.^: Matches the beginning of a line or paragraph.$: Matches the end of a line or paragraph.
These elements can be combined to create sophisticated search queries. For instance, to find phone numbers in various formats like 206-555-3982, (206) 555-3982, 206.555.3982, and 206 555 3982, you could construct a GREP expression. InDesign offers preset queries that can assist with common tasks like changing punctuation formats or converting telephone number formats. Selecting "Phone Number Conversion (dot format)" from the query list can be a starting point. A GREP expression for this might look something like \(?(\d\d\d)\)?[-. ]?(\d\d\d)[-. ]?(\d\d\d\d). The grouping references in the "Change to" field can then be edited to suit your specific needs for standardization.
Leveraging Find/Change for Specific Document Information
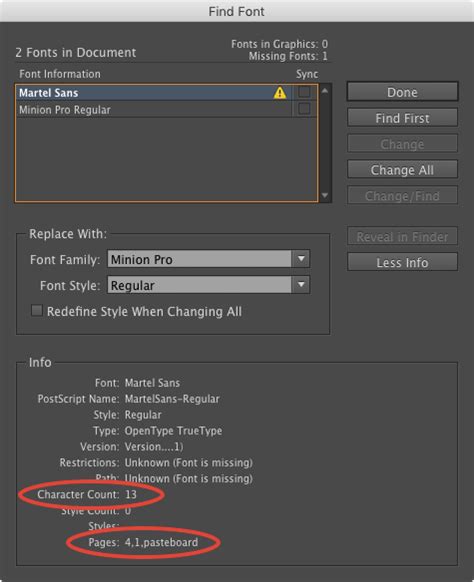
Beyond general text correction, Find/Change, in conjunction with other InDesign features, can help manage document-specific information. For example, knowing which fonts are in use within a document is crucial for consistency and to avoid potential licensing or substitution issues. InDesign provides a dedicated tool for this: "Find Font."
You can access Find Font from the Type menu. This dialog box presents a comprehensive list of all fonts currently utilized in your document, including specific styles within font families (e.g., Montserrat Italic, Montserrat Light). If you identify a font that shouldn't be present, like "Myriad Pro Regular" in a document where it's not intended, you can select it in the Find Font dialog. Then, clicking "Find First" will immediately take you to the first instance of that font on the page, allowing you to investigate and replace it if necessary.
Stop Wasting Time! Use These 10 InDesign GREPs Now!
Customizing and Saving Queries
For frequently performed or complex Find/Change operations, InDesign allows you to save your queries. This is particularly useful for standardizing specific formatting across multiple projects or for sharing efficient search and replace routines with colleagues. When you save a query, you can include various settings, such as options to "Include Locked Layers and Locked Objects (Find Only)," "Include Locked Stories (Find Only)," or "Include Footnotes." These customized queries are stored as XML files, making them portable and easily shareable.
Options to Refine Your Search
Within the Find/Change dialog, several checkboxes and icons allow you to refine your search criteria and the scope of the operation:
- Case-sensitive: This option ensures that the search distinguishes between uppercase and lowercase letters. If unchecked, "Apple" and "apple" would be treated as the same.
- Whole word: This option restricts the search to complete words. If you search for "run" with "Whole word" checked, it will not find "running" or "brunette."
- Include Locked Layers and Locked Objects (Find Only): Allows you to search within content on locked layers or locked objects, but you cannot change them.
- Include Locked Stories (Find Only): Similar to locked layers, this enables searching within locked text frames.
- Include Footnotes: Extends the search to include text within footnotes.
When performing a search, you have options to "Find Next" to step through each instance, "Change" to modify the current instance and move to the next, "Change and then find" to apply the change and then search for the next occurrence, or "Change All" to apply the replacement to all matching instances at once. The "Change All" option should be used with confidence, as it performs the operation across the entire defined scope without individual confirmation.
Considerations for Different Audiences
The Find/Change feature's utility spans from novice users to seasoned professionals. For beginners, understanding the basic "Find what" and "Change to" fields is the first step. As users become more comfortable, exploring the GREP options opens up a world of possibilities for complex text manipulation. The ability to save queries and utilize presets makes advanced functionalities accessible even to those who may not be GREP experts. The online documentation for InDesign provides further clarity on these advanced concepts, and community forums are excellent resources for asking questions and sharing insights.
Avoiding Common Pitfalls
When using Find/Change, especially with GREP, it's crucial to be precise. A misplaced character or an incorrectly defined pattern can lead to unintended consequences. Always test your GREP expressions on a small, non-critical section of your document or on a duplicate file before applying them globally. Pay close attention to the "Find Format" and "Change Format" options, which allow you to search for and apply specific character or paragraph styles, colors, or other formatting attributes, further enhancing the precision of your operations. For instance, you might want to find all instances of a particular word that are formatted in bold and replace them with the same word in italics, or perhaps find all occurrences of a specific phrase and apply a new paragraph style.
The "Use this to avoid a certain pattern from your search" and "Use this to find a certain pattern" descriptions in the user's provided text highlight the dual nature of search criteria. You can define what you want to find, and conversely, what you don't want to find, using various exclusion methods within GREP. Similarly, the distinction between finding text irrespective of typing case and finding case-sensitive text is directly managed by the "Case-sensitive" checkbox or specific GREP metacharacters.
A "query" in InDesign is essentially a saved Find/Change operation, encompassing the "Find what," "Change to," and all associated search and formatting options. These queries are powerful for ensuring consistency across projects. For example, standardizing how telephone numbers are displayed is a common use case for saved queries, preventing inconsistencies like (123) 456-7890 and 123.456.7890 appearing in the same document.
By mastering the Find/Change feature and its GREP capabilities, users can significantly enhance their efficiency and accuracy when working with text in Adobe InDesign.