Adobe InDesign's "Facing Pages" feature is a fundamental setting that dictates how your document's pages are displayed and organized, particularly for print-oriented projects. This functionality automatically arranges pages in a spread format, mimicking the experience of opening a physical book or magazine, where two pages are visible side-by-side. This article will delve into the intricacies of facing pages, their application, and how to effectively manage them within your InDesign workflow.
What are Facing Pages?
At its core, "Facing Pages" is a setting that automatically arranges Adobe InDesign pages in a spread format. This means that instead of viewing pages individually, you see them in pairs - a left-hand page and a right-hand page - just as you would when reading a book. This visual representation is crucial for designing documents where content flows across two pages, such as a chapter that begins on the right-hand page of a spread and continues onto the left-hand page of the next.
The option to enable or disable facing pages is a critical decision made during the document setup process. When creating a new document, InDesign's default setting for print documents is to have "Facing Pages" turned on. This is because many print projects, by their nature, benefit from this spread-based layout.
When to Use Facing Pages
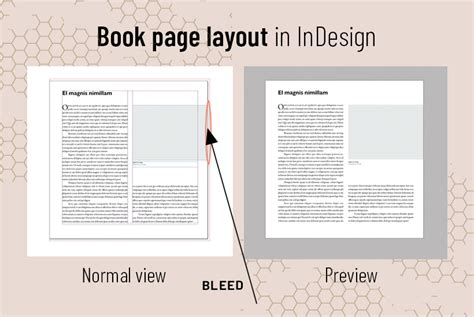
Facing pages are best used with documents like magazines, books, and reports. These types of publications are typically bound in a way that allows readers to view two pages simultaneously. The spread format in InDesign allows designers to visualize the final printed output more accurately, enabling them to plan for elements that might span across the gutter (the space between two pages) or to ensure a consistent visual flow from one page to the next.
Examples of printed pieces that commonly use the facing page layout include:
- Menus (which can also be designed as single pages)
- Newsletters
- Programs
- Announcements
- Booklets
- Notecards (for general greetings, birthdays, weddings, get well wishes, congratulations, etc.)
- Documents with multiple folds, such as a 4 Pages Half Fold, where each sheet is folded in half to create four pages, with two pairs of facing pages on the unfolded sheet.
Managing Pages and Spreads in InDesign
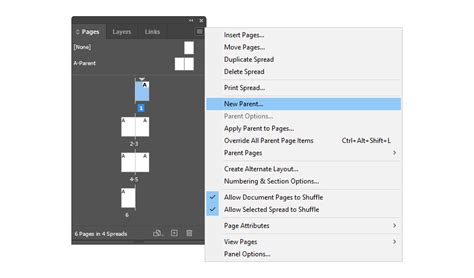
The Pages panel in InDesign is your central hub for managing all aspects of your document's layout, including individual pages, spreads, and master pages (referred to as "parent pages" in the provided text). This panel provides information about and control over pages, spreads, and parents.
The Pages Panel Explained
Within the Pages panel, you'll encounter several key elements:
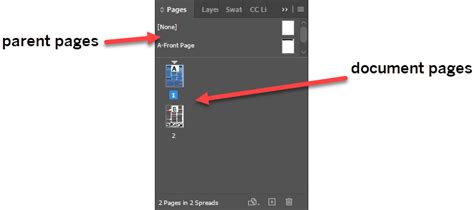
- Page Icons: These are thumbnail representations of each page in your document. You can select a page by clicking its icon.
- Parent Pages: These are master pages or spreads that automatically format other pages or spreads. Applying a color label to parent pages affects all pages to which the parent is applied.
- Spreads: These are groups of pages that are viewed together. In a facing pages document, spreads typically consist of two pages: a left-hand page and a right-hand page.
- Page Numbering: The panel clearly indicates the page numbers. You can choose to display spreads in one vertical column by selecting "Show Vertically" or display thumbnail representations of the content of each page or parent by selecting "Show Thumbnails."
Navigating and Manipulating Pages
- Targeting and Selecting: To both target and select a page or spread, double-click its icon or the page numbers under the icon. To select a page, click its icon.
- Adding Pages: To add a page after the active page or spread, click the "New Page" button in the Pages panel or choose Layout > Pages > Add Page. To add multiple pages to the end of the document, choose File > Document Setup and specify the total number of pages. You can also insert pages and specify a document parent by choosing "Insert Pages" from the Pages panel menu or Layout > Pages > Insert Pages.
- Changing Layouts: You can change the layout from Single Pages to Facing Pages or vice versa. This is a document-wide setting that requires you to go to File > Document Setup to make this modification. The Parent page in the Pages Panel will then need to be changed from 1 page to 2 (or vice versa) to accurately represent the new layout.
Understanding Reader Spreads vs. Printer Spreads
A common point of confusion, especially when designing for print, is the distinction between "Reader Spreads" and "Printer Spreads."
Reader Spreads
When you design a booklet or any document intended for printing, you often set up your page size to reflect the final dimensions of each individual page. For example, if you need a booklet that is 8.5" tall and 7" wide, you would set up your InDesign document with pages that are 8.5" tall and 7" wide. This is known as designing in Reader Spreads. In this scenario, you are designing the pages as you would view them when reading the final product. The fold of the paper would effectively occur at the boundary where two pages meet in the spread. This approach allows you to visualize the flow of content and design elements across the page pairs as a reader would experience them.
Printer Spreads (Imposition)
Printer Spreads, on the other hand, refer to how the pages are arranged on a larger sheet of paper before it is folded and bound. This process is called imposition. The printer takes your designed pages and arranges them in a specific order on larger sheets so that when the sheets are printed on both sides, folded, and cut, the pages appear in the correct sequence.
For instance, consider a simple 8-page booklet printed on 8.5" x 14" sheets that are then folded in half. To create this, a printer might arrange the pages on a single 8.5" x 14" sheet such that:
- One side of the sheet shows pages 1 and 6.
- The other side of the sheet shows pages 2 and 5.
Another sheet would be used for pages 3 and 4. When folded, these sheets create the correct reading order.
The user in the provided text describes a booklet that is 8.5" tall and 7" wide. To achieve this, they initially considered setting up pages as 8.5" tall by 14" wide and then splitting them. However, the advice given is to set up the page size as 8.5" tall by 7" wide and design in Reader Spreads. The printer, in turn, would organize the PDF into Printer Spreads for double-sided printing. This is a much more intuitive and manageable workflow for the designer.
Printer Spreads, Signatures and Impositions
Turning Facing Pages On and Off
You can control whether your InDesign document uses facing pages at any stage of its creation.
Turning On Facing Pages
When you want to enable facing pages, you can do so in two primary ways:
- During Document Creation: When you go to
File > New > Document, within the "Preset Details" section, ensure that "Facing Pages" is checked. The "Start Page #" is also important here. For standard book layouts, it's usually set to 1. - After Document Creation: If you've already created a document without facing pages and wish to add them, navigate to
File > Document Setupand check the "Facing Pages" option.
Turning Off Facing Pages
Conversely, if you need to disable facing pages:
- During Document Creation: In the
File > New > Documentdialog, simply uncheck the "Facing Pages" option. This will create a document with a single-page layout. - After Document Creation: Go to
File > Document Setupand uncheck the "Facing Pages" option.
Important Note: Turning off facing pages in an existing document can sometimes be a tedious process, especially if you have many spreads. InDesign will attempt to reflow the pages, but manual adjustments may be necessary to ensure the layout remains as intended.
Advanced Layout Considerations
Handling Single Pages in Facing Pages Documents
Sometimes, even in a facing pages document, you might encounter a solitary page that doesn't fit neatly into a spread. For instance, a booklet cover might have a front and back cover that you want to treat as a single spread. If you have a "pesky single page 1 floating there before the two spreads," you can manage this. One method is to change the odd page number to any even-numbered page, and it will magically become a left-hand page. Conversely, if you have a spread starting on page 2 and a blank page 1, you can define page 2 as the section start.
To manually adjust page placement within spreads:
- In the Pages panel, deselect "Allow Selected Spread to Shuffle."
- Select Page 1 and move it from the right to the left.
- Now select a right-hand page from a facing pages spread in Parent Pages.
- Drag it over to the right of page 1, dragging until you see a thick dark vertical line appear to the right of page 1 and to the left of your dragged page. This indicates where the new spread will be created.
Documents with Specific Folding Requirements
For documents requiring specific folding techniques beyond a simple half-fold, understanding how to set up spreads in InDesign is crucial.
4 Pages Half Fold
For a document with a half-fold (bi-fold), which results in four pages total (front, inside-left, inside-right, back), the default facing pages setup in InDesign might not be ideal. The default typically sets page 1 as a right-side page, pages 2-3 as a spread, and page 4 as a left-side page. For a half-fold, you often want pages 1 and 4 to form a spread, mirroring the unfolded sheet.
To achieve this, you can either:
- During New Document Setup: Set the "Start Page #" to 2 in the "Preset Details."
- After Document Creation: Go to
File > Document Setupand change the "Start Page #" to 2.
After this adjustment, the Pages panel will display two pairs of 2-page spreads, reflecting the layout of an unfolded half-folded sheet.
To visualize the final result of folded documents, creating a small thumbnail-sized paper comp is highly recommended. Fold a piece of paper in half and mark the front, inside-left, inside-right, and back pages. Unfold it, and you'll see two facing-page spreads. This physical model can then be replicated in InDesign.
Additional Folding Options
The print industry offers numerous folding options, each requiring specific layout considerations in InDesign. When dealing with more than one fold, you'll have more than two pages per spread.
To add pages to an existing spread, you must first deselect "Allow Document Pages to Shuffle" in the Pages panel. Then, you can drag a Parent Page down to the document page section. Hover next to the page icon until you see a bracket, then release the mouse. This process might require some practice.
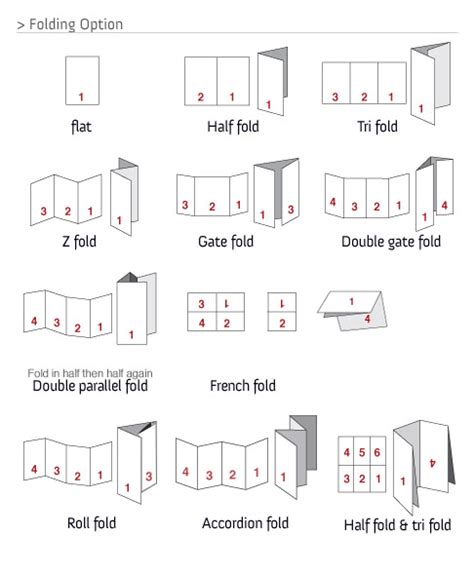
Here are a few popular folds and their associated setups in the Pages Panel:
- Trifold (2 folds): Results in 3 pages on each side of the paper.
- Z-fold (2 folds): Same layout as for the Trifold.
- Gate fold (2-3 folds): With 3 folds, the layout would be the same as for the Barrel fold.
- Barrel fold (3 folds): Results in 4 pages on each side of the paper (8 pages total).
- Accordion fold (3 or more folds): Same layout as for the Barrel fold.
- French fold or Cross fold (paper folded in half twice): Results in 8 pages total. The layout is the same as for a Half fold with additional pages. This layout can be tricky, as content on two of the spreads might need to be positioned upside-down to account for the double fold.
Understanding facing pages and their management in InDesign is crucial for producing professional, print-ready documents. By mastering the Pages panel and the distinction between reader and printer spreads, designers can confidently tackle a wide range of publication projects.