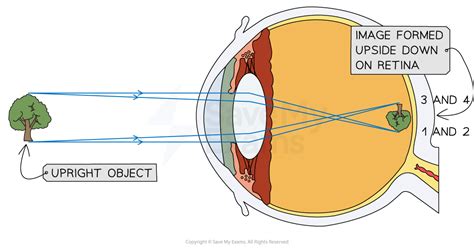
Red eye, a common photographic artifact, occurs when a camera's flash reflects directly off the retina at the back of the eye. While Photoshop offers an automatic Red Eye Tool that effectively resolves most instances, particularly in human subjects, certain scenarios present a greater challenge. These often involve unusual eye colors in animals, harsh lighting conditions, or extreme reflections that the automated tool cannot adequately address. This article delves into advanced techniques within Adobe Photoshop designed to tackle these more complex red eye situations, ensuring your photographs retain their natural beauty and impact.
Understanding the Nuances of Red Eye
Red eye may not appear as often as it once did, but it can still pop up whenever flash photography is being used. Red eye occurs when a photo is taken with a flash that is too close to the subject. This is very common for on-camera flashes for that reason. Red eye appears when a harsh flash on a camera is used in a darker environment, which is directed towards an individual.
To avoid the problem altogether, try using a larger flash such as a speed-light. To avoid the subject having gold eyes in images, use a speed light or try bouncing the flash off of the room to soften the lighting.
When the Automatic Tool Falls Short
The standard Red Eye Tool in Photoshop, typically found within the Spot Healing Brush Tool's flyout menu, is designed for simplicity and speed. It works by detecting the red pupil and replacing it with a darker, more natural-looking color. However, this tool can falter when faced with:
- Animal Eyes: Animals often have eyes that reflect light in colors other than red, such as green, yellow, or purple. The automatic tool is not programmed to recognize and correct these variations.
- Hot Spots and Highlights: In some human eyes, particularly with strong direct flash, a bright hot spot within the red area can confuse the automatic tool, leading to an unnatural or incomplete correction.
- Subtle or Partial Red Eye: When only a small portion of the pupil is affected, or the red is not a deep crimson, the automatic tool might miss it or create an awkward artifact.
In these instances, a more manual and controlled approach is necessary. This often involves carefully selecting the affected area and applying adjustments precisely where needed.
Advanced Manual Red Eye Correction for Human Subjects
When the automatic Red Eye Tool leaves an unnatural highlight or fails to fully correct the issue, a more deliberate manual method is required. This process focuses on isolating the red pupil and then systematically desaturating and darkening it.
Step 1: Layer Duplication and Zooming In
Before making any adjustments, it is a best practice to duplicate your background layer. This is achieved by pressing "Command J" on a Mac or "Control J" on a PC. This ensures that your original image remains untouched, allowing for non-destructive editing. Following this, zoom in closely on the eyes to gain a detailed view of the problem area.
Step 2: Precise Selection of the Pupil
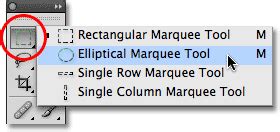
The key to a successful manual correction is accurate selection. While the Magic Wand Tool can be used to select individual pieces of the pupil, it can be cumbersome. A more efficient method, especially when the entire pupil is visible, is to use the Elliptical Marquee Tool.
- Select the Elliptical Marquee Tool.
- Carefully trace a circle around the red part of the eye, encompassing the pupil.
- Crucially, avoid including the highlight within the eye in this initial selection, as you do not want to desaturate or darken this important detail.
Step 3: Deselecting the Highlight
To exclude the highlight from your selection, employ the Magic Wand Tool in conjunction with the Alt (Option on Mac) key.
- Select the Magic Wand Tool.
- Hold down the Alt (Option) key.
- Click directly on the highlight within the eye. This action will deselect only that specific area, leaving the rest of the pupil selected.
You will now have a "donut" shape selected, representing the area you intend to recolor.
Step 4: Desaturating the Red
With the pupil area isolated, the next step is to remove the red color. The quickest way to achieve this is by using a keyboard shortcut:
- Mac: Command + Shift + U
- PC: Control + Shift + U
The "U" in this shortcut can be remembered as "unsaturate." This command will strip the color from the selected area, turning it into a grayscale representation.
Step 5: Darkening the Pupil
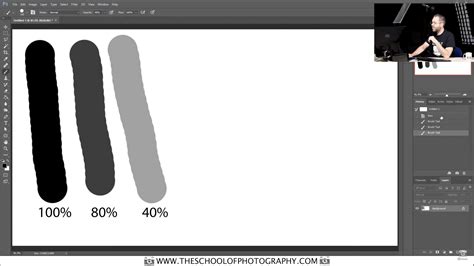
Now that the color has been removed, the selected area needs to be darkened to resemble a natural pupil. While the Burn Tool can be used effectively, painting with black at a low opacity often yields excellent results and provides fine control.
- Select the Brush Tool (shortcut "B").
- Ensure your foreground color is set to black.
- Set the brush opacity to a low value, around 20%. This allows for gradual darkening without creating harsh, unnatural blocks of color.
- Carefully paint within the selected area. The goal is not to make the pupil pure black, but rather a dark gray, which is more typical of natural pupils. Continue painting until the area is a consistent, dark gray and the problematic hot spot is effectively masked.
Step 6: Deselect and Review
Once you are satisfied with the color and darkness of the pupil, deselect the area by pressing "Command D" (Mac) or "Control D" (PC). Zoom out to assess the overall look of the eye. If necessary, repeat the process for the other eye. The result should be a natural-looking pupil that blends seamlessly with the rest of the eye.
Advanced Manual Red Eye Correction for Animal Subjects
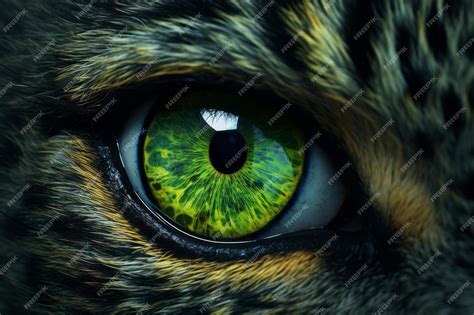
The automatic Red Eye Tool is notoriously ineffective for animal photography. This is because animal eyes often reflect light in a spectrum of colors, including green, yellow, and purple, which the tool is not designed to interpret. Correcting these requires a nuanced approach using color blending modes and targeted adjustments.
Step 1: Layer Duplication and Brush Mode Selection
As with human subjects, begin by duplicating your background layer ("Command J" or "Control J"). Then, select the Brush Tool ("B"). The critical step here is to change the brush's blending mode.
- Select the Brush Tool.
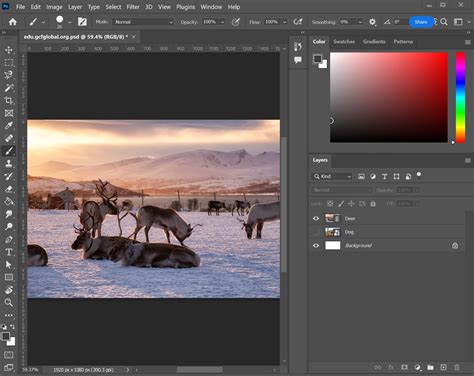
- In the tool options bar at the top, locate the "Mode" dropdown menu.
- Change the mode from "Normal" to "Color".
- Ensure your foreground color is set to black.
- Set the brush opacity to 100%.
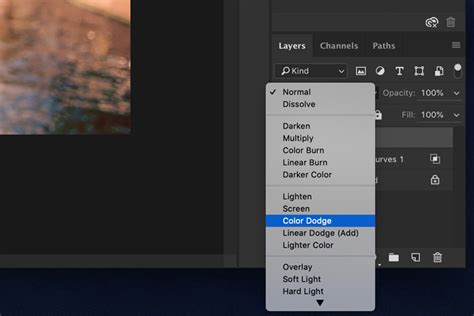
The "Color" blending mode is essential because it allows you to desaturate the underlying colors without altering their luminosity.
Step 2: Desaturating the Animal's Eyes
With the brush set to "Color" mode and black as the foreground color, carefully paint over the affected area of the animal's eye. As you paint, the green, yellow, or purple hue will be replaced by gray, effectively desaturating the eye while preserving the existing highlights and darker edges. This method is quite forgiving, as it does not typically affect the surrounding fur or feathers.
Step 3: Darkening the Desaturated Area
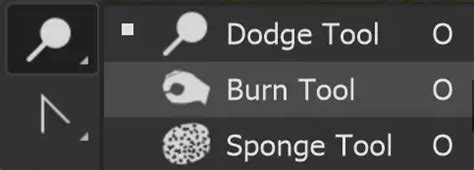
After desaturating both eyes, the next step is to darken them to a natural pupil color. For this, the Burn Tool is often the preferred choice, as it allows for controlled darkening of specific tonal ranges.
- Select the Burn Tool.
- In the tool options bar, set the "Range" to "Midtones". This is crucial to avoid affecting the bright highlights and the dark edges of the iris.
- Set the "Exposure" to a low value, around 20%. This allows for gradual darkening.
- Carefully paint over the desaturated areas of the pupils. The aim is to achieve a dark gray, not pure black, which would look unnatural. Continue burning until the eyes appear realistic and have a good depth of color.
It's often beneficial to leave a slight rim of darker color around the edge of the pupil, as this can add a sense of depth and realism to the eye, mimicking the natural shape.
Handling Extreme Cases and Variations
Sometimes, the red eye effect is so severe that the pupil is completely "blown out," leaving no discernible detail. In these extreme situations, a combination of techniques might be necessary, including painting from scratch.
Case Study: Completely Blown Out Pupils
Consider an image where the pupils are so bright that no detail of their original color or shape is visible.
- Initial Desaturation: Begin by duplicating the layer and using the Brush Tool in "Color" mode with black as the foreground color to desaturate any residual color spill around the eye area, including onto the fur or skin. This cleans up any unwanted coloration outside the pupil.
- Painting the Pupil: Switch the Brush Tool back to "Normal" mode. Set the foreground color to black and adjust the brush opacity to around 50%. Carefully paint over the area where the pupil should be, creating a dark gray shape. You may need to adjust brush size and opacity to achieve a natural look. Zoom in closely for precision.
- Recreating Highlights (Optional but Recommended): If the subject's companion has highlights in their eyes, it can look unnatural if this subject does not. To add a highlight:
- Switch your foreground color to white.
- Select a very small brush size.
- Make a small click or two within the newly painted pupil to create a realistic highlight. This adds a crucial element of life and dimension to the eye.
Choosing Between Burn Tool and Paintbrush
The decision to use the Burn Tool or the Paintbrush for darkening often depends on the presence of detail you wish to preserve.
- Burn Tool: Ideal when there is existing detail, such as gradients or highlights within the pupil area, that you want to retain while simply darkening the overall tone. It offers a gentler, more nuanced darkening effect.
- Paintbrush: More suitable for completely obliterating existing artifacts or when you need to paint a new color or tone from scratch, especially when the original detail is lost or undesirable. It allows for more direct control over color application.
Preventing Red Eye in Future Shoots
While Photoshop offers powerful tools for correction, prevention is always the best approach.
- External Flash Units: Using external flash units (speedlights) that can be positioned away from the lens axis significantly reduces the likelihood of red eye.
- Bouncing the Flash: Instead of pointing the flash directly at the subject, bounce it off a ceiling or wall. This diffuses the light, creating a softer, more flattering illumination that minimizes direct reflection into the eye.
- Ambient Light: Increase the ambient light in the scene. This allows you to use a lower flash power setting, or even no flash at all, thus eliminating the primary cause of red eye.
- Subject Distance: Ensure there is adequate distance between the camera and the subject. A greater distance can alter the angle of reflection, making red eye less probable.
- Animal-Specific Settings: Some cameras offer "red-eye reduction" modes that pre-flash the subject before the main exposure. While this can help with human subjects, its effectiveness on animals is limited due to their varied eye structures.
How to remove red eye from photo in photoshop ?
By understanding these advanced techniques and incorporating preventive measures, you can effectively tackle even the most stubborn red eye issues in Photoshop, ensuring your photographs are always picture-perfect.