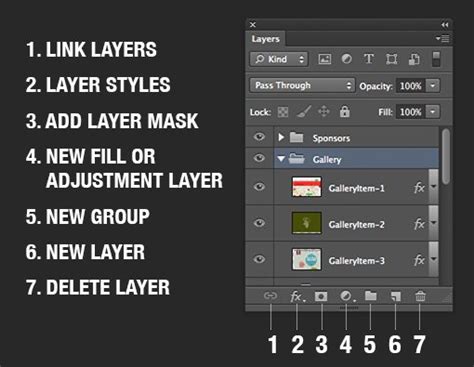
Photoshop's powerful layer system allows for intricate and iterative editing, offering unparalleled flexibility. However, as projects grow in complexity, managing numerous layers can become cumbersome, impacting file size and potentially slowing down workflows. This is where the concept of "flattening" comes into play. Flattening in Photoshop refers to the process of merging all the layers of an image into a single background layer. This technique helps streamline the editing process and brings the final image one step closer to being print-ready or suitable for uploading on the web.
The Core Concept: Merging Layers into One
At its heart, flattening in Photoshop is about consolidation. When we flatten an image, Photoshop condenses all the visible layers, preserving the appearance and any applied effects. This action is typically performed to simplify and reduce the file size of an image, especially when preparing it for printing or sharing. The result is a single layer, often referred to as the "background layer," which contains the combined visual information of all the previously separate layers.
Why Flatten? The Benefits of Consolidation
The decision to flatten an image is often driven by several practical advantages:
- File Size and RAM Efficiency: Layers can significantly increase the file size of an image, thereby also tying up valuable processing resources. Flattening reduces the file size of an image, making it easier to handle, store, and transfer. This is particularly beneficial for large, complex projects or when working on systems with limited RAM.
- Exporting and Compatibility: When exporting images for web use or sharing with clients, flattened images offer greater compatibility. Many platforms and software applications are designed to work with single-layer images, ensuring that your design and quality are consistently displayed across various devices and mediums.
- Printing and Performance: Printers that do not support layered files will require images to be flattened before printing. Flattening images can also benefit the printing process by simplifying the data that needs to be processed.
- Streamlined Workflow: For certain stages of the editing process, having a single layer can simplify further manipulations. It can make it easier to apply global adjustments or to prepare the image for final output.
- Maintaining Design and Quality: While flattening can cause a loss of editability, it ensures that the image appears consistent across various platforms and devices. This contributes to maintaining the design and quality intended by the designer.
How to Flatten an Image in Photoshop
Photoshop offers straightforward methods to flatten your image:
- Via the Layer Menu: Navigate to the
Layermenu and selectFlatten Image. - Via the Layers Panel Context Menu: Right-click (Windows) or Control + click (Mac) on any layer in the Layers Panel and choose
Flatten Imagefrom the context menu.
Difference between Merge and Flatten in Photoshop
Important Considerations Before Flattening
While flattening offers considerable benefits, it's crucial to be aware of its implications and potential drawbacks. Flattening is a permanent action, meaning any changes or corrections required after flattening will no longer be possible on the individual layers. Therefore, it's essential to weigh the benefits against the potential drawbacks.
- Irreversibility: Once an image is flattened, the individual layers are merged and cannot be easily separated or edited independently. This is a significant point to consider, as it removes the flexibility of making non-destructive edits later.
- Loss of Transparency: It is essential to note that once we flatten the image, any transparent areas within the layers will be filled with white. If transparency is a critical element of your design, you must take precautions.
- Resolution Consistency: If your layers have varying resolutions, they will all be converted to the resolution of the background layer after flattening.
- Opacity Merging: When layers with different opacities are merged, the resulting image might not appear as expected. Careful inspection of opacity settings is advised.
Alternatives and Workarounds: Maintaining Flexibility
Given the permanent nature of flattening, it's wise to explore alternatives and workarounds that can help minimize file size and maintain a flexible workflow without resorting to full flattening immediately:
- Save a Backup: Before flattening, it is highly recommended to create a backup copy of your work. This prevents any unwanted loss of data or edits, ensuring you can always revert to your previous work stage if needed. You can achieve this by going to
File > Duplicate. - Merge Layers: Instead of flattening the entire image, you can choose to merge specific layers. Merging layers combines several selected Photoshop layers into one layer. This allows you to consolidate parts of your image while keeping other sections editable. To merge selected layers, select the desired layers in the Layers panel, right-click, and choose
Merge Layers. - Merge Visible Layers: This option merges all currently visible layers into a single layer, while keeping hidden layers intact. To perform this, select a pixel layer as your base, hide the layers you don’t want to combine, and then go to
Layer > Merge Visible. - Stamp Visible: Similar to merging visible layers, stamping visible layers creates a new merged layer from all visible layers without altering the original layers. This is useful when you want to apply adjustments or effects to a combined version without destroying the individuality of the original layers. Press
Shift+Alt+Ctrl+E(Windows) orShift+Opt+Cmd+E(macOS) to stamp visible layers. - Convert to Smart Objects: Converting layers or groups of layers into Smart Objects preserves their original image data and allows for non-destructive scaling, rotating, and filtering. This is an excellent way to reduce the complexity of your Layers panel while retaining editability. Right-click on a layer or group and select
Convert to Smart Object. - Organize and Delete Unnecessary Layers: Before considering flattening, optimize your workflow by simplifying your layers panel. Delete unnecessary layers or elements that no longer serve a purpose. Give layers descriptive names by double-clicking the layer name in the Layers panel. Color coding layers and groups can also help you locate related layers more efficiently.
- Exporting vs. Flattening: If your primary goal is to create a file for web use or sharing, consider using Photoshop's export options (
File > Export > Export AsorSave for Web (Legacy)). These options allow you to choose file formats like JPEG or PNG, which are inherently flattened, without permanently altering your layered PSD file.
File Formats and Flattening
When saving a flattened image, the choice of file format is crucial, as each has its own advantages and drawbacks:
- PSD (Photoshop Document): This is Photoshop's native format and preserves all layers, adjustments, and other editable data. If you flatten an image within a PSD, you will still have the option to save a layered version separately.
- JPEG: This format compresses the image to create a smaller file size, but with some loss in quality. JPEGs are inherently flattened and are widely used for web images and general sharing.
- PNG: This format supports lossless compression and allows for transparency, making it ideal for web graphics that require transparent backgrounds. PNGs are also flattened.
- TIFF (Tagged Image File Format): This format retains high image quality and can support layers (though when saving a flattened TIFF, it will be a single layer). TIFFs are often used for print and archival purposes. When saving a flattened TIFF, go to
File > Save As, and in the Save As dialog, choose "TIFF" as the file format.
It's important to remember that not all file formats support layers or transparency. When using the Save As command, you can choose the desired file format and set its specific options (e.g., compression level for JPEG or TIFF).
Merging vs. Flattening: A Subtle Distinction
A common point of confusion arises when comparing "merging layers" and "flattening an image." While both processes consolidate layers, there's a key difference:
- Merging Layers: This process allows you to combine specific, selected layers into a single layer. You can choose which layers to merge, leaving other layers independent and editable. This offers more control over the consolidation process.
- Flattening Image: This action collapses all visible layers into one single background layer. It's a more encompassing process that affects the entire document.
In essence, merging is a more selective consolidation, while flattening is a complete reduction of all layers to a single entity. Many professionals prefer to merge layers strategically to manage file size and complexity without losing the ability to edit specific parts of the image later. Some tutorials might demonstrate merging layers instead of flattening because it offers a balance between file size reduction and preserving editability.
Conclusion
Flattening in Photoshop is a powerful technique for simplifying images, reducing file sizes, and preparing them for output. However, its irreversible nature necessitates careful consideration and exploration of alternative methods like merging layers, converting to Smart Objects, or utilizing export functions. By understanding the nuances of flattening and its alternatives, Photoshop users can optimize their workflows, maintain flexibility in their editing process, and achieve professional results. Always remember to save a backup of your layered file before committing to a flattened version.