In the realm of photography, achieving absolute sharpness from the immediate foreground to the most distant horizon can be an elusive goal. Scenes with considerable depth of field, such as long rows of flowers stretching towards a distant barn, present a challenge that even modern camera lenses, when stopped down to apertures like f/16, f/22, or f/32 with optimal hyperfocal point settings, cannot fully overcome. While a single shot might render one portion of the scene in exquisite detail, other areas will inevitably fall into a soft blur. This is where the powerful technique of focus stacking emerges as a critical tool for photographers aiming for unparalleled clarity and depth.
Focus stacking is a post-processing technique that involves merging multiple photographs, each captured with a different focal point, into a single image. This process effectively extends the depth of field, ensuring that all elements within the frame, from the closest detail to the furthest expanse, are rendered with tack-sharp precision. While the concept might sound complex, it is a straightforward yet highly effective method that can elevate photographic results, particularly in genres like landscape, macro, and product photography.
The Imperative of a Stable Foundation: Tripod and Composition
The cornerstone of successful focus stacking lies in maintaining absolute consistency between the images that will be merged. This is where a sturdy tripod becomes not just recommended, but essential. A robust tripod ensures that your camera remains perfectly still throughout the series of shots, preventing even slight shifts in perspective that can complicate the merging process and introduce unwanted artifacts.
When composing your scene, especially for landscape photography, it's advisable to select an aperture within your lens's "sweet spot." This typically falls in the range of f/8 to f/11, where lenses generally exhibit their sharpest performance while minimizing the detrimental effects of diffraction. Once your composition is locked in and your camera is securely mounted on the tripod, it's time to consider the technical settings.
Mastering Exposure and Focus for Stacked Sequences
To ensure seamless blending of images in post-processing, it is paramount that your exposure settings-specifically ISO and shutter speed-remain fixed across the entire series of photographs. This consistency guarantees that variations in brightness or color do not interfere with the merging algorithm. If you are shooting outdoors, it is crucial to capture your series of images quickly. Motion within the scene can be a significant impediment to successful focus stacking. Flowers, leaves, or plants swaying in the wind, or any other moving objects, are notoriously difficult, if not impossible, to merge without introducing odd artifacts or requiring extensive manual editing.
The most effective method for capturing your focus-stacked sequence is by utilizing manual focus. For most DSLR and mirrorless cameras, this offers the most precise control. Begin by focusing on the nearest element in your scene and capture your first photograph. Then, with deliberate small increments, rotate the focus ring of your lens towards infinity, progressively focusing on parts of the scene that are further away, taking a shot at each distinct focal plane. Continue this process until you have captured the furthest element in your scene or achieved infinity focus. For landscape photography, you will typically end up with a series of approximately 2 to 8 photos, depending on the aperture used and the desired depth of field.

Leveraging Camera Automation: Focus Bracket Shooting
Some advanced camera bodies offer a feature known as "Focus Bracket Shooting" or "Focus Shift Shooting." If your camera supports this functionality, learning to use it can significantly streamline the focus stacking process. In this mode, you typically compose your shot and then initiate the focus shift function. The camera will then automatically take a series of photos, incrementally adjusting the focus depth with each exposure. It's important to note that some cameras, in their pursuit of capturing all elements, might push the focus slightly beyond infinity. Therefore, you will likely need to discard the extra images at the end of the series that extend beyond the necessary focal range before proceeding with the merging process.
The Post-Processing Workflow: Lightroom and Photoshop Synergy
Focus stacking is a technique that cannot be fully achieved within Lightroom alone. The workflow typically involves an initial pass in Lightroom for essential edits, followed by a more specialized merging process in Photoshop or dedicated stacking software.
Initial Edits in Lightroom
Begin by importing your focus-stacked sequence of photos into Lightroom. Select one image from the series and apply your desired edits, such as adjusting color temperature, exposure, contrast, highlights, and shadows. Once you are satisfied with the look of this initial image, you can synchronize these edits across the entire series. To do this, highlight all the photos in your focus-stacked sequence in Lightroom, right-click, and select "Sync Settings." This ensures that all images share the same basic aesthetic treatment, which is crucial for a cohesive final result.
Addressing Focus Breathing in Photoshop
A common phenomenon with camera lenses, particularly zoom lenses, is "focus breathing." This occurs when the focal length of the lens subtly changes as the focus point is adjusted, leading to a slight apparent zoom in or out. In a focus-stacked sequence, this can manifest as slight differences in magnification between the layers, making alignment more challenging. While sometimes subtle, focus breathing can become quite obvious depending on the lens used. For instance, the Nikkor 70-200mm f/2.8E FL and the Nikkor 70-700mm f/4G, both sharp lenses, can exhibit differing degrees of focus breathing, with the f/4 version sometimes showing more pronounced effects.
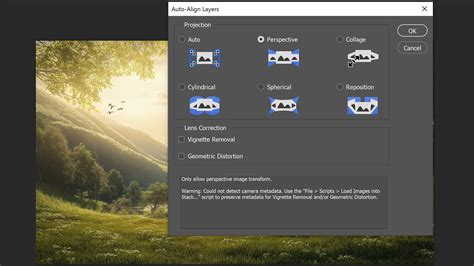
Photoshop offers a powerful solution to this issue with its "Auto-Align Layers" feature. After exporting your synchronized images from Lightroom as layers in Photoshop (typically by selecting "Edit in > Open as Layers in Photoshop"), select all the imported layers. Navigate to "Edit > Auto-Align Layers." For most scenarios, the "Auto" projection setting will yield excellent results. However, in some cases, "Collage" might be more appropriate, allowing for rotation, scaling, and translation adjustments.
The Art of Blending: Auto-Blend Layers
Once your layers are accurately aligned, the next step is to blend them together. With the same layers still selected, go to "Edit > Auto-Blend Layers." In the dialog box that appears, choose "Stack Images" as your Blend Method. You should also select "Seamless Tones and Colors" to help ensure a smooth transition between the layers. Clicking "OK" will initiate Photoshop's intelligent blending process.
Photoshop analyzes each layer, identifying areas of micro-contrast to determine which parts of the image are in focus. It then intelligently masks out the out-of-focus areas and reveals the in-focus portions from the corresponding layer. This creates a composite image where the sharpest elements from each individual shot are combined.
Refining the Blend: Manual Adjustments and Masking
While Photoshop's auto-blend feature is remarkably effective, it's not always perfect. You may encounter instances where the blending process results in subtle artifacts, especially in areas with uniform tones, such as a clear or cloudy sky. In such cases, you may need to perform manual adjustments.
Inspect the layer masks applied to each layer. The layer that captured the furthest element in focus (often the layer at infinity focus) should ideally contain the sky. If this layer is not at the top of the layer stack, move it there. Select the layer mask of this top layer, which should ideally encompass the entire sky. Choose a brush tool, set its color to white, and begin brushing over the sky area. Brushing with white on a layer mask reveals the content of that layer. This manual brushing allows you to ensure that the sky from the infinity-focused shot is seamlessly integrated.
If your lens exhibited significant focus breathing, you might observe transparent areas along the edges of the merged photos where the scaling differences are pronounced. The auto-blend process might also leave artifacts at the edges of the photograph. The quickest solution for these issues is often to crop out any edges that did not merge satisfactorily due to scale changes.
Photoshop Layer Masks Explained in 2 Minutes
Beyond Photoshop: Dedicated Focus Stacking Software
While Photoshop is a powerful and versatile tool for focus stacking, it's not the only option available. Dedicated software solutions like Helicon Focus and Zerene Stacker are specifically designed for image stacking and often offer more advanced algorithms and finer control over the blending process. These programs can sometimes yield superior results, especially with challenging sequences or when dealing with complex subjects. They may provide more sophisticated methods for handling micro-contrast analysis and edge blending, potentially reducing the need for extensive manual refinement.
Essential Gear for Focus Stacking
While it's possible to experiment with focus stacking using just a smartphone camera and minimal equipment, investing in a few key items will significantly enhance your results and streamline the process.
The Indispensable Tripod
As previously emphasized, a tripod is the bedrock of focus stacking. It provides the necessary stability to ensure consistent framing and perspective across your image series. Without a tripod, achieving the precise alignment required for effective blending becomes an arduous, if not impossible, task.
Interchangeable-Lens Cameras
For maximum control over your camera settings and the flexibility to choose lenses that best suit your creative vision, an interchangeable-lens camera, whether a DSLR or a mirrorless model, is highly recommended. These cameras offer the manual control essential for focus stacking.
Lenses with Manual Focusing Capabilities
A lens that offers precise manual focusing is crucial. Manual focus allows you to meticulously control the point of focus for each shot in your sequence. While some cameras offer autofocus assistance for manual focusing, the ability to directly adjust the focus ring provides the most granular control.
When Focus Stacking Becomes Necessary
In many situations, standard photographic techniques can achieve a satisfactory depth of field. For instance, with a wide-angle lens and a moderately narrow aperture like f/16, many landscape scenes can be captured with sufficient sharpness throughout. However, there are specific scenarios where focus stacking becomes indispensable:
- Extreme Depth of Field Requirements: When a scene demands sharpness from an extremely close foreground subject to a very distant background, such as intricate macro details against a sweeping landscape, focus stacking is the only way to achieve this.
- Product Photography: In commercial product photography, clients often require every single item in a meticulously arranged scene to be in sharp focus. Focus stacking ensures that all products, from the front row to the back, are rendered with perfect clarity.
- Macro Photography: The shallow depth of field inherent in macro photography makes focus stacking a near-universal requirement for capturing intricate details with complete sharpness.
Advanced Considerations and Techniques
Managing Movement in the Scene
One of the primary adversaries of focus stacking is movement. If your scene features elements that are in motion, such as trees swaying in the wind or flowers dancing in a breeze, merging the images can lead to significant artifacts. To mitigate this:
- Choose Still Subjects: Whenever possible, photograph scenes with minimal movement. Still-life subjects or barren landscapes are ideal.
- Control Movement: If a slight movement is unavoidable, consider techniques to stabilize it. For a flower, you might use a "plamp" (a clamp with a flexible arm) to hold it steady, or even use your body to shield it from the wind.
- Manual Masking for Moving Subjects: If capturing a moving subject is essential, you can photograph the scene with sufficient depth of field in a single shot for the moving element. Then, use manual masking techniques in post-processing to overlay this sharply focused moving subject onto your focus-stacked background.
The Role of Remote Releases and Focusing Rails
- Remote Release: When shooting in low light conditions where slower shutter speeds are necessary, even the press of your camera's shutter button can introduce slight vibrations. Using a remote release or a camera's self-timer function can help eliminate this subtle shake, ensuring maximum sharpness. After adjusting focus, waiting for any residual vibrations to settle before triggering the camera via a remote release can further improve image quality.
- Focusing Rail: For macro photography, where precise and minute focus adjustments are critical, a focusing rail is an invaluable tool. This accessory attaches to your tripod and allows for incremental, controlled movement of the camera along a horizontal axis. This eliminates the need for delicate manual focus ring adjustments, making the process of capturing your focus-stacked sequence significantly more manageable and accurate. While not strictly mandatory, a focusing rail greatly simplifies macro focus stacking and enhances the quality of the stacked images.
Combining Focus Stacking with HDR
In scenes with a high dynamic range-meaning they contain both very bright and very dark areas, such as a sunset-photographers often employ High Dynamic Range (HDR) techniques. HDR involves capturing multiple exposures of the same scene to retain detail in both the highlights and shadows. It is possible to combine focus stacking with HDR. Instead of capturing just one image for each focus point, you would capture multiple bracketed exposures for each focus position. In post-processing, you would first merge each set of bracketed exposures into an HDR image, and then proceed to focus stack these HDR images. This combined approach allows for both exceptional depth of field and accurate exposure across the entire scene's dynamic range.
The Future of Focus Stacking
As camera technology continues to evolve, so too will the tools and techniques available for focus stacking. While dedicated software and advanced camera features continue to improve, the fundamental principles of meticulous capture and intelligent post-processing remain at the core of this powerful technique. By mastering focus stacking, photographers gain a profound ability to control depth of field, unlocking creative possibilities and ensuring that every crucial detail in their images is rendered with breathtaking clarity. Whether you're capturing the delicate intricacies of a flower's petal, the rugged textures of a vast landscape, or the mesmerizing details of a microscopic subject, focus stacking empowers you to present your vision with unparalleled sharpness and impact.