Adobe Photoshop, a powerhouse in digital imaging, offers a robust set of tools for manipulating and refining images. At the heart of many creative workflows lies the concept of the foreground color. This fundamental element dictates how your brushstrokes appear, how fills are applied, and the very essence of color interaction within your project. Understanding how to effectively select, manage, and utilize the foreground color is paramount for both beginners and seasoned professionals alike. This guide delves into the multifaceted world of Photoshop's foreground color, from its basic definition to advanced selection techniques, ensuring a deep and practical understanding for users of all levels.
The Essence of Foreground and Background Colors
In Photoshop, the foreground and background colors are represented by two overlapping squares, typically found at the bottom of the left-hand toolbar. The square on top signifies the foreground color, which is the primary color used for painting, filling, and creating strokes. When you initiate a new document or reset your color defaults, the foreground color is often black, and the background color is white. The background color, on the other hand, plays a crucial role when using tools like the Eraser on a background layer, effectively converting pixels to this designated hue. Furthermore, these two colors are instrumental in creating gradient blends using the Gradient Tool, allowing for smooth transitions between distinct colors.
Diverse Methods for Selecting Foreground Colors
Photoshop provides an array of intuitive methods to select your desired foreground color, catering to different workflow preferences and precision needs.
The Color Picker: A Visual Palette
The Color Picker is perhaps the most visually direct way to choose a color. You can access it by clicking the foreground color square located at the bottom-left of the toolbar. This window presents a large color field displaying a spectrum of hues and their corresponding shades. A thin, vertical slider, often described as rainbow-colored, allows you to navigate through different hues. Once you've selected a hue, the larger color area updates to show a range of saturation and brightness variations for that specific hue. Clicking within this larger square selects the precise shade.
The Color Picker also offers a "New" and "Current" color preview. The "New" square at the top of the window displays your newly selected color, while the "Current" square retains the color that was previously active. This visual comparison is invaluable for making informed color choices.
How to Use the Color Picker Tool in Photoshop
Precise Color Selection with Numerical Values
For users who require absolute precision, the Color Picker allows you to input color values directly. At the bottom-right corner of the Color Picker window, you'll find fields for various color models:
- HSB (Hue, Saturation, Brightness): This model uses percentages for Hue (0-360 degrees on a color wheel), Saturation (0% for grayscale, 100% for pure color), and Brightness (0% for black, 100% for full brightness).
- RGB (Red, Green, Blue): Commonly used for digital displays like monitors and mobile devices, RGB values range from 0 (no color) to 255 (full intensity) for each channel.
- LAB (Luminance, A, B): This model offers Luminance (0-100), the 'A' channel (representing green to red), and the 'B' channel (representing blue to yellow).
- CMYK (Cyan, Magenta, Yellow, Black): Essential for print design, CMYK values represent the percentage of each ink required to create a specific color, ranging from 0% to 100%.
- Hexadecimal: A six-digit code (preceded by '#') widely used in web design to define exact colors displayed by web browsers.
Entering numeric values into these fields ensures you can replicate specific colors with exactitude, a critical aspect for brand consistency and professional design.
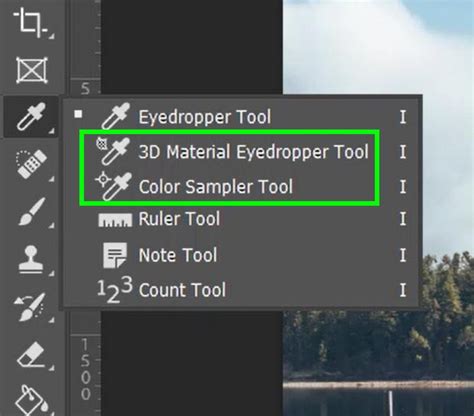
The Eyedropper Tool: Sampling from Your Canvas
The Eyedropper Tool, recognizable by its icon resembling an eyedropper, is indispensable for selecting colors directly from an image you are currently working on. To utilize it, you first need an image open in Photoshop. You can open an image by navigating to "File" > "Open" in the menu bar, or by right-clicking an image file and selecting "Open with" > "Photoshop."
Once the image is open, select the Eyedropper Tool from the toolbar. Hovering your cursor over the image will transform it into the eyedropper icon. Clicking on any pixel within the image will instantly set the foreground color to that sampled color.
The Eyedropper Tool offers advanced options accessible from the menu bar at the top of the Photoshop interface:
- Sample Size: This dropdown menu allows you to determine the area from which the color is sampled. "Point Sample" selects the color of a single pixel, offering the highest precision. Alternatively, you can choose a small square pixel area to sample an average color, which can be useful for less uniform areas.
- Sample: This setting dictates which layer the Eyedropper Tool samples from. You can choose to sample from the current active layer or from all visible layers.
- Show Sampling Ring: When enabled, a visual ring appears around the eyedropper cursor, displaying the currently selected color in its top half. This provides immediate visual feedback as you hover over different areas of your image.
Alternatively, you can click and drag the Eyedropper Tool across your image to continuously sample colors until you find the perfect match.
The HUD Color Picker: Real-time Color Selection
A more dynamic approach to color selection is the HUD (Heads-Up Display) Color Picker. This can be accessed by holding down "Shift" + "Alt" and right-clicking your mouse. This method displays a compact color picker directly on your canvas, often featuring an eyedropper with a ring around it. As you hover over the color field or slider within the HUD Color Picker, the top half of the ring updates in real-time to show the color you are about to select. Releasing the mouse button locks in the color you were hovering over.
The Color Panel: An Ever-Present Palette
The Color Panel, typically located in the upper-right corner of the Photoshop workspace, serves as a persistent mini-Color Picker. It usually features a color slider and a color field square, similar to the main Color Picker, allowing for quick adjustments. If the Color Panel is not visible, you can open it by going to "Window" > "Color" in the menu bar.
Within the Color Panel, you'll find the familiar overlapping squares representing the foreground and background colors. You can also access different color modes by clicking the icon with four horizontal lines in the upper-right corner of the panel and selecting a mode:
- Hue Cube: Similar to the main Color Picker, with a hue slider and a color field.
- Brightness Cube: The large square displays hues, and a thin strip on the side acts as a brightness slider.
- Grayscale Slider: This mode focuses on shades of gray, using a single slider from 0 (white) to 100 (black).
- RGB Sliders: For digital displays, with individual sliders for Red, Green, and Blue (0-255).
- HSB Sliders: For Hue, Saturation, and Brightness.
- CMYK Sliders: For print, with sliders for Cyan, Magenta, Yellow, and Black (0-100%).
- Lab Sliders: For Luminosity, A, and B values.
You can also select colors from the Swatches Panel ("Window" > "Swatches"), which offers a library of pre-defined colors, or load custom swatch libraries.
Advanced Selection Techniques and Refinement
Beyond basic color selection, Photoshop offers sophisticated tools to isolate specific elements within an image, which is crucial for applying foreground colors accurately to targeted areas.
Automatic Selections: The Power of AI
Modern Photoshop versions incorporate AI-powered tools for effortless selections. With a single click, you can automatically select the Subject, Sky, or Background of your photo. Photoshop analyzes the image and creates a precise selection border around the identified element.
Selection Tools for Precision
For more intricate selections, Photoshop provides a suite of powerful tools:
- Marquee Tools (Rectangular and Elliptical): Used for selecting basic geometric shapes. You can specify exact dimensions for the marquee.
- Lasso Tools (Lasso, Polygonal Lasso, Magnetic Lasso): The Lasso Tool allows for freehand selections. The Polygonal Lasso Tool creates selections with straight lines by clicking points. The Magnetic Lasso Tool attempts to snap to the edges of objects as you drag your cursor, making it easier to draw precise selection borders.
- Magic Wand Tool: This tool selects areas of similar color with a single click. You can adjust the "Tolerance" value to control the range of colors selected. The "Contiguous" option ensures that only adjacent pixels of similar color are selected, while "Sample All Layers" allows sampling from all visible layers.
- Quick Selection Tool: This tool makes selections based on color and texture similarity as you click or drag over the desired area. It's highly intuitive and effective for complex shapes.
- Object Selection Tool: This tool allows you to draw a rectangle or lasso around an object, and Photoshop will automatically identify and select it.
Refining Your Selections: The Refine Edge Dialog
Once a selection is made, the Refine Edge dialog box (accessible by clicking "Refine Edge" after making a selection with most selection tools) is your go-to for making it more precise. Here you can:
- Adjust Radius: Controls the size of the border area where edge refinement occurs. "Smart Radius" automatically adjusts for both hard and soft edges.
- Smooth: Softens jagged edges.
- Feather: Blurs the edges of the selection, creating a softer transition.
- Contrast: Sharpens the selection edges.
- Shift Edge: Moves the selection border inward or outward.
- Decontaminate Colors: This crucial option helps to replace color fringes around the edges of a selection with the colors of nearby fully selected pixels. This is particularly useful for selections of hair or fur, where subtle color fringing can be noticeable. Because this option changes pixel color, it requires outputting to a new layer or document to retain the original layer.
Masking for Non-Destructive Editing
For non-destructive workflows, layer masks are paramount. Instead of directly applying color changes, you can use masks to selectively reveal or hide parts of a layer. The Selection Brush Tool is particularly useful in conjunction with masks, allowing you to paint directly onto the mask to refine the selected areas.
The Role of AI in Foreground Selection and Beyond
Adobe is continuously integrating Artificial Intelligence into its Creative Cloud suite, and Photoshop is no exception. The AI Assistant, currently in public beta, aims to streamline workflows by allowing users to describe desired edits in natural language. For instance, you could ask the AI to "brighten the foreground" or "remove distractions." The assistant can either perform the edit automatically or guide you through the steps.
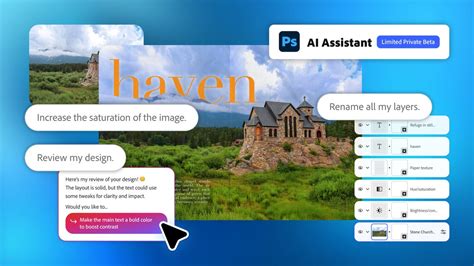
While the AI Assistant shows promise, its current iterations can sometimes produce unexpected results, such as incorrect initial selections or unintended adjustments to highlights. However, its ability to break down edits in the history pane allows for manual intervention and learning. Features like AI Markup, which enables users to sketch elements and have generative AI add them, further showcase Adobe's commitment to AI-driven creativity. For subscribers, these AI features offer unlimited image generation until a certain date, after which usage may be subject to plan credits.
Conclusion
The foreground color in Photoshop is far more than just a simple color swatch; it's a dynamic element that underpins a vast range of creative possibilities. From the straightforward selection via the Color Picker and Eyedropper Tool to the sophisticated AI-driven capabilities and precise refinement options, Photoshop empowers users to achieve unparalleled control over their color choices. Mastering these tools not only enhances the aesthetic quality of your work but also streamlines your editing process, making your creative journey more efficient and enjoyable. Whether you are adjusting the hue of a subject's clothing or creating complex composite images, a thorough understanding of the foreground color and its associated tools is an essential skill for any Photoshop user.
tags: #foreground #tool #photoshop