The ability to selectively blur parts of an image is a fundamental technique in digital photography and graphic design, offering a powerful way to enhance focus, create artistic effects, and correct imperfections. Adobe Photoshop, a leading software in image manipulation, provides a suite of sophisticated blur tools, among which the Gaussian Blur stands out for its versatility and effectiveness. Named after the mathematician Carl Friedrich Gauss, this filter applies a mathematical function to an image, resulting in a smooth, natural-looking blur. Understanding how to wield the Gaussian Blur, along with other blur filters, can unlock a myriad of creative possibilities, transforming ordinary images into compelling visual narratives.
The Core of Gaussian Blur: A Mathematical Approach to Softness
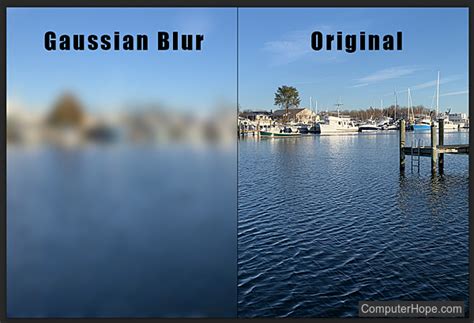
At its heart, Gaussian blur is the application of a mathematical function to an image to soften it. This function, derived from the Gaussian function, essentially calculates a weighted average of the surrounding pixels for each pixel in the image. The "weight" is determined by the proximity of the surrounding pixels; those closer to the target pixel have a greater influence on its new value than those farther away. This process creates a normal distribution of pixel values, smoothing out random variations and producing a soft, organic blur.
Photographer Kenton Waltz likens the effect to "laying a translucent material like vellum on top of the image." This analogy aptly describes how Gaussian blur diffuses light and color, reducing the harshness of edges and transitions. The degree of this diffusion, or blurriness, is controlled by a parameter known as the "Radius," measured in pixels. A larger radius means that the Gaussian function considers a greater number of neighboring pixels, leading to a more pronounced blur. Conversely, a smaller radius involves fewer neighboring pixels, resulting in a subtler softening.
Why Choose Gaussian Blur? Practical Applications in Image Editing
Photographers and designers turn to Gaussian blur for a variety of practical and artistic reasons:
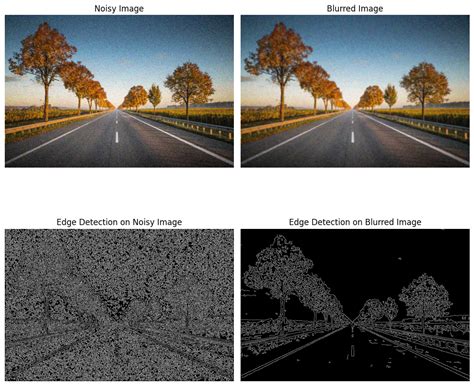
Noise Reduction: In low-light photography, images can often suffer from significant digital noise, appearing as random speckles of color or brightness. Gaussian blur is highly effective at muting this noise by smoothing out these variations. By averaging the pixel values, it reduces the high standard deviation that characterizes noisy images, leading to a cleaner, more polished result.
Directing Viewer Attention: In product photography or any scenario where a specific subject needs to be emphasized, Gaussian blur can be strategically employed. By applying the blur to all areas except the intended focal point, the viewer's eye is naturally drawn to the sharpest, most detailed section of the image. This is a powerful technique for guiding the narrative and ensuring key elements are not overlooked.
Mitigating Chromatic Aberration: Chromatic aberration, often seen as colored fringes (typically red or white) along high-contrast edges in an image, can be a distracting artifact. Gaussian blur can help to soften these edges and reduce the visibility of these color fringes, particularly in landscape photography where sharp, contrasting elements like palm fronds against a bright sky might exhibit this issue.
Creative and Artistic Effects: Beyond its corrective capabilities, Gaussian blur is a potent tool for creative expression. Photographer Andres Gonzalez, for instance, has utilized a Gaussian filter to achieve surreal effects. His technique involves duplicating the original image layer, applying a Gaussian blur to the duplicate, and then selectively erasing the blur in areas intended to remain in focus. This creates a dreamlike or otherworldly atmosphere, demonstrating the filter's potential for artistic manipulation.
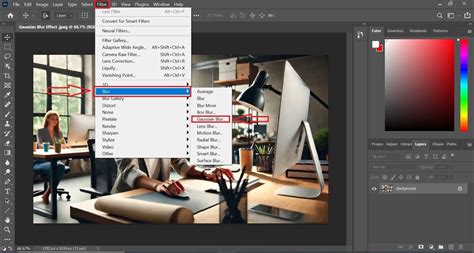
How To Use The Gaussian Blur Effect In Adobe Photoshop (2026 Easy Guide)
Implementing Gaussian Blur in Photoshop: A Step-by-Step Guide
The process of applying Gaussian blur in Adobe Photoshop is straightforward, making it accessible even for beginners.
Open Your Image: Begin by opening your desired image in Photoshop. This can be done by navigating to
File > Openor using the keyboard shortcutCTRL+O. If you are using an earlier version of Photoshop, you might need to drag the image file into the Photoshop window and then dock its tab to the right of the menu bar.Duplicate the Layer: Before applying any filters, it is always good practice to create a backup of your original image. Select the image layer in the Layers panel and press
CTRL+Jto duplicate it. This ensures that your original image remains untouched, allowing for non-destructive editing.Access the Gaussian Blur Filter: With the duplicated layer selected, navigate to the Photoshop menu bar and choose
Filter > Blur > Gaussian Blur.Adjust the Radius: A new window will pop up, presenting the Gaussian Blur options. The primary control here is the "Radius" slider. As you adjust this value (measured in pixels), you will see a live preview of the blur effect on your image. Experiment with different values to achieve the desired level of softness. A larger radius results in a more pronounced blur, while a smaller radius produces a subtler effect. Remember that increasing the blur intensity generally leads to decreased sharpness.

Beyond Gaussian Blur: Exploring Photoshop's Diverse Blur Filters
While Gaussian blur is a staple, Photoshop offers a rich array of other blur filters, each designed for specific purposes. Understanding the differences between them is key to making informed editing choices.
Average Filter: This filter calculates the average color of an entire image or a selected area and then fills that area with that single color. The result is a completely smooth, monochromatic look, often used to create a very basic, flattened effect or as a starting point for further manipulation. It effectively eliminates all detail and hard edges, creating a solid color block.
Smart Blur: The Smart Blur filter offers a more precise approach to blurring. It blurs an image while attempting to preserve edges and details. It works by analyzing the pixel values and applying a blur selectively, often distinguishing between areas of smooth tone and areas with sharp transitions. This filter is particularly useful for reducing noise without sacrificing important image features. It also provides options for controlling the "Threshold" and "Radius" to fine-tune the blurring process, and offers different blur qualities, such as "Normal," "Draft," and "Premimum."
Surface Blur: Similar to Smart Blur, the Surface Blur filter blurs an image while preserving edges. Its strength lies in its ability to smooth out areas of similar color and tone without affecting distinct boundaries. This is achieved by sampling pixel values and applying the blur based on their similarity. It's excellent for smoothing skin tones or reducing unwanted textures while keeping sharp lines intact. The filter allows for adjustments to "Radius" and "Threshold" to control the extent of the blur and the sensitivity to edge detection.
Depth Blur: This advanced filter is designed to simulate the shallow depth of field effects often seen in photography. It creates a sense of depth by blurring the background and foreground while keeping the main subject in sharp focus. Depth Blur automatically generates a "Depth Map" which it then uses to apply a realistic blur. In its "Quick" mode, it automatically identifies the subject. In "Advanced" mode, users have more control, including the ability to select a focal point using the "Focal Point Selector" by clicking on the image preview. The "Blur Strength" parameter in Depth Blur refers to the intensity of the blur applied to areas outside the focal range.
Lens Blur: This filter allows you to simulate the optical blur produced by camera lenses, enabling you to narrow the depth of field and keep some objects in focus while blurring others. You can control the shape of the blur's highlights (often more circular) and adjust parameters like the focal distance and the degree of rotation.
Iris Blur: Iris Blur allows you to highlight a focal point and blur the background, creating an elliptical or circular blur effect that mimics the aperture of a camera lens. You can adjust the size and feathering of the blurred area to control the transition from sharp to blurred.
Motion Blur: This filter is used to create the dramatic sense of movement in an image. It simulates the effect of a camera moving during a long exposure, blurring objects in a specific direction and amount. You can control the angle and distance of the blur to convey different types of motion.
Advanced Techniques and Considerations
When working with blur filters, especially Gaussian Blur, several advanced techniques and considerations can elevate your results:
Layer Masks: For non-destructive editing and precise control, always use layer masks. Instead of directly erasing blur from a duplicated layer, apply a layer mask. You can then use a black brush to "paint away" the blur in specific areas, revealing the sharp layer underneath. This allows you to easily refine your selections and make adjustments later.
Combining Blur Filters: Don't be afraid to combine different blur filters to achieve unique effects. For instance, you might use Gaussian blur for a general softening and then apply Smart Blur to retain specific details.
Product Mockups: In the realm of product design and marketing, blur effects are invaluable for creating realistic mockups. You can place your product design onto a mockup template and then use blur to create a sense of depth, focus attention on the product, or integrate it seamlessly into a background scene. Techniques involving selection tools, layer masks, and careful application of blur filters are essential here. For example, selecting a mockup background with the Magic Wand tool, then using layer masks to integrate a product image, and finally applying subtle blur to the background can create a professional presentation.
Understanding Pixel Values: It is important to grasp that each pixel's new value in a blurred image is set to a weighted average of its surrounding pixels. This means that the original pixel value is modified based on its neighbors. This principle is fundamental to understanding how blur filters operate and why certain adjustments lead to specific visual outcomes.
Iterative Refinement: The process of blurring often involves iteration. You might apply a blur, assess the result, and then refine the settings. For instance, if you find the blur is too strong, you can decrease the blur radius or adjust the opacity of the blurred layer. If you need to add sharpness back, you can decrease the blur radius.
By mastering the Gaussian blur effect and exploring the diverse range of blur tools available in Photoshop, you gain a powerful toolkit for image enhancement and creative expression. Whether you're aiming for subtle improvements or dramatic artistic statements, Photoshop's blur filters offer the flexibility and precision to bring your vision to life.