Inkscape offers a powerful suite of tools for manipulating colors and generating vector objects from raster images. Whether you aim to precisely match a color from an imported image, create detailed vector graphics, or apply sophisticated color adjustments, Inkscape provides the flexibility to achieve your design goals. This tutorial delves into the various methods for color selection, application, and the intricate process of tracing images to extract specific color regions as vector objects.
Understanding Color Selection Fundamentals in Inkscape
Colors are the cornerstone of compelling visual design, and Inkscape empowers you to choose, refine, and apply them with remarkable precision. The primary interface for color interaction is the color palette, typically located at the bottom of the Inkscape window. However, Inkscape also supports additional, system-integrated color palettes, offering a broader spectrum of choices.
Applying and Adjusting Fill and Stroke Colors
To begin applying colors, select an object on your canvas. For instance, you can draw a simple rectangle using the Rectangle Tool. Once selected, clicking on a color swatch in the bottom palette will instantly set it as the object's fill color. This change is also reflected in the status bar.
To add an outline, also known as a stroke, to your selected object, hold down the Shift key and click on a desired color in the palette. This action assigns the chosen color to the object's stroke. If you wish to remove an outline, hold down Shift and click on the 'X' swatch in the color palette. Similarly, to remove the fill color from an object, select it and click on the 'X' swatch without holding Shift. The object will remain on the canvas but will be devoid of both fill and outline.
Expanding Your Color Palette Options
Inkscape allows you to display and utilize a wider range of colors beyond the default palette. By clicking the arrow symbol next to the standard palette, you can access an overview of additional color palettes. To view more colors simultaneously, you can adjust the visible area of the palette by modifying the size of the color fields through the palette's options.
For granular control over color, the Fill and Stroke panel is indispensable. This panel can be accessed by clicking the icon in the command bar. Within this panel, you can meticulously adjust the fill color, stroke color, and even define patterns for the stroke. It offers extensive options for defining fills, including gradients, and allows you to specify precise color tones using RGB, HSL, or CMYK values. The color wheel within this panel is particularly useful for visually selecting various color tones and fine-tuning their saturation and brightness. Experimenting with the available sliders will help you discover the perfect color for your design.
Controlling Transparency (Opacity)
Adjusting the transparency, or opacity, of an object is straightforward. A dedicated opacity slider is available in the Fill and Stroke panel. It's important to note that reducing the opacity typically affects only the currently selected object. When working with layers, transparency can sometimes behave differently. You can also independently adjust the transparency of an object's stroke, allowing for distinct transparency levels between the fill and the outline, which opens up numerous flexible design possibilities.
The Power of the Dropper Tool
The Dropper Tool is a highly versatile instrument for color selection. When activated, the cursor transforms into an eyedropper. Clicking on any area of your canvas or an imported image will instantly pick up that color and apply it to the currently selected object. For even greater precision, you can drag a small circle with the Dropper Tool to capture the average color of a specific region within an image. This is invaluable for achieving exact color matches.

Advanced Color Selection: Picking from Other Documents
A common scenario is needing to pick a color from a different Inkscape document. If the desired color resides within a vector object in another file, you can copy that object (Ctrl+C) from its source document. Then, in your target document, select the object you wish to modify and paste the style using Ctrl+Shift+V. This command transfers the fill and stroke properties, including color, from the copied object to the selected one.
Tracing Images to Select Color Regions
A more complex, yet incredibly powerful, feature in Inkscape is the ability to trace imported raster images to generate vector objects based on color. This is particularly useful when you need to isolate specific colored areas of an image and convert them into scalable vector shapes.
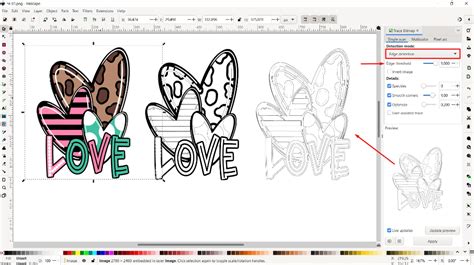
The "Trace Bitmap" Functionality
The "Trace Bitmap" feature, accessible via Path > Trace Bitmap, is the key to this process. When you import an image into Inkscape, it remains a raster (pixel-based) graphic. Trace Bitmap converts this raster image into a vector graphic.
The "Trace Bitmap" dialog offers various modes and settings to control how the tracing is performed. For selecting regions by color, the "Colors" mode is most relevant. Within this mode, you can specify the number of "scans" or distinct colors you want Inkscape to detect and vectorize. A higher number of scans will attempt to capture more subtle color variations, while a lower number will simplify the color palette.
The "Smooth" option helps to create cleaner, less jagged paths, which is often desirable. For higher precision, especially when aiming for pixel-level accuracy, you may need to scale up your source bitmap before tracing. For example, a detail from an image can be linearly scaled by 1000% to reveal its underlying pixel blocks. Tracing this enlarged image can yield a more precise vector representation of specific color regions.
Important Consideration: Tracing large, upscaled bitmaps can result in an immense amount of data. This can lead to very large file sizes and potentially slow down Inkscape’s performance. It's crucial to balance the need for precision with the practicalities of file management and processing power.
Understanding the "Select Same" Feature
For simpler color selections within existing vector objects, Inkscape offers a convenient feature called "Select Same." Since Inkscape version 0.91, this can be found under the Edit > Select Same menu. Alternatively, when an object is selected, right-clicking on it will bring up a context menu where you can also find the "Select Same" option. This feature allows you to select all objects within your document that share a specific attribute, such as fill color, stroke color, stroke width, or opacity. This is an incredibly efficient way to modify a consistent color scheme across multiple objects simultaneously.
Advanced Techniques and Workflow Examples
Beyond basic color application and tracing, Inkscape supports more complex workflows involving layers, gradients, and precise object manipulation.
Working with Layers
Inkscape's layer system is fundamental for organizing complex designs. You can create new layers, name them, and move objects between them. To draw or edit an object, ensure you are on the correct layer; the active layer will be highlighted, typically turning blue. Locking layers (by clicking the padlock icon) prevents accidental modifications, which is useful when working with background elements.
Applying Gradients for Shading and Depth
Gradients are essential for creating realistic shading and adding a sense of depth to objects. Inkscape offers both linear and radial gradients. When using the Gradient Tool, you'll see gradient stops on a control bar, usually at the top of the workspace. These stops allow you to define colors and their positions within the gradient.
For instance, to create a radial gradient for a sphere:
- Select the object (e.g., a circle).
- Choose the Gradient Tool.
- A control bar will appear with gradient options. You'll typically see a center stop and an outer stop.
- Adjust the colors at these stops. For a yellow sphere with a hint of orange, you might set the center stop to a lighter yellow and the outer stops to a deeper orange.
- You can add more gradient stops to introduce additional colors or finer control over the color transitions.
- The position and angle of the gradient can be manipulated by dragging the control points on the object itself, allowing you to simulate light sources from different directions.
Inkscape Tutorial : Abstract Background with Gradient Mesh
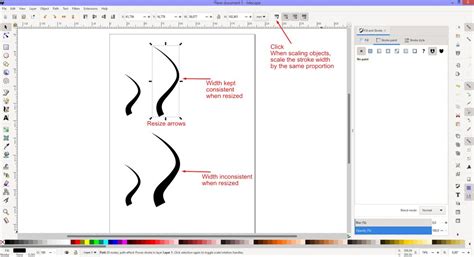
Precise Object Manipulation: Scaling, Rotating, and Transforming
Inkscape provides robust tools for transforming objects. The Select Tool allows you to scale objects uniformly or non-uniformly by dragging their bounding box handles. To access more advanced transformations like rotation and skewing, the Object > Transform menu is your gateway.
Within the Transform panel, you can:
- Rotate: Specify an angle and axis of rotation. You can also move the object's rotation center by clicking and dragging the small circle that appears on the object when it's selected for rotation.
- Scale: Adjust the dimensions by a percentage or absolute value.
- Skew: Distort the object along its axes.
These transformation tools are critical for tasks like creating symmetrical elements, adjusting the perspective of objects, or crafting intricate patterns. For example, to create antlers for a character, you might draw a simple rectangle, scale it, rotate it, and then duplicate and arrange these transformed shapes.
Utilizing Guides for Alignment
Guides are non-printing lines that assist in precise alignment and positioning of objects. You can pull guides directly from the rulers (horizontal and vertical) that border the Inkscape workspace. Once a guide is on the canvas, you can move it with the Select Tool. Guides can be particularly helpful when creating symmetrical elements or ensuring that objects are consistently spaced.
Working with Bezier Curves and Paths
The Bezier Tool (or Pen Tool) is fundamental for creating custom shapes and lines. You click to create anchor points, and dragging the handles of these points allows you to create smooth curves. When drawing a line or path, you can set its stroke color and width in the Fill and Stroke panel.
To apply a color from an image to a Bezier curve:
- Select the Bezier curve (or line).
- Choose the Color Picker tool.
Shift + Clickon the desired color in your imported image. This will change the stroke color of your selected curve. Zooming in on the image is recommended for precise color picking.
It's important to remember that in Inkscape, the Color Picker tool doesn't set a global "active color" like in some other programs. Instead, it directly modifies the fill or stroke color of the currently selected object.
Conclusion of Color and Tracing Capabilities
Inkscape offers a comprehensive and flexible environment for all your color manipulation and image tracing needs. From simple color applications to complex gradient shading and precise vectorization of raster images, the tools provided empower designers to achieve professional results. By mastering the color palette, Fill and Stroke panel, Dropper Tool, Trace Bitmap function, and the "Select Same" feature, you can significantly enhance your workflow and the visual quality of your designs. Experimentation with layers, transformations, and guides will further unlock the creative potential within Inkscape.