Adobe Photoshop, a powerhouse in digital imaging, offers a robust suite of tools for manipulating text within your creative projects. Whether you're a student working on a marketing assignment, a meme enthusiast, or a professional designer, understanding Photoshop's text editing features is crucial for effective visual communication. This guide will delve into the various functionalities available, from basic text addition and modification to advanced techniques for removing and replacing text on objects, ensuring your typography is as impactful as the imagery it complements.
The Foundation: Understanding Type Layers and Basic Editing
At its core, Photoshop treats text as a distinct entity through "Type Layers." When you add text using the Type Tool, it doesn't simply become pixels; it's preserved as a layer that remembers its textual nature. This allows for non-destructive editing and a wealth of formatting options.
To begin editing existing text, locate the specific text layer within the Layers panel. If this panel isn't visible, navigate to Window > Layers. Once the text layer is selected, you have several ways to enter edit mode. A common and intuitive method is to select the Move Tool and then double-click directly on the text itself on your canvas. This action essentially "unlocks" the text for modification. Alternatively, you can select the Horizontal Type Tool (represented by a 'T' icon) or the Vertical Type Tool, ensure the correct type layer is active, and then click directly on the text. This will reveal a blinking insertion point, allowing you to select characters, delete them, or input new ones, much like editing a standard document.
Confirming your edits is also straightforward. You can commit changes by selecting a different tool, clicking on another layer in the Layers panel, or by clicking the checkmark icon in the Options bar. For those who prefer keyboard shortcuts, pressing the Esc key typically commits the text changes by default. It's worth noting that Photoshop has evolved its default font size calculation. Instead of a fixed 12pt, it now intelligently bases the default size on your document's resolution and zoom level, which is a significant improvement for usability.
Fine-Tuning Your Typography: Formatting and Appearance
Photoshop provides an extensive array of formatting options to refine the appearance of your text. These controls are primarily found in the Options bar (usually located below the main menu) and the Character panel (Window > Character).
Font, Size, and Color
The fundamental aspects of text appearance are easily adjustable. With your text selected in edit mode, you can choose from a vast library of fonts using the dropdown menu in the Options bar or Character panel. Similarly, you can adjust the font size, either by typing in a specific value or by dragging the size slider.
Color is another critical element. To change the text color, simply select the text you wish to modify, then click on the color swatch in the Character panel. This will open the color picker, allowing you to select any hue to match your design's aesthetic.
Spacing and Alignment
Precise control over spacing enhances readability and visual appeal. The Character panel offers options for adjusting:
- Kerning: The space between specific pairs of characters. This is particularly useful for improving the look of certain letter combinations.
- Tracking: The overall spacing between all characters in a selected block of text.
- Leading: The vertical space between lines of text. Photoshop's "Auto" leading option adjusts this automatically, but manual control is also available.
Alignment options are also readily accessible. You can align your text to the left, center, right, or justify it, ensuring it fits harmoniously within your design. For vertical alignment specifically, you can select the text tool, click the "Align" button, and choose from various vertical alignment icons and options.
Advanced Text Effects and Transformations
Photoshop goes beyond basic formatting, offering dynamic ways to manipulate text.
Warping Text: The "Warp Text" feature allows you to bend and shape your text to follow specific curves or paths, adding a dynamic and artistic flair. This is accessible from a dropdown menu in the Options bar when the Type Tool is active.
Clipping Masks: A powerful technique for creating unique visual effects. By placing an image or pattern on a layer above your text layer, you can create a clipping mask (Layer > Create Clipping Mask or Alt/Option + Click between layers). This will confine the image or pattern to the shape of the text, effectively filling your text with the chosen content.
Transformations: For resizing, rotating, or skewing text, the Free Transform command (Edit > Free Transform or Ctrl/Cmd + T) is invaluable. You can also rotate type by 90-degree increments or flip characters horizontally or vertically.

Incorporating Text into Images: Adding and Replacing
Adding new text to an image or replacing existing text are common tasks in Photoshop, and the approach can vary depending on the complexity of the background.
Adding New Text
To add new text to an image, select the Horizontal Type Tool or Vertical Type Tool from the toolbar. Click on the desired location on your canvas where you want the text to appear. As you type, Photoshop automatically creates a new text layer in the Layers panel. For professional placement, consider using Photoshop's guide layouts (View > New Guide Layout) to adhere to principles like the Rule of Thirds, ensuring your text is positioned harmoniously within the image.
Replacing Text on a Complex Background
When text is part of an image with a complex, busy background, replacing it requires a more nuanced approach, often involving removing the original text first.
- Duplicate the Layer: Always start by duplicating your background layer (
Ctrl/Cmd + J). This preserves the original image. - Select the Text: Use a precise selection tool like the
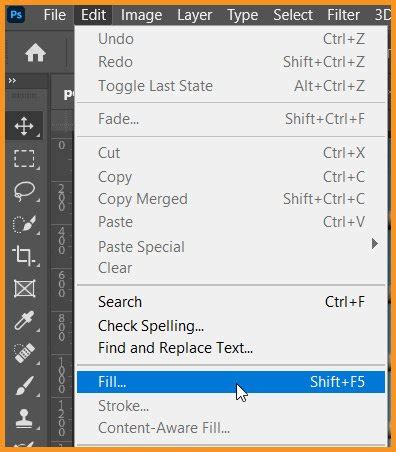
Quick Selection ToolorLasso Toolto carefully select the text you want to remove. - Content-Aware Fill: Navigate to
Edit > Content-Aware Fill. This intelligent feature analyzes the surrounding pixels and attempts to seamlessly fill the selected area, effectively removing the text while blending with the background. You can refine the sampling area and preview the results within the Content-Aware Fill dialog box. - Insert New Text: Once the original text is removed, use the
Type Toolto add your new text. You can choose to match the original font and style or opt for something entirely new. After typing, it's often beneficial toRasterize Type(Right-click the new text layer > Rasterize Type) if you intend to apply certain pixel-based filters or transformations that aren't available on live text layers.
Replacing Text in a Text Box
If the text you need to replace is within a dedicated text box object (common in design templates or layered Photoshop files), the process is simpler.
- Locate the Text Box: Identify the text layer that represents the text box.
- Use Find and Replace Text: Photoshop offers a
Find and Replace Texttool (accessible through theEditmenu). This tool allows you to search for specific text strings within your document and replace them with new text. This is particularly efficient for documents with multiple instances of the same text.
Advanced Text Editing and Management
Photoshop offers further tools and considerations for comprehensive text management.
Text Layer Properties and Blending Options
You can further customize text layers by accessing their Blending Options (Right-click the text layer > Blending Options). This opens a dialog box where you can apply effects like drop shadows, glows, bevels, and more, adding depth and dimension to your typography.
Converting Text to Shapes or Paths
For more advanced manipulation, you can convert text into vector shapes or paths (Layer > Type > Convert to Shape or Convert to Work Path). This transforms the text into editable vector points, allowing for intricate modifications, masks, and filters that are not directly applicable to text layers.
Spell Checking and Language Dictionaries
Photoshop includes a built-in spell checker to help catch errors. You can select specific text or an entire text layer and go to Edit > Check Spelling. If you're working with text in a different language, you can specify the language dictionary in the Character panel (pop-up menu at the bottom of the panel) to ensure accurate checking. The spell checker can flag misspellings and offer corrections.
Anti-Aliasing for Smooth Edges
Anti-aliasing is a crucial feature that smooths the jagged edges of text, making them blend more seamlessly with the background. You can choose from various anti-aliasing options (None, Sharp, Crisp, Strong, Smooth) in the Options bar, selecting the best fit for print or web design. It's important to note that anti-aliasing can sometimes increase the color count and file size of an image.
Working with Text Across Devices
The advent of Adobe Creative Cloud has made working with Photoshop on various devices more feasible than ever. With Photoshop available on platforms like the iPad, designers can maintain a seamless workflow regardless of their location. Creative Cloud allows for easy access to multiple Adobe products and services, facilitating integration with tools like Illustrator or InDesign and keeping assets synchronized across devices.
In essence, Photoshop's text editing capabilities are designed to provide creators with extensive control. From simple corrections to complex visual integrations, the tools available empower you to communicate your message effectively and artistically through typography. Consistent practice with these features will undoubtedly lead to greater proficiency and unlock even more creative possibilities in your design projects.