Photoshop, a cornerstone of digital design, offers a robust feature known as Artboards, which fundamentally transforms how designers approach multi-page projects and varied design outputs. While the default workflow in Photoshop revolves around a single canvas, the introduction of Artboards allows for the creation and management of multiple distinct canvases within a single document. This capability is particularly invaluable for projects such as business cards, flyers, brochures, or even for generating multiple iterations of a single design concept. The ability to add layers to each artboard and work on them individually without affecting elements on other artboards streamlines complex workflows and enhances organizational efficiency.

Understanding the Core Concept: Artboards as Containers
At its heart, an artboard in Photoshop functions as a specialized container, much like a group, but with the distinct purpose of acting as an individual canvas. Think of them as distinct, self-contained workspaces within the larger Photoshop document. This differs from the traditional canvas, where you are typically limited to a single design area. Artboards enable you to work on various documents or different versions of the same design simultaneously, all within the same PSD file. This is especially beneficial when you need to create multiple iterations of a design, for example, exploring different layouts for a webpage or various color schemes for a logo. Each artboard can hold its own set of layers and layer groups, allowing for a highly organized and modular design process.
Creating Artboards: From New Document to Existing Files
There are several pathways to creating artboards in Photoshop, catering to different needs and workflows.
1. Starting with a New Document
The most straightforward method to begin working with artboards is to create a new document with artboards enabled from the outset.
- Initiate a New Document: Open Photoshop and navigate to
File > Newfrom the home screen or menu bar. - Enable Artboards: In the "New File" panel that appears, you'll have the option to select a template or input custom width and height dimensions for your initial artboard. Crucially, locate the "Document Type" or a similar setting and select "Artboard" from the available options. Alternatively, you might see a checkbox specifically labeled "Artboards" which you need to check. This action ensures that the document you create will be structured with an artboard as its foundation.
- Document Setup: Once you've specified your desired dimensions and confirmed the artboard option, click "Create." Your document will then open in the workspace, pre-populated with a single artboard.
2. Converting an Open Document to Use Artboards
For those who have an existing Photoshop document without artboards, there's a method to integrate them. This is particularly useful when you receive a PSD file from a designer who hasn't utilized artboards, as is a common scenario for developers working with designer-provided files.
- Layer Grouping: A key strategy to create an artboard that precisely matches the dimensions of your existing canvas involves a clever workaround. First, ensure your layers are well-organized. If you have multiple layer groups, you might want to consolidate them. A method to achieve this is by selecting all the layer groups you wish to include in your artboard and then, from the Layers panel's fly-out menu, choosing "New Group from Layers." This consolidates your existing elements into a single group.
- Creating a Placeholder Layer: To define the boundaries of your new artboard, you'll create a temporary layer. Navigate to the top of your Layers panel and create a new layer. Fill this new layer with white (or any solid color). This layer will serve as a visual anchor for defining the artboard's size and position. It's imperative that this white fill layer is placed at the very top of your Layers panel and outside of any existing groups to avoid complicating your layer structure.
- Artboard from Layer: With the white fill layer selected, you can now create an artboard based on its dimensions. From the Layers panel fly-out menu, select "Artboard from Layers." This action will generate a new artboard that perfectly encompasses the area of your white fill layer.
- Refining the Artboard: Once the artboard is created, you can then delete the temporary white fill layer. The artboard should now precisely match the size and position of your original canvas.
- Manual Size Adjustment (if needed): If the "Artboard from Layers" method doesn't yield the exact dimensions you require, or if you need to precisely match a specific canvas size, you can manually adjust the artboard. With the Artboard Tool selected (more on this below), you can enter the exact width and height values in the Options bar at the top of the screen. If you previously noted down the original canvas dimensions, you can enter those here. Setting the X and Y values to "0" will align the artboard to the top-left corner of the document. When the artboard icon itself is selected in the Layers panel, its width and height will be displayed in the top settings bar, allowing for precise numerical input.
3. Using the Artboard Tool for Customization
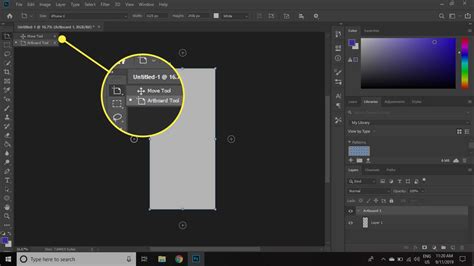
The dedicated Artboard Tool offers the most direct control over creating and manipulating artboards.
- Activate the Artboard Tool: Select the Artboard Tool (often represented by an icon resembling a rectangle with lines, or accessible by pressing
Von your keyboard and then holdingShiftif the Move Tool is active). - Add New Artboard: With the Artboard Tool active, you'll notice an "Add New Artboard" icon in the Options bar at the top of the screen. Clicking this icon will present you with a list of preset artboard sizes, tailored for various devices like iPhones, iPads, and web resolutions. You can select a preset or choose to enter custom dimensions.
- Click and Draw: After choosing a size, you can click directly onto your canvas to place the new artboard. You can also click and drag to define a custom size as you draw it.
- Properties Panel for Fine-Tuning: For more precise adjustments to an artboard's size, position, or even its background color, the Properties panel is your go-to. With an artboard selected (either by clicking its name in the Layers panel or its bounding box in the canvas), the Properties panel will display its attributes. Here, you can input exact width and height values, adjust its X and Y coordinates, and even assign a background color. It's important to note that any background color you set for an artboard will be exported as visualized on the canvas, meaning if you see a background color, it will be included in your export.
Working with Artboards: Editing, Duplicating, and Organizing
Once your artboards are in place, Photoshop provides intuitive ways to manage them.
Editing Artboards
The Artboard Tool is central to editing existing artboards. You can select an artboard by clicking on its name in the Layers panel or by clicking on its bounding box on the canvas. Once selected, you can resize it using the handles that appear or by entering precise dimensions in the Options bar or Properties panel.
Adding More Artboards
To expand your multi-page design, you can add new artboards in several ways:
- Plus Icons: When you hover over an existing artboard in the Layers panel or on the canvas, you'll see small plus (+) icons appear. Clicking these icons will create a new artboard adjacent to the existing one, often inheriting its dimensions by default.
- Artboard Tool: As mentioned earlier, using the Artboard Tool and clicking the "Add New Artboard" icon allows you to create artboards based on presets or custom dimensions.
Duplicating Artboards
Creating identical or similar artboards is a common requirement.
- Layers Panel Method: Select the artboard you wish to duplicate in the Layers panel. You can then duplicate it by clicking the duplicate artboard icon (often found at the bottom of the Layers panel) or by using the keyboard shortcut
Alt(Windows) orOption(Mac) and dragging the artboard. - Artboard Tool Method: With the Artboard Tool selected, you can click on an existing artboard and then choose a "Duplicate Artboard" option from the Artboard Options bar.
Rearranging Artboards
The order of your artboards can be crucial for workflow and export.
- Drag and Drop: Using the Artboard Tool, simply click and hold on the artboard you wish to move and drag it to its desired new position within the document. The visual layout on your canvas will update accordingly.
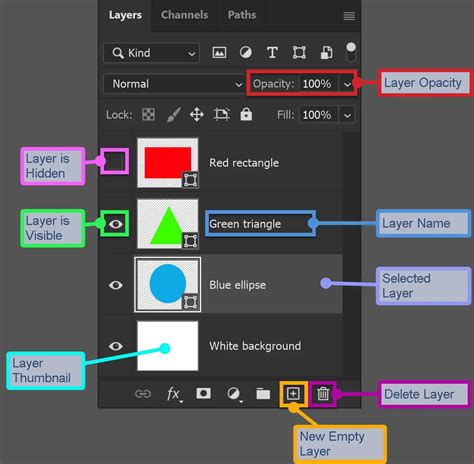
Layer Management within Artboards
Each artboard can contain its own set of layers and layer groups.
- Layer Groups: To maintain order within complex artboards, utilize Layer Groups. You can create a new group from selected layers by right-clicking in the Layers panel and choosing "Group Layers."
- Closing/Opening Groups: For better visibility, you can collapse or expand Layer Groups within an artboard by clicking the disclosure triangle next to the group's name. Right-clicking this triangle offers options to "Close/Open this Group" or "Close/Open all Other Groups," which can be very handy when dealing with many layers.
Exporting Artboards: Optimizing for Various Outputs
The ability to export individual artboards or all of them at once is a core strength of this feature.
- Export As: Photoshop's "Export As" dialog (
File > Export > Export As) is the primary tool for exporting artboards. Here, you can select which artboards to export, choose from various file formats (like PNG, JPG, GIF, SVG), and define specific settings for each, including dimensions, resolution, and scaling. This is essential for preparing assets for different devices and platforms. - Save for Web (Legacy): For advanced optimization, especially for web use, the "Save for Web (Legacy)" option (
File > Export > Save for Web (Legacy)) offers granular control over file formats, compression levels, and previewing different optimization settings. - Exporting for Multiple Devices: When designing for a range of devices, it's recommended to create multiple artboards within a single document, each tailored to a specific screen size or resolution. You can then export each artboard with its appropriate settings. Creating a table to manage these export settings can be incredibly helpful.
- Including Overlapping Areas: The "Export As" dialog often includes an option to include areas that might overlap between artboards, which can be useful in certain design scenarios.
Advanced Tips and Performance Enhancements
To further enhance your artboard workflow, consider these advanced techniques.
Smart Objects for Reusability
If design elements are used across multiple artboards, convert them to Smart Objects. This allows you to scale and edit these elements on any artboard without degrading their quality, ensuring consistency and simplifying updates.
Leveraging Graphics Processor
For smoother performance, especially with complex documents containing numerous artboards and layers, enable Photoshop's advanced GPU drawing mode. Navigate to Preferences > Performance, and under "Graphics Processor Settings," ensure "Use Graphics Processor" is checked and select "Advanced" from the "Drawing Mode" dropdown. Note that this feature's compatibility may depend on your graphics card.
Importing Vector Assets
When you need to incorporate vector graphics from Adobe Illustrator into your Photoshop artboards, simply copy the vector object from Illustrator and paste it into your Photoshop document. Choose "Smart Object" as the paste option to maintain scalability and editability.
How to Use Artboards in Photoshop
By understanding and implementing these strategies, designers can transform their Photoshop workflow, moving from single-canvas limitations to the powerful, organized, and efficient world of artboard-based design. This not only streamlines the creation process but also significantly improves the management and export of assets for a wide array of digital applications.