Achieving accurate white balance in video footage is a cornerstone of professional color grading. While much of the work in DaVinci Resolve leans towards creative color choices, ensuring your white balance is correctly set is a foundational step that minimizes effort and maximizes impact. This tutorial delves into various techniques for nailing white balance, from quick fixes to more nuanced adjustments, ensuring your footage looks its best.
The Importance of White Balance in Post-Production
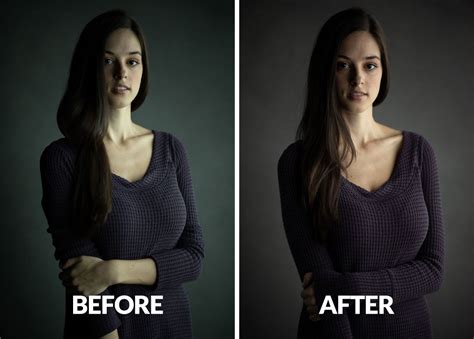
Color grading often involves creative choices, but a significant part of this process is nailing the white balance. When footage is captured with an incorrect white balance, it can result in noticeable color casts, making scenes appear too warm (yellow/orange), too cool (blue), or tinged with green or magenta. Simply put, white balance restores things in the image that should be white, gray, or black back to their true neutral tones. This is crucial because a camera sensor, unlike the human eye, cannot adapt to different lighting conditions automatically. If the camera's color setting doesn't match the lighting's color temperature, undesirable color shifts occur.
While it's always ideal to set the white balance correctly at the point of capture, this isn't always feasible, especially in documentary, event, or fast-paced shooting scenarios. As Shawn, a cinematographer with a background in photojournalism and documentary work, notes, "As much as I’m a stickler for detail when it comes to getting things right in-camera, even I have to concede that sometimes it’s better to get an imperfect shot than no shot at all." He elaborates, "there are occasions whereby I don’t have the luxury of shooting a gray card, or even setting the white balance on the camera. This happens mostly on documentary and event shoots; you move from one room to another very quickly, or something totally unexpected appears right before you, and if you don’t smash that record button, you’re left with no footage and some piss-poor excuses as to why you didn’t shoot it because 'the settings weren’t perfect'."
This often leaves the task of correcting white balance to the colorist, or the filmmaker themselves in post-production. "What really frustrates me is that often you have to fix these mistakes as part of your allocated grading time, leaving even less time for creative decision making and style crafting," Shawn states. This frustration led to a search for efficient ways of white balancing in DaVinci Resolve.
Preparing Your Footage for White Balance Correction
Before diving into any white balance adjustments, it's paramount to ensure you're working with the original, untouched footage. This means that no color adjustments should have been made prior to the white balance correction. Furthermore, it is strongly recommended to perform white balance adjustments on a new node. This allows for a non-destructive workflow, where the white balance correction can be easily isolated, modified, or removed without affecting other grading decisions. This practice is particularly important when dealing with compressed footage, even formats like ProRes, where early correction in the node tree, before creative looks are applied, is essential for optimal results.
Fundamental White Balance Tools in DaVinci Resolve
DaVinci Resolve offers a variety of tools to address white balance issues, catering to different needs and levels of complexity.
The White Balance Picker (Eyedropper Tool)
The most straightforward and often the first tool people reach for is the white balance picker, also known as the eyedropper tool. The concept is simple: click the eyedropper and then move it over any area in the image that should be neutral - meaning it should be pure white, black, or gray. The tool then analyzes the color of that selected area and attempts to neutralize it, thereby correcting the overall color cast of the image.
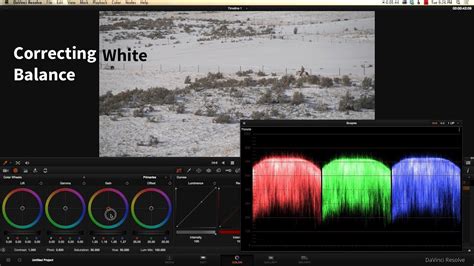
However, as Donovan Anderson points out, "placing the eyedropper on a truly 'neutral' area is not always easy. Sometimes there is no white object in the frame, and using the white balance eyedropper can still cause some color shifts." In such cases, it's crucial to check the result using the RGB Parade in the Scopes panel. This visual tool displays the red, green, and blue channels separately, allowing you to see if the channels are balanced. Ideally, when white balance is correct, the three lines in the RGB Parade should be at the same level in neutral areas.
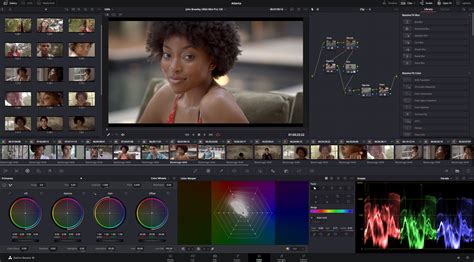
Temperature and Tint Controls (Primary Color Wheels)
A more traditional and commonly used method involves the temperature and tint sliders, often found within the Primary Color Wheels panel. These controls allow for manual adjustments to the overall color cast:
- Temperature: This slider adjusts the balance between blue and yellow. Sliding towards yellow makes the image warmer, while sliding towards blue makes it cooler. This directly addresses color casts caused by different light sources, such as tungsten bulbs (warm) or daylight (cooler).
- Tint: This slider adjusts the balance between green and magenta. Sliding towards green corrects for casts common with fluorescent lighting, while sliding towards magenta can correct for other specific lighting conditions.
When using these controls, it's important to observe the image for any color casts and make incremental adjustments. Again, the RGB Parade scope is invaluable here, helping you to visually balance the three color channels.
Color temperature & White balance: everything you need to know
Advanced White Balance Techniques in DaVinci Resolve
While the basic tools are effective, sometimes more nuanced adjustments are required, especially when dealing with specific elements within the frame or challenging footage.
Using the Primary Color Wheels: Black-Point and White-Point Pickers
Beyond the temperature and tint, the Primary Color Wheels offer black-point and white-point pickers. These function similarly to the white balance eyedropper but are specifically designed to neutralize the darkest (black point) or brightest (white point) areas of the image.
- Black-Point Picker: Select a point that should be pure black.
- White-Point Picker: Select a point that should be pure white.
Like the general white balance eyedropper, the success of these pickers depends on identifying truly neutral areas in the image. Using these can be very effective, but care must be taken as they can also affect contrast if not used judiciously.
The Primary Color Wheels also allow for direct manipulation of color by dragging the dot on the color wheel or by adjusting the numeric values below. However, as noted, "To be honest, if you only use the mouse to move the wheels or type in numbers, it's hard to get a clear feel for the grade. Also, when you drag curves, wheels, or other controls with the mouse, values can jump or drift when you release the mouse." This highlights the benefit of using dedicated hardware controllers.
The Color Warper Tool for Specific Color Adjustments
For more intricate corrections, the Color Warper tool can be a powerful ally. This tool allows for precise manipulation of specific color ranges. In one instance, a red/orange fix was achieved by utilizing the Color Warper. By identifying the line on the edge of green and orange tones and shifting it ever so slightly towards orange/red, a subtle but effective correction was made. This method is more involved than simply sliding the temperature but can yield superior results when dealing with specific color issues.
Addressing Specific Elements: Serial Nodes and Qualifiers
When a general white balance correction doesn't fully resolve an issue, or if a specific object in the frame is causing a problem, a more targeted approach is needed. Donovan Anderson's example of a wedding shoot illustrates this perfectly. After an initial correction, he noticed an issue with the white dress. To address this, he created a serial node specifically for the white dress.
Within this node, he employed the color picker in conjunction with qualifiers. The goal was to select the brightest part of the dress, which should ideally be white. By using the qualifier's eyedropper on the dress and then adjusting the "range" of the qualifier, he ensured that only the white areas of the dress (and other white elements) were selected. This process requires careful adjustment to avoid selecting areas that are not intended to be part of the mask.
Once the white areas were isolated with the mask, the next step was to address any unwanted color shifts within those selected areas. By finding the saturation adjustment and decreasing it, any stray tones or shifts within the white dress faded away, resulting in a cleaner, more accurate white.
Color temperature & White balance: everything you need to know
Leveraging Hardware for Precision
While DaVinci Resolve's software tools are powerful, precision can sometimes be challenging with a mouse and keyboard alone. For those who frequently color grade, investing in dedicated hardware can significantly improve the workflow and accuracy.
"If you often color grade video in DaVinci Resolve, you may consider buying an editing keyboard or controller," the article suggests. "Blackmagic Design's Speed Editor is a good choice. TourBox is not just a simple hotkey mapper." These controllers offer tactile feedback and dedicated controls that can make fine adjustments much easier and more intuitive.
Furthermore, the concept of "HoverAdjust" is mentioned, which is a feature where adjustments are made dynamically as the mouse hovers over a control. This can be particularly useful for fine-tuning color balance.
The Global Wheel: A Versatile Tool for Color Balance
Among the various controls, the Global wheel is highlighted as a particularly useful tool for correcting color balance. It offers a singular control for overall color adjustments, making it more streamlined than manipulating multiple wheels or sliders.
The Global wheel has two control modes: using the wheel itself or entering numeric values. For steady and responsive control, using the wheel is recommended. The Global wheel is designed around display gamma, meaning adjustments made with it mimic how a camera captures light, similar to changing camera color temperature or filters.
It's important to distinguish the Global wheel from the Primaries Offset wheel. The Global wheel behaves more naturally within the working color space or encoding, often protecting highlights and maintaining better color relationships. Adjusting the dot on the wheel allows for changes to the red, green, and blue waveforms in the Parade scope, providing a visual representation of the correction being made.

Considerations for Compressed Footage
Working with compressed footage, even professional formats like ProRes, presents unique challenges. While 10-bit footage with a decent bit rate offers more latitude for correction in post-production compared to lower bit-depth formats, it's still best practice to aim for accurate white balance at the point of capture. However, if this isn't possible, understanding that these tools can help salvage footage with less-than-ideal white balance is reassuring. Applying these corrections early in the node tree, before creative grading, ensures that the foundational color accuracy is established before stylistic choices are made.
Conclusion: A Multi-Faceted Approach to White Balance
Correcting white balance in DaVinci Resolve is not a one-size-fits-all process. It often requires a combination of tools and techniques, depending on the source footage and the specific issues encountered. From the simple eyedropper to the nuanced controls of the Color Warper and the targeted masking capabilities, DaVinci Resolve provides a robust toolkit. By understanding these methods and applying them strategically, colorists and editors can ensure their footage is neutral, accurate, and ready for the creative stages of grading, ultimately leading to more polished and professional results.