The allure of glitter, with its captivating shimmer and ability to transform the ordinary into the extraordinary, can now be recreated digitally. Photoshop offers a versatile toolkit for achieving this dazzling effect, allowing artists and designers to imbue their images with a touch of magic. This tutorial delves into the intricacies of creating a high-shine glitter texture, exploring various techniques to achieve different metallic finishes and applying them creatively to text, shapes, or even specific elements within a photograph.
Laying the Foundation: Creating a Base Glitter Texture
The journey to a perfect glitter effect begins with establishing a robust base texture. This foundational step allows for customization and the creation of a wide spectrum of metallic appearances, from classic gold and silver to trendy rose gold and vibrant blues or greens.
To initiate the process, open Photoshop and navigate to "File" > "New." A canvas size of 1024 by 1024 pixels is a good starting point for creating a reusable texture. Next, set your foreground color to a neutral gray, such as #b4b4b4, or a similar shade. This serves as the canvas for our texture.
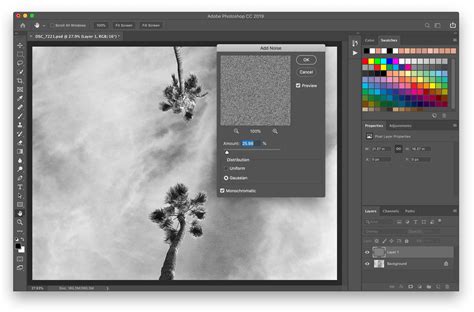
The introduction of subtle noise is crucial for mimicking the granular nature of glitter. Access this by going to "Filter" > "Noise" > "Add Noise." A moderate level of noise is recommended to create a gritty texture without appearing overly pixelated. The slider bar below allows for precise adjustment of the noise level, ensuring a natural look.
Following the noise application, a "Gradient Overlay" is applied. This step is where the initial color of the glitter begins to form. For a classic gold effect, select a medium gold color for the gradient. This foundational step is critical; it is the base upon which further refinements will build.
To enhance the depth and dimensionality of the texture, duplicate the current layer twice. This can be achieved by pressing "Command" or "Control" + "J" twice. You should now have three layers, which can be helpfully labeled as "Layer 1," "Layer 2," and "Layer 3" for clarity.
The next stage involves applying motion blur to one of these layers to introduce streaks and elongate the "glitter" particles. Navigate to "Layer 2" and select "Filter" > "Blur" > "Motion Blur." The radius for this blur should be set to 1 pixel. This subtle motion blur begins to break up the uniform noise and introduce a sense of directionality, mimicking the way light reflects off individual glitter particles.
Now, focus on "Layer 1" and apply a different blur effect. Go to "Filter" > "Blur" > "Gaussian Blur." The radius for the Gaussian Blur should be set to 1 pixel. This softer blur helps to create a less defined, more diffused sparkle compared to the motion blur.
The interplay between these different blur effects and the initial noise and gradient overlay is what begins to sculpt the convincing glitter texture. By strategically applying these filters, we are essentially simulating the way light would catch and reflect off countless tiny, irregular surfaces.
Refining the Sparkle: Adjusting and Enhancing Glitter Layers
With the base texture established, the next critical phase involves refining its appearance and preparing it for application. This includes adjusting the visual properties of the glitter layers and preparing them for integration into your main project.
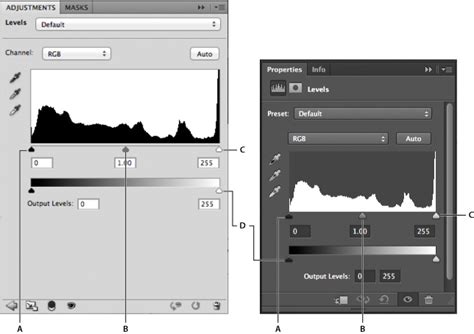
A key technique for controlling the intensity and appearance of the glitter is by utilizing "Levels." Since the glitter textures are Smart Objects, you can add a Levels Adjustment Smart Filter to the layer. To do this, press "Ctrl" or "CMD" + "L" on the selected glitter layer. Within the Levels dialog box, moving the highlight slider to the left can significantly increase the contrast and make the glitter appear brighter and more pronounced. This adjustment is crucial for achieving that high-shine effect.
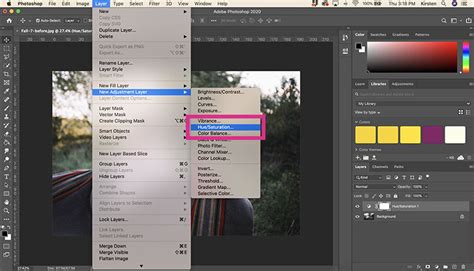
The ability to customize the color of the glitter is a powerful aspect of this technique. The base texture can be transformed into virtually any metallic hue. For instance, to create a rose gold glitter, you would adjust the "Hue" and "Saturation" of the glitter layer. Accessing the "Hue/Saturation" adjustment (often found within the "Image" > "Adjustments" menu or as an adjustment layer) allows you to manipulate the color. Moving the "Hue" slider will shift the color across the spectrum, while the "Saturation" slider controls the intensity of that color. This allows you to precisely match the glitter to the colors within your image or create a desired aesthetic.
The flexibility of this method extends to creating other metallic effects as well. By altering the base color and the subsequent adjustments, you can generate silver, rose gold, or any other metallic glitter. This adaptability makes the base texture a versatile asset for various design projects.
Applying the Glitter: Techniques for Integration
Once you have created and refined your glitter textures, the next step is to effectively apply them to your desired elements within Photoshop. This involves techniques for selection, masking, and layering to ensure a seamless and impactful integration.
The process begins by opening the image to which you want to apply the glitter effect. Then, import your created glitter texture. This is done by going to "File" > "Place Linked." This action will add the texture as a new layer above your background image in the "Layer Stack." It is advisable to initially hide all other textures if you have multiple prepared.
The core principle for applying the glitter is to target specific objects or areas within your photograph. The "Lasso Tool" is an excellent choice for making a rough selection around the areas you wish to make sparkle. For example, if you are working on clothing, you might start by selecting the white areas of a shirt. It's important to remember that precision in this initial selection is not paramount, as the selection can be refined later using a Layer Mask.
After making your selection, convert it into a Layer Mask. This is a non-destructive way to isolate the glitter effect. Once the mask is created, you can easily clean up the edges and ensure the glitter is confined precisely to the desired areas. This meticulous masking process is key to achieving a professional and believable result.
The concept of "matching up the color of the glitter layer to the color of something in a photo" is a powerful artistic guideline. This ensures that the glitter feels integrated with the overall image rather than appearing as an arbitrary addition. Take time to identify other areas or details within the photograph where this newly matched glitter texture would enhance the visual narrative.
However, there may be instances where a prepared texture doesn't naturally harmonize with any specific colors in the photo. In such cases, the "Hue/Saturation" adjustment becomes indispensable. By adding this adjustment to the glitter texture layer, you can modify its hue and saturation to better complement the surrounding elements. This allows for creative freedom, even when the initial textures don't perfectly align.
The tutorial also mentions the availability of pre-made "Glitter Sparkle Brushes." These brushes offer a different approach to applying glitter. One brush might provide a more scattered effect, suitable for broader coverage, while others might offer more concentrated sparkle. To use these brushes, they first need to be loaded into your "Brushes" panel.
How to Install Brushes in Photoshop + FREE Brush Download
The goal is to create an "eye-catching style," and sometimes, this involves a degree of artistic exaggeration. Don't be afraid to push the boundaries of the effect slightly to make it truly stand out.
Advanced Techniques and Creative Applications
Beyond the fundamental application, Photoshop's capabilities allow for sophisticated layering and customization of glitter effects, opening doors to a multitude of creative possibilities.
One advanced technique involves utilizing multiple glitter textures on a single object. By creating separate selections and masks for different parts of an object, you can apply distinct glitter types and colors, adding layers of complexity and visual interest. For instance, one area of fabric might have a fine gold glitter, while an adjacent section could feature larger, more iridescent particles.
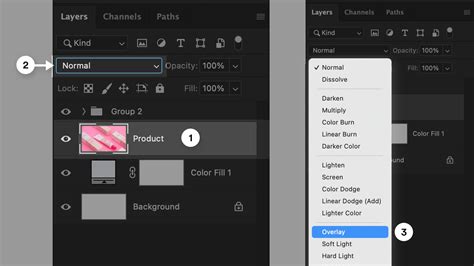
The use of "Blend Modes" in Photoshop can also dramatically alter how the glitter interacts with the underlying image. Experimenting with modes like "Screen," "Overlay," or "Soft Light" can create different levels of integration and sparkle intensity. "Screen" mode, for example, is often effective for making bright, luminous effects like glitter pop.
Beyond simply applying glitter to existing elements, consider using these textures to create entirely new assets. The base glitter texture, with its adjustable properties, can serve as a foundation for creating custom metallic patterns. These patterns can then be saved and reused across multiple projects, streamlining the design workflow.
For those working with text or shapes, the glitter effect can be applied as a fill. To do this, you'll typically need to "rasterize" the text or shape layer. This converts the editable text or vector shape into pixels, allowing the glitter texture to be applied directly. Once rasterized, you can use a "Clipping Mask" to confine the glitter texture to the boundaries of your text or shape. This is a crucial step if you intend to use the glitter effect as a fill for typography or custom shapes.
If the intention is to use the glitter effect as an image border, the clipping mask step can be omitted. The glitter layer can simply be positioned around the edges of the image.
When resizing images or elements with applied glitter effects, it's important to remember that scaling can sometimes impact the perceived density and size of the glitter particles. Using the "V" key to select the "Selection Tool" (Move Tool) allows for resizing. It's often beneficial to scale the glitter layer along with the object it's applied to, maintaining a consistent visual relationship.
The process of saving your final artwork is also a consideration. When you click "File" > "Save," you'll be prompted to select a "Format" such as JPEG or PNG. The choice of file type can influence the quality and transparency of your image, so select the option that best suits your needs.
The flexibility of this glitter effect technique is further demonstrated by its ability to be applied to various image types. Whether you are enhancing portraits, product photography, or graphic designs, the principles remain the same: create a compelling glitter texture, isolate it with masks, and integrate it thoughtfully into your composition.
Finally, remember that "Tutorial projects, like the ones we share here on the blog, are meant to help you grasp the use of the most powerful aspects of design software one step at a time." This iterative approach to learning and applying these techniques will undoubtedly build your design assets and confidence.