Adobe Photoshop, since its inception in 1988, has been a cornerstone of digital image manipulation, constantly evolving to meet the demands of creative professionals. While the program offers an expansive array of tools that can seemingly alter images beyond recognition, a photographer doesn't need to master every single facet to achieve professional-grade results. Many photographers, like the author, find that a core set of features, when skillfully applied, can transform images to a high standard. This article delves into some of these indispensable Photoshop features, providing insights for both novice and experienced users aiming to polish their photographs.
The Foundation of Non-Destructive Editing: Layers and Adjustment Layers
At the heart of Photoshop's power lies the concept of layers. Layers are fundamental to understanding how the software operates, allowing users to make changes to an image without permanently altering the underlying pixels. This non-destructive approach provides immense flexibility, enabling experimentation with different effects and adjustments without fear of irreversible mistakes. Any edits made directly to a background layer, however, are permanent. By working with layers, one can isolate elements, apply effects, and easily compare different versions of an image.
Building upon this, Adjustment Layers are another essential tool for non-destructive editing. These specialized layers allow for modifications to an image's color, brightness, contrast, and other properties without impacting the original pixel data. This is an excellent method for experimenting with various looks for an image, as adjustment layers can be toggled on and off, facilitating easy comparison between before and after states.
Master Layers - Photoshop for Beginners | Lesson 2
Precision and Control: The Pen Tool and Selection Techniques
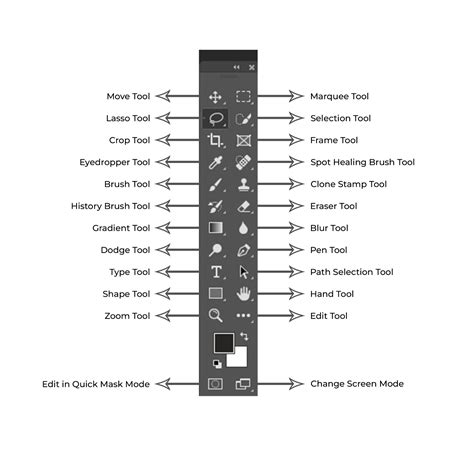
When complex selections or "cut-outs" from busy backgrounds are required, the Pen Tool proves invaluable. Initially perceived by some as a tool solely for graphic designers, its utility for photographers is immense. Located in the toolbar, the Pen Tool operates by creating a series of connected points around an intended object. By dragging these points, users can generate intricate curves, enabling the creation of virtually any shape. Once the path is drawn, a simple right-click can convert it into a selection, perfect for isolating objects or creating image masks for adjustment layers.
Beyond the Pen Tool, a variety of other selection methods exist, including the Marquee Tools and Lasso Tools. Mastering these selection techniques is a crucial skill for any photographer undertaking detailed photo editing, compositing, or advanced retouching. The ability to precisely define areas within an image is foundational to manipulating specific elements without affecting the rest of the photograph.
Restoring Detail: Shadow/Highlight and Healing Tools
Photographs, even those that are generally well-exposed, can sometimes lack detail in shadow or highlight areas. The Shadow/Highlight command is a powerful tool for addressing these issues. With the preview option enabled, users can see adjustments in real-time, allowing for precise control over the recovery of detail in darker and lighter regions of the image. This command operates intelligently, identifying shadow and highlight areas automatically, negating the need for manual selections for many users. While the basic sliders are often sufficient, a "Show More Options" button reveals further controls for advanced fine-tuning.
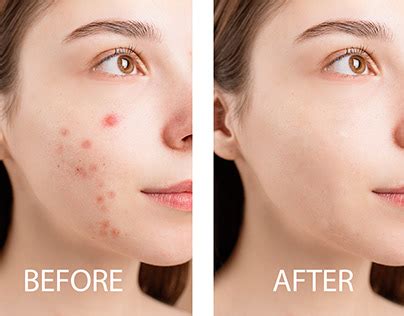
For more localized corrections, Photoshop offers a suite of healing tools. The Spot Healing Brush Tool, found near the Brush icon, is ideal for removing blemishes and imperfections. Applied with a brush, it samples surrounding pixels to seamlessly blend away unwanted elements. This tool can be used for small spots or even drawn over larger areas for more extensive retouching.
The Patch Tool, located with the Healing Brush, offers a slightly different approach. It allows users to draw a selection around an area to be repaired and then drag that selection to a clean source area. Photoshop then uses the sampled pixels to repair the selected region. This visual preview is particularly helpful for aligning repairs with patterns, such as on tiled walls, or for maintaining horizons in landscape photography. Many photographers underestimate the Patch Tool's power, often opting for newer, AI-driven tools, but its precise control over the source of the repair makes it invaluable for specific tasks.
Sculpting Tonality: Levels and Curves
The Levels and Curves tools are instrumental in controlling an image's tonality, brightness, and contrast. While both address exposure and contrast, they offer different levels of control. The Levels tool adjusts the overall lightness or darkness of an image by manipulating input and output sliders. Curves, on the other hand, provide more granular control.
The Curves Tool presents an image's tonality as a diagonal line on a graph. By adjusting the shape of this line, users can precisely modify the highlights, midtones, and shadows. A common technique is creating an "S-curve," where the line is bent to subtly increase contrast. Furthermore, the Curves tool can be applied to individual color channels (Red, Green, Blue), offering immense power for color grading and achieving specific aesthetic looks. For instance, adjusting only the blue channel can impart a distinct stylistic tone to an image. While initially intimidating, mastering Curves can significantly enhance an image's depth and mood.
Essential Workflow Enhancements: Crop Tool and History Panel
The Crop Tool is a fundamental yet highly effective feature for improving image composition. It allows photographers to remove unwanted elements, alter the aspect ratio, and straighten crooked horizons, thereby giving images more impact. The Photoshop interface, while evolving, retains a familiar layout, with the Options bar offering crucial controls for specific tools, such as refining selections or adjusting brush opacity.
The History Panel serves as a comprehensive log of all edits made to an image. It automatically records each step, allowing users to easily undo any changes or revert to an earlier point in the editing process. This is particularly useful for experimentation and for recovering from accidental mistakes, providing a safety net for complex editing workflows.
The Rise of AI: Generative Fill
Recent advancements in Photoshop have introduced AI-powered features, most notably Generative Fill. This technology, utilizing text-to-image prompts, simplifies complex editing tasks and is transforming image manipulation for photographers and content creators alike. While AI tools can significantly assist in post-production, it remains crucial to develop strong in-camera capture skills. However, even the most brilliant shots can be further enhanced with Photoshop's evolving capabilities.
Integrating Software: Lightroom and Photoshop Workflow
For many photographers, Adobe Lightroom serves as the primary editing hub. It excels at organizing files, applying batch edits, and establishing an overall look, especially for RAW files. Lightroom's intuitive interface and powerful batch editing capabilities make it efficient for processing large volumes of images, such as wedding galleries or client shoots.
When an image requires more intricate attention-such as removing background distractions, advanced skin retouching, blending exposures, or creating complex composites-photographers seamlessly transition to Adobe Photoshop. The synergy between Lightroom and Photoshop, often accessed through the Adobe Creative Cloud Photography Plan, allows for a comprehensive workflow. An image can be edited in Lightroom, then right-clicked to open directly in Photoshop for detailed work. Upon saving in Photoshop, the updated version is automatically reflected back in Lightroom, ensuring a smooth and integrated process.
Exploring Alternatives and Complementary Tools
While Adobe Lightroom and Photoshop form the backbone of many professional workflows, other software options cater to specific needs. Capture One is favored by high-end commercial and studio photographers for its exceptional RAW processing, color grading, and tethered shooting capabilities, though it presents a steeper learning curve.
Luminar Neo offers creative boundaries pushing with AI-powered tools like sky replacement and portrait enhancement, ideal for quick, shareable results, particularly for social media content. For those seeking Photoshop-like functionality without a subscription, Affinity Photo provides a robust, one-time purchase alternative with layers, masks, and RAW editing.
DxO PhotoLab is renowned for its superior RAW image quality, particularly in lens corrections, sharpening, and noise reduction, with its DeepPRIME denoising tool being highly regarded. ON1 Photo RAW aims to be an all-in-one solution, combining features of Lightroom and Photoshop. For budget-conscious users or those preferring open-source software, Darktable offers a free, powerful alternative to Lightroom, though with a steeper learning curve.
Ultimately, the choice of software depends on individual needs and workflow. For beginners, Lightroom is often recommended for its user-friendliness and powerful tools. For those requiring pixel-level control and advanced compositing, Photoshop remains the industry standard. When used in conjunction, these two programs offer a complete editing solution, from initial organization and global adjustments to highly detailed retouching and creative manipulation. Exploring presets, whether for Lightroom or Photoshop, can further accelerate the editing process and help establish a consistent, professional aesthetic.