Creating tables within Adobe Photoshop, while not a primary function like in dedicated layout or spreadsheet software, is an achievable task through creative application of its robust tools. This guide will walk you through the process, from basic line drawing to advanced techniques, enabling you to construct and manipulate tables for various design needs.
The Fundamental Structure of a Table
At its core, a table is an organized arrangement of data into rows and columns, forming a grid of cells. Each cell acts as a container, capable of holding text, inline graphics, or even other nested tables. This structured approach is fundamental to presenting information clearly and efficiently, whether you're designing a simple infographic or a complex layout. The concept of rows and columns, and the cells they define, is universal across various software, but the methods to achieve them differ significantly.
Building Blocks: Photoshop's Grid and Line Tools
Unlike applications such as Microsoft Word or Excel, Photoshop does not offer a one-click "Insert Table" command. Instead, the creation of tables relies on leveraging Photoshop's visual aids and drawing tools. The primary method involves using the Grid feature in conjunction with line-drawing techniques.
To begin, open Photoshop and create a new document. Navigate to "File" > "New" and select your desired document size and background color. Once your canvas is ready, access the "View" menu, hover over "Show," and select "Grid." This action overlays a customizable grid onto your document, providing essential visual guides for alignment.
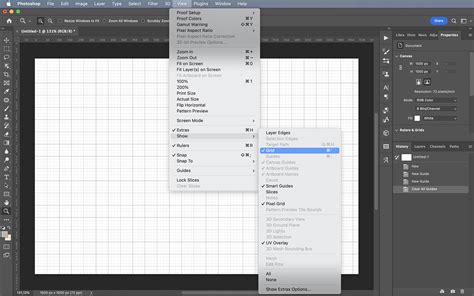
The grid's spacing can be adjusted to suit your needs. Go to "Edit" > "Preferences" > "Guides, Grid & Slices" to customize the gridline frequency and subdivisions. This step is crucial for ensuring your table cells are uniformly sized and aligned.
Drawing the Table Structure
With the grid visible, you can now begin to draw your table's borders. The Brush Tool is your primary instrument for this. Before you start drawing, it's advisable to set the brush's hardness to 100% to ensure crisp, defined lines. You'll also want to select a brush size that corresponds to your desired line thickness; a larger brush will result in wider lines. Choose a color for your table lines that contrasts well with your background.
To create a straight line, which will form the boundaries of your cells, click once with the Brush Tool at a starting point on a visible grid line. Then, hold down the SHIFT key and click again at the desired end point of the line. This action will draw a perfectly straight line between the two points. Repeat this process to create all the necessary horizontal and vertical lines that define your table's rows and columns. For instance, to create six vertical lines, you would execute this SHIFT-click process six times, ensuring each line is aligned with the grid.
1 Minute PS Skills - How to Convert Picture to Line Art Drawing in Photoshop
Refining the Table and Adding Content
Once all the lines are in place, you have a basic table structure. However, the grid itself is still visible. To achieve a clean table appearance, you need to hide the grid. Return to the "View" menu and uncheck the "Grid" option. Your table will now be visible without the underlying gridlines, appearing as if it were drawn directly onto the background.
Adding text to your table cells is straightforward. Select the Type Tool and click within a cell. You can then type your text as you normally would. The text will behave similarly to text within a text frame, flowing within the confines of the cell. As text is added or deleted, you can adjust the cell's content, and if the row height is not fixed, the cell will expand or contract to accommodate the text.
Advanced Table Manipulation in Photoshop
Beyond basic creation, Photoshop offers several techniques for modifying and enhancing your tables.
Resizing and Adjusting Table Dimensions
If you need to resize your table, a common approach involves isolating the table structure. Select the "Magic Wand Tool" from the left-hand toolbar. Zoom in on your table and click on one of the lines. This action will select the area occupied by the table lines. Pressing the "Delete" button will remove these lines, effectively leaving you with a table on a transparent background. You can then select the table area using selection tools and resize it by dragging its bounding box.
Deleting Individual Cells or Rows/Columns
To remove a specific cell, make a selection of that cell using the "Rectangular Marquee Tool" or a similar selection tool. Once the cell is selected, press the "Delete" key on your keyboard. This will remove the content and background of that cell. For deleting entire rows or columns, you would select all the lines that form that row or column and delete them.
Importing Textual Data as Tables
Photoshop can also import data that can be converted into tables. If you have tabbed text in a text file, you can use the "Place" command ("File" > "Place") to import it. Photoshop will often recognize the tab delimiters and can present this data in a structured format, which can then be further refined into a table. This is particularly useful when migrating data from other sources.
Linking to External Data Sources (Conceptual)
While Photoshop doesn't have direct linking capabilities like Adobe InDesign for Excel spreadsheets, you can achieve a similar outcome through a workflow. You could create a table in Excel or a similar program, save it as an image (e.g., PNG, JPG), and then import that image into Photoshop. For dynamic updates, you would need to re-export the table from its source and re-import it into Photoshop.
Anchoring Graphics within Cells
You can add graphics to your table cells, making them "inline graphics" within the text flow of the cell. To do this, you would typically place the graphic onto your canvas, then use the "Object" > "Anchored Object" > "Insert" command. This allows the graphic to be associated with a specific point in the text, moving with it as text is added or deleted within the cell. This is a more advanced technique that allows for rich content within your table cells.

Handling Overset Text in Cells
When the content of a cell exceeds its available space, it becomes "overset." This can happen if you have fixed row heights and a large amount of text. Photoshop doesn't have automatic text reflow for overset text in the same way dedicated layout programs do. You will need to manually adjust the row height, divide the cell into multiple cells, or reduce the font size to manage overset text.
Header and Footer Rows
While not as explicitly defined as in InDesign, you can simulate header and footer rows by creating distinct rows at the top or bottom of your table using the drawing techniques described earlier. You can then apply specific formatting (e.g., different text color, bolding) to these rows to visually designate them as headers or footers. If you need these to repeat on subsequent pages (in a multi-page document context), this would typically be handled in a layout application like InDesign, where you would place your Photoshop-generated table.
Considerations for Effective Table Design
When designing tables in Photoshop, keep the following in mind:
- Purpose: Clearly define why you need a table in Photoshop. If it's for complex data presentation or dynamic content, other software might be more suitable. Photoshop excels when the table is a visual element within a broader graphic design.
- Scalability: Photoshop tables are essentially collections of shapes and text layers. While they can be resized, extreme scaling might lead to pixelation or loss of clarity, especially for the drawn lines.
- Interactivity: Photoshop tables are static. For interactive elements or data manipulation, you'll need to use different tools or workflows.
- Accessibility: Ensure sufficient contrast between text, cell backgrounds, and borders for readability.
By understanding these methods and considerations, you can effectively create and manage tables within Adobe Photoshop, enhancing your design capabilities and presentation of information.